Friday, December 23, 2011
 Peace Love Happiness

This tutorial was written by me on 23 December 2011. Any similarities to other tutorials is purely coincidental.
Supplies Needed:
2 tubes of choice. I am using the amazing artwork of Jennifer Janesko. I purchased these when CILM was still open. You can now purchase the appropriate license at CDO.
Scrap kit. I am using Christmas Traditions designed by me. You can purchase it at any here, here, here, here, here, here, here, here, or here.
Template 200 made by me. You can grab it here.
Mask 434 by Vix. You can grab this mask, plus lots others at her site here (under goodies). Thank you, Vix!
Font of choice. I used Clipper Script, which can be found here.
Plugins needed:
Xero Filters - Radiance and Bad Dream XL (freeware)
Xenofex 1- Shower Door
Eyecandy 4000 - Gradient Glow
**************************************************************************************************************************
Ok! Let's get started. Open up the template. Duplicate by holding down Shift + D. Close the original.
Delete the credit info layer. Highlight the Angled Green Square layer. Go to selections > select all. Selections > float. Selections > defloat. Open up a paper from the kit. ( I used paper 34) Resize the paper by about 50%, bicubic. Copy and paste the paper as a new layer onto your canvas. Position the paper to your liking within the selection. Go to selections > invert. Hit delete on your keyboard. Deselect. (CTRL + D) Apply Eyecandy 4000 - Gradient Glow with the following settings:
Give the layer a drop shadow of H and V 4, Opacity 40, Blur 12.00. Delete the template Angled Green Square layer.
Highlight the Green Square layer. Select, float and defloat. Open up a paper from the kit. (I used paper 22) Resize by about 40%, bicubic. Add a new layer to your working image. Paste into selection. Deselect. Apply Gradient Glow to the paper layer, same settings you just used. Give the layer a drop shadow of H and V -4, Opacity 40, Blur 12.00. Delete the template green square layer.
Highlight the Angled Red Square layer. Select, float and defloat. Open up a paper from the kit. (I used paper 2) Resize by about 50%, bicubic. Copy and paste the paper as a new layer onto your canvas. Position the paper to your liking within the selection. Selections > invert. Hit delete on your keyboard. Deselect. Apply Gradient Glow, same settings. Give the layer a drop shadow of H and V -3, Opacity 40, Blur 10.00. Delete the template angled red square layer.
Highlight the Angled Gray Square 1 layer. Select, float and defloat. Open up another paper from the kit. (I used paper 2) Resize by about 40%, bicubic. Copy and paste as a new layer onto your canvas. Position it to your liking within the selection. Selections > invert. Hit delete and deselect. Apply Gradient Glow, same settings. Give the layer a drop shadow of H and V -2, Opacity 40, Blur 8.00. Delete the template angled gray square 1 layer.
Highlight the Large Circle layer. Select, float and defloat. Open up a paper from the kit. (I used paper 29) Resize by about 55%, bicubic. Add a new raster layer to your working image. Paste the paper into the selection of the new layer. Deselect. Apply Gradient Glow, same settings. Give the layer a drop shadow of H and V 0, Opacity 50, Blur 16.00. Delete the template large circle layer.
Highlight the Angled Gray Square 2 layer. Select, float and defloat. Open up another paper from the kit. (I used paper 24) Resize by about 45%, bicubic. Copy and paste as a new layer onto your canvas. Position the paper to your liking within the selection. Selections . Invert. Hit delete on your keyboard. Deselect. Apply Gradient Glow, same settings. Give the layer a drop shadow of H and V -3, Opacity 40, Blur 8.00. Delete the template angled gray square 2 layer.
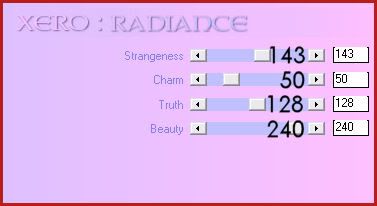
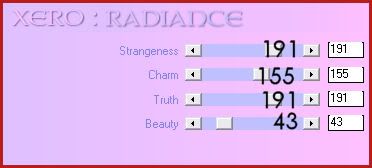
Highlight the Medium Circle layer. Select, float and defloat. Open up a paper from the kit. (I used paper 27) Position the paper to your liking. Duplicate the paper. Drag the top (duplicated) paper to right above your small circle layer. Hide the top paper layer. Highlight your bottom (and unhidden) paper layer. Selections > invert. Hit delete. Deselect. Apply Xero Filters - Radiance with the following settings:
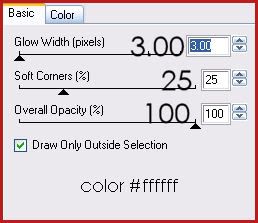
Now apply Eyecandy - Gradient Glow with the following settings:
Give the layer a drop shadow of H and V 0, Opacity 50, Blur 13.00. Delete the template Medium Circle layer.
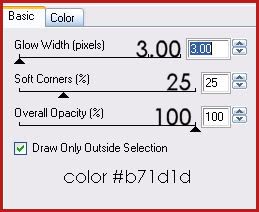
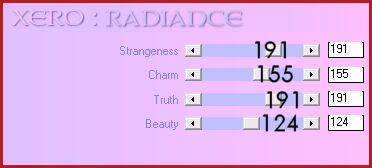
Highlight the Small Circle layer. Select, float and defloat. Unhide and highlight the hidden paper. Selections > invert. Hit delete on your keyboard. Deselect. Apply Xero - Radiance, same setting you just used. Apply Gradient Glow with the following settings:
Give the layer a drop shadow of H and V 0, Opacity 45, Blur 10.00. Delete the template small circle layer.
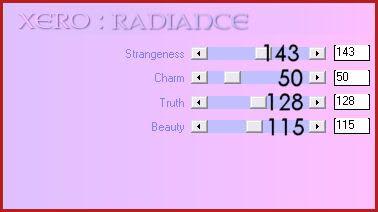
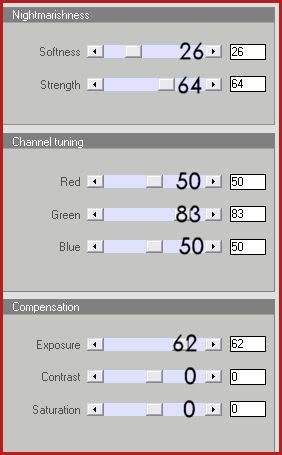
Highlight the White Frame Fill layer. Select, float and defloat. Open up another paper from the kit. (I used paper 30) Resize by about 58%, bicubic. Copy and paste as a new layer onto your canvas. Duplicate the paper layer 2 times. Hide your top 2 paper layers, and drag them above your small green square 2 layer. Highlight your bottom paper layer. Selections > invert. Hit delete on your keyboard. Deselect. Apply Xero Radiance with the following settings:
 Highlight the White frame layer. Give it a drop shadow of H 2, V 0, Opacity 50, blur 4.00.
Highlight the small green square 1 layer. Select, float and defloat. Unhide and highlight one of your duplicated paper layers. Selections > invert. Hit delete on your keyboard. Deselect. Apply Gradient Glow with the following settings:
Give the layer a drop shadow of H and V 0, Opacity 45, Blur 8.00.
Highlight your Small Green Square 2 layer. Select, float and defloat. Unhide and highlight your other paper layer. Selections > invert. Hit delete on your keyboard. Apply Gradient Glow, same settings you just used. Give it a drop shadow, H and V 0, opacity 45, Blur 8.00. Delete both small green square layers.
Highlight your white square 1 layer. Select, float and defloat. Highlight the paper layer beneath your selected white square. Right click on the paper layer, and choose Promote Selection to Layer. Don't deselect yet. Deselect.
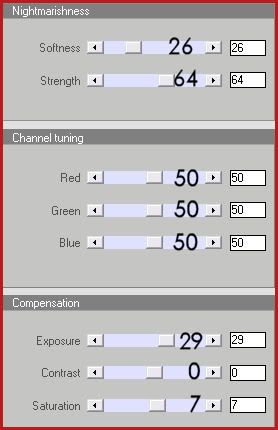
Open up your first tube of choice. Resize, as necessary, bicubic. Copy and paste as a new layer onto your canvas. Position the tube to your liking within the selection. Selections > invert. Hit delete on your keyboard. Deselect. Apply Xero - Radiance with the following settings:
Change the blend mode of the tube to Overlay. Highlight the paper layer beneath the tube layer and give it a drop shadow of H and V 0, Opacity 45, Blur 6.00. Duplicate the paper layer. Go to image > mirror. Repeat with the tube layer. Delete both white square layers.
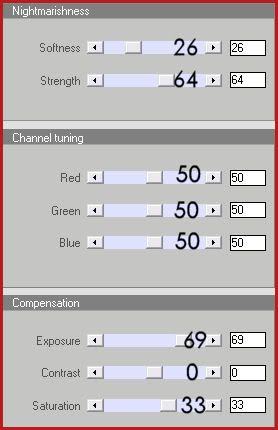
Open up your main tube. Resize as necessary, bicubic. Highlight your white frame layer. Copy and paste the tube as a new layer onto your canvas. Position it to your liking. Grab your freehand selection tool, feather set at 0, selection type point to point. Carefully select around the part of the tube you don't want hanging below your frame. Hit delete on your keyboard. Deselect. Apply Xero Radiance with the following settings:
Go to adjust > sharpness > unsharp mask. Apply with a radius of 5, strength 15, clipping 4. Give your tube a drop shadow of H and V 0, Opacity 65, Blur 17.00.
Open up bow 4 from the kit. Resize by 70%, bicubic. Copy and paste as a new layer onto your canvas. Go to image > mirror. Then, image > flip. Position it to your liking on the Large Circle layer. Give it a drop shadow of H and V 4, Opacity 40, Blur 6.00.
Open up the Pine Branch from the kit. Resize by 40%, smartsize. Apply unsharp mask, same settings as before. Copy and paste as a new layer onto your canvas. Apply Xero Bad Dream XL with the following settings:
Position the branch to your liking on the medium circle layer. Give it a drop shadow of H and V 3, Opacity 35, Blur 6.00.
Open up the Ornament Cluster from the kit. Resize by 35%, smartsize. Copy and paste as a new layer onto your canvas. Apply Xero Bad Dream XL, same settings you just used. Apply unsharp mask, same settings. Position it to your liking above your green square layer. Give it a drop shadow of H and V -3, Opacity 35, Blur 6.00.
Open up the Ribbon Poinsettia from the kit. Resize by 45%, smartsize. Copy and paste as a new layer onto your canvas. Apply Xero Bad Dream XL with the following settings:
Apply unsharp mask, same settings. Position it below your ornament cluster. Give it a drop shadow of H -3, V 3, Opacity 40, Blur 6.00.
Open up Ribbon 2 from the kit. Resize by 35%, smartsize. Apply unsharp mask, same settings. Copy and paste as a new layer onto your canvas. Position it to your liking on the angled red square layer. Give it a drop shadow of H -2, V 0, Opacity 40, Blur 5.00.
Open up Pine Cone 1 from the kit. Resize by 20%, smartsize. Copy and paste as a new layer onto your canvas. Position it to your liking behind small green square 2 layer. Give it a drop shadow of H and V 2, Opacity 35, Blur 5.00.
Open up Bow 2 from the kit. Resize by 35%, smartsize. Apply unsharp mask. Copy and paste as a new layer onto your canvas. Position it to your liking at the upper left corner of your left white square layer. Give it a drop shadow of H 3, V 0, Opacity 40, Blur 5.00.
Open up the Bauble with Ribbon from the kit. Resize by 35%, smartsize. Apply unsharp mask. Copy and paste as a new layer onto your canvas. Position it opposite your bow 2 layer.
Open up a Christmas Candles Arrangement from the kit. Resize by 40%, smartsize. Copy and paste as a new layer onto your canvas. Apply Xero Bad Dream XL with the following settings:
Apply unsharp mask, same settings. Give it a drop shadow of H and V 2, Opacity 40, Blur 8.00.
Open up the leaf from the kit. Resize by 35%, smartsize. Copy and paste as a new layer onto your canvas. Position it next to the Candles. Give it a drop shadow of H -2, V 0, Opacity 35, Blur 5.00.
Open up the gingerbread girl and boy. Resize them by 20%, smartsize. Apply unsharp mask. Copy and paste them as new layers onto your canvas. Position the next to each other below the leaf. (see my tag for reference)
Open up the Baubles String Deco 3 from the kit. Resize by 75%, bicubic. Copy and paste as a new layer onto your canvas. Position beneath all your layers as in my tag above. Give it a drop shadow of H 0, V -2, Opacity 45, Blur 4.00.
Open up the Stocking Ornament from the kit. Resize by 30%, smartsize. Apply unsharp mask. Copy and paste as a new layer onto your canvas. Position as in my tag above. Give it a drop shadow of H 0, V-2, Opacity 35, Blur 4.00.
Highlight your top layer. Open up snowflake brush 2 from the kit. Resize by 30%, smartsize. Copy and paste as a new layer onto your canvas. Give it a drop shadow of H 1, V 0, Opacity 45, Blur 2.00. Position it at the upper left of your tag. Duplicate. Go to image > mirror. Then, image > flip.
Open up the Peace Love Happiness Word Art from the kit. Resize by 50%, smartsize. Copy and paste as a new layer onto your canvas. Apply Gradient Glow with the following settings:
Position it to your liking. Give it a drop shadow of H 2, V 0, Opacity 40, Blur 3.00.
Add any other embellishments of your choosing.
Hide your white background layer. Merge your visible layers together. Resize your working image by 90%, bicubic. Go to image > canvas size. Change to 800 w by 600 h. Duplicate your merged layer. On the bottom layer, go to adjust > blur > gaussian blur. Apply with a radius of 25.00. Apply Xenofex 1 - Shower Door with the following settings:
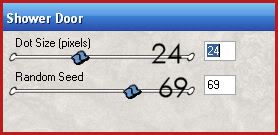
Lower the opacity of the layer to about 60.
Highlight your white background layer. Open up paper 4 from the kit. Copy and paste as a new layer onto your canvas. Apply Vix Mask 434 with the following settings:
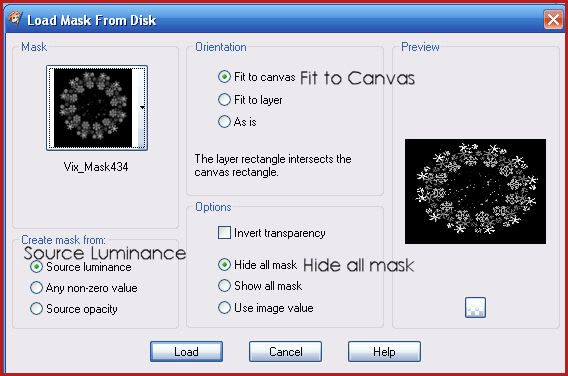
Delete the mask layer from your layer palette, answer yes to the pop up box and merge the group. Go to adjust > add/remove noise, and apply with the following settings:
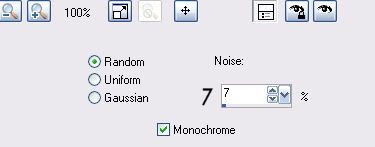
Give the mask layer a drop shadow of H 1, V 0, Opacity 50, Blur 3.00.
Crop and resize to your liking. Add your copyright info, watermark and text. Save as PNG.
I hope you enjoyed this tutorial! If you have any questions, just give me a shout.
Happy Holidays!!
Subscribe to:
Post Comments (Atom)
0 comments:
Post a Comment