Wednesday, February 22, 2012
 Do I Dazzle You? - Forum Style
This tutorial was written by me on 22 February 2012. Any similarities to other tutorials is purely coincidental.
Supplies Needed:
1 female tube, and 1 male close up of choice. I am using the awesome artwork of Ismael Rac. If you would like to use his artwork you must purchase the appropriate license at his store here.
Total Eclipse scrap kit made designed by me. If you would like to purchase it, you can at any of my stores. :-)
Font of choice. I used Zephyr, which is widely known as the "Twilight" font. This is a pay font, however, Dafont has a free one that is very similar to it called Twilight New Moon. You can download that one here.
Plugins:
Eyecandy 5000 Nature - Corona
Xero Filters - Bad Dream XL, Soft Mood XL and Soft Vignette (freeware)
Jasc Animation Shop (opt)
No other supplies needed
*******************************************************************************************************************
OK! Let's get started! Open up a new transparent image 650 width by 275 height (pixels). Open up paper 12 from the kit. Copy and paste as a new layer onto your canvas. Position it in your canvas like this:

Open up paper 1 from the kit. Copy and paste as a new layer onto your canvas. Position it on your canvas like this:

Grab your freehand selection tool, type point to point, feather set at 100, anti - alias ticked. Select in wavy lines around the left part of the paper that doesn't have the twinkle on it like this:
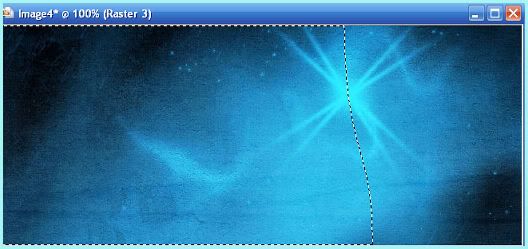
Hit delete on your keyboard 3 times. Deselect (CTRL+D).
Grab your freehand selection tool again, but change the feather from 100 to 60. Select the right part of the paper that doesn't have the twinkle in it like this:
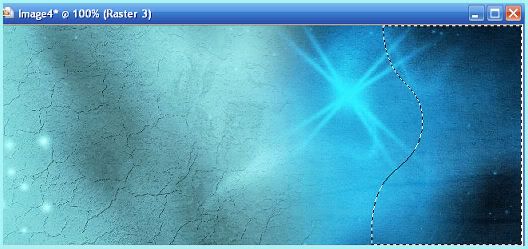
Hit delete on your keyboard 2-3 times. Deselect. Merge your visible layers.
Copy and paste paper 12 as a new layer onto your canvas again. Position the paper on your canvas like this:
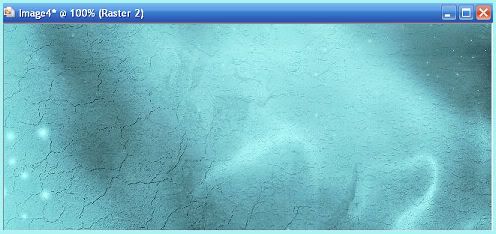
Change the blend mode of the layer to overlay. Merge your visible layers.
Open up Beads Deco 1 from the kit. Resize by 70%, bicubic. Copy and paste as a new layer onto your canvas. Position them to the right of the canvas. Duplicate the beads. Lower the opacity of the bottom layer to 22 and give it a drop shadow of H -6, V0, Opacity 100, Blur 15.00. Change the blend mode of the top beads to Screen.
Open up Cloud 2 from the kit. Resize by 70%, bicubic. Copy and paste as a new layer onto your canvas. Go to image > flip. Position the cloud to the right of your canvas. Give it a drop shadow of H and V 0, Opacity 20, Blur 25.00. Change the blend mode to Luminance (Legacy) and lower to the opacity to about 63.
Go to your materials palette and change your foreground color to null, and your background color to black. Grab your preset shape tool, shape - ellipse - circle. Draw a circle that almost touches the top and bottom of the canvas.
Position the circle to the right of the canvas. Change the circle vector layer to a raster layer. Go to selections > select all. Selections > float. Selections > defloat. Open up paper 10 from the kit. Copy and paste as a new layer onto your canvas. Position within the circle like this:
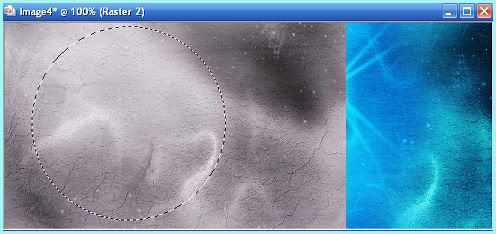
Selections > invert. Hit delete on your keyboard. Deselect.
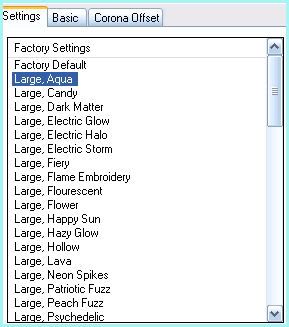
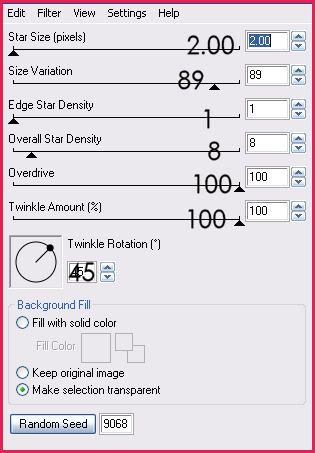
Go to effects > plugins > eyecandy 5000 nature - corona. Click on the settings tab and choose Large, Aqua:
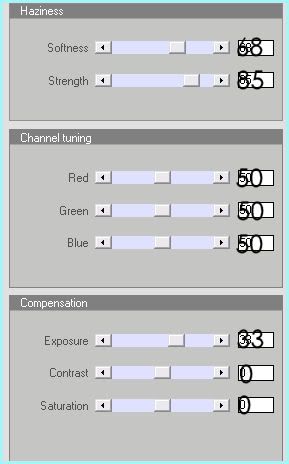
Now click the basic tab, and enter the following settings:

Apply Xero Filters - Soft Mood XL to the Corona Circle with the following settings:
Give the layer a drop shadow of H and V 0, Opacity 30, Blue 25.00. Change the blend mode of the layer to Hard Light.
Open up the moon from the kit. Resize by 47% smartisize. Apply unsharp mask, Radius 5, Strength 15, Clipping 2. Copy and paste as a new layer onto your canvas. Position to the right of the Corona circle so that they are overlapping a bit. (see my tag for reference) Apply Xero - Soft Mood XL, same settings as before. Give the moon a drop shadow of H and V 0, Opacity 35, Blur 25.00. Change the blend mode of the moon to Luminance (Legacy)
Open up Sparkle Deco 1 from the kit. Resize by 60%, bicubic. Copy and paste as a new layer onto your canvas. Go to image > mirror. Position it to the right of your canvas.
Open up the sparkle trail 1 from the kit. Resize by 70%, bicubic. Copy and paste as a new layer onto your canvas. Position to the left of the canvas. Give it a drop shadow of H 2, v 0, Opacity 30, Blur 5.00. Lower the opacity to about 65.
Open up Light Ray 2 from the kit. Resize by 70%, bicubic. Copy and paste as a new layer onto your canvas. Go to image > free rotate. Rotate right by 45.00 degrees, both boxes unchecked. Position the light ray so that it looks as if it is shining out of the right upper hand corner.
Open up your female tube of choice. Resize your tube as necessary, bicubic. Copy and paste as a new layer onto your canvas. Position your tube to the left of your canvas.
Grab your freehand selection tool, type point to point, feather set at 25, anti-alias ticked. Select around the outer edge of your tube like this:

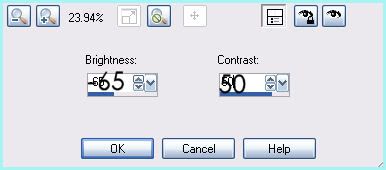
Go adjust > Brightness/Contrast > Brightness/Contrast. Apply with the following settings:
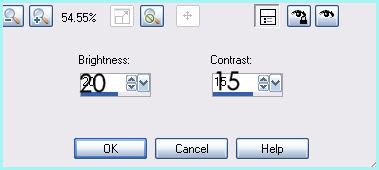
Now go to selections > modify > contract by 15. Apply Brightness/Contrast same settings. Contract by 15. Apply Brightness/Contrast(same settings). Contract by 15. Apply Brightness/Contrast (same settings). Contract by 20. Apply Brightness/Contrast (same settings). Contract by 20. Now go to selections > invert. Apply Brightness/Contrast with the below settings:
Deselect (CTRL+D)
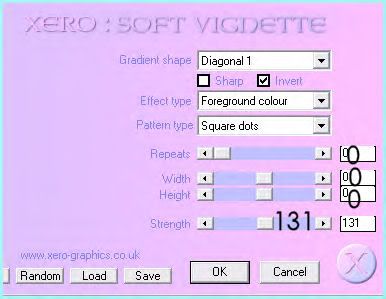
Change your foreground color to c5a8f8. Grab your freehand selection tool, same setting as before. Select around your tube again, making the selection a bit larger than before. Apply Xero Filters - Soft Vignette with the following settings:
Repeat the Soft Vignette. Deselect.
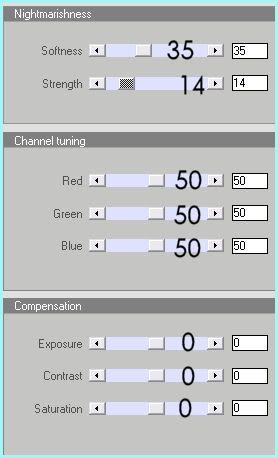
Now apply Xero Bad Dreams XL to your female tube with the following settings:
Apply Unsharp mask, same settings as before. Give your female tube a drop shadow of H and V 0, Opacity 75, Blur 25.00.
Open up your male close up. Resize, if necessary, bicubic, so that his face fits into the Corona Circle. Copy and paste as a new layer onto your canvas. Position it in the center of your Corona circle.
Grab your freehand selection tool, type point to point, feather set at 15, ant-alias ticked. Select around the circumference of the Corona Circle. Go to selections > invert. Still on your male close up tube, hit delete on your keyboard 2 times. Deselect.
Grab your freehand selection tool, same settings but change the feather to 25. Select around the outer edge of your male tube (like you did with your female tube) Go to adjust > Brightness/ Contrast > Brightness/Contrast. Apply with the following settings:
Now go to selections > modify > contract by 15. Apply Brightness/Contrast same settings. Contract by 15. Apply Brightness/Contrast(same settings). Contract by 15. Apply Brightness/Contrast (same settings). Contract by 20. Apply Brightness/Contrast (same settings). Contract by 20. Now go to selections > invert. Apply Brightness/Contrast with the below settings:
Deselect (CTRL+D)
Change your foreground color to #0ca1f2. Grab your freehand selection tool, same setting as before. Select around your tube again, making the selection a bit larger than before. Apply Xero Filters - Soft Vignette with the following settings:
Repeat the Soft Vignette. Deselect. Duplicate your male tube. Resize by 85%, bicubic. Move the smaller duplicated male tube so that if fits into the moon. The smaller male tube layer should be sitting just above the moon layer. Change the blend mode of the smaller male tube to Hard Light. Open up the sun from the kit. Resize by 85%, bicubic. Copy and paste as a new layer onto your canvas. Position it above your smaller male tube. Change the blend mode of the sun to Soft Light and lower the opacity to about 77.
Highlight your larger male tube, and drag the layer below the Corona Circle layer.
Add any other embellishments of your choosing.
Highlight your top layer. Using a brightish blue color, type out Do I Dazzle You? Give the text a drop shadow of V 0, H 2, Opacity 50, Blur 3.00. Position the text to your liking and change the blend mode to Hard Light.
Go to Image > Canvas Size. Change the canvas size to 660 width to 285 height. Add a new layer to your working image. Drag the new layer above your bottom blended layer. Highlight your bottom layer (the blended paper layer) Select, float and defloat. Go to selections > modify > expand by 1. Floodfill your new layer with white. Go to selections > modify > contract by 2. Still on your white layer, hit delete on your keyboard. Deselect. Give the thin white line a drop shadow of H and V0, Opacity 50, Blur 10.00.
Open up paper 14 from the kit. Copy and paste as a new layer onto your canvas. Highlight your bottom blended paper layer. Select, float and defloat. Go to selections > modify > contract by 3. Highlight your paper 14 layer and hit delete. Deselect. Give the layer a drop shadow of H and V 0, Opacity 50, Blur 20.00.
With your freehand selection tool, type point to point, feather set at 0, carefully select around objects that are hanging out of the tag and into the border. Delete them.
Add your copyright info, your watermark, and name.
If you are not animating, lower the opacity of the larger male tube to about 75, and lower the opacity of the smaller male tube to about 90.
Save as JPG or PNG.
If you are animating, rename your larger male tube layer M1, and your smaller male tube layer M2. Open up Animation Shop.
In PSP, lower the opacity of M2 to 0. Change the opacity of the M1 layer to 100. Copy merged. Paste as a new animation in Animation Shop.
Back to PSP. Lower the opacity of the M1 layer to 75. Copy merged. Paste after frame 1 in Animation Shop.
In PSP, lower the opacity of M1 to 52. Change the opacity of M2 to 10. Copy merged. Paste after frame 2 in Animation Shop.
Back in PSP, lower the opacity of M1 to 28. Change the opacity M2 to 35. Copy merged. Paste after frame 3 in Animation Shop.
In PSP, lower the opacity M1 to 12. Change the opacity M2 to 57. Copy merged. Paste after frame 4 in Animation Shop.
In PSP, lower the opacity M1 to 3. Change the opacity to M2 to 77. Copy merged. Paste after frame 5 in Animation Shop.
In PSP, lower the opacity of M1 to 0. Change the opacity of M2 to 91. Copy merged. Paste after frame 6 in Animation Shop.
In Animation Shop, you should have a total of 7 frames. Select frame 1. Copy this frame. Paste it after frame 7. You should now have 8 frames.
Highlight frame 7. Go to Effects > Insert Image Transition. Apply the following settings:
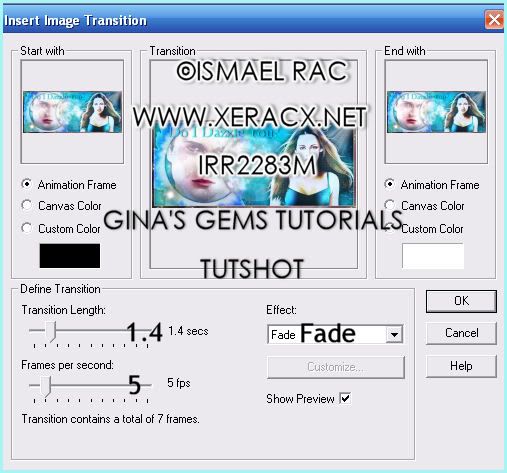
You should now have 15 frames. Highlight frame 7. Duplicate this frame. You should now have 16 frames.
Select all frames (CTRL+A) Change the frame properties to 25.
Optimize and save as gif.
I hope you enjoyed this tutorial! If you have any questions, just give me a shout, or send me an email. :-)
Monday, February 20, 2012
Feel the Music Forum Style

This tutorial was written by me on 20 February 2012. Any similarities to other tutorials is purely coincidental.
Supplies Needed:
Tube of choice. I am using the amazing artwork of Ismael Rac. If you would like to use his artwork, you must purchase the appropriate license at his store here.
Music Notes Deco 1 and 2. These are from my tagger's kit, Feel the Music. I've provided them in the supplies for this tutorial. If you would like to get the free add on, you can at my scrap blog, or if you would like to purchase the entire kit, you can at any of my stores.
Font of choice. I used Century Gothic.
Plugins Needed:
Filters Unlimited 2.0 - Audio Wave and Lens Flare
Eyecandy 5000 Nature - Corona
Xenofex 2.0 - Lightning, Constellation (optional)
Xero Filters - Bad Dream XL and Radiance (freeware)
DSB Flux - Linear Transmission (freeware)
Transparency - Eliminate Black (freeware)
Jasc Animation Shop
Supplies HERE
*******************************************************************************************************************
OK! Let's get started! Open up a new transparent image 650 width by 250 height. Open up your tube and using your eyedropper tool, choose 2 bright colors for your foreground and background colors. (I used a bright purple color #8c5ced for my foreground color and a bright coral color #fe3365 for my background.) Click on your foreground color in your materials palette, and click the Gradient tab. Create a Gradient using your foreground and background colors, Angle 45, Repeats 0, Invert Checked, Style Linear.
Floodfill your transparent image with the gradient. Duplicate the gradient layer. Hide the top gradient layer and highlight your bottom gradient layer. Go to adjust > blur > gaussian blur. Apply with a radius of 15. Repeat the gaussian blur. Apply Filters Unlimited - Lens Flare with the following settings:

Now apply Filters Unlimited - Lens Flare again, with the following settings:

Make certain that Flip Horizontal is ticked.
Highlight and unhide your top gradient layer. Apply DSB Flux - Linear Transmission with the following settings:

Now apply Transparency Filters - Eliminate Black. You should be left with horizontal white lines.
Still on the white lines layer, go to image > free rotate. Rotate right by 45.00 degrees, all boxes UNchecked. You should now have white diagnol lines running through the middle of your gradient layer. Lower the opacity of the lines to about 50.
Open up your tube. Copy and paste as a new layer onto your canvas. Resize the tube (bicubic) so that it will fit nicely along the diagnol lines. Also, mirror and rotate as necessary to get the tube to lay atop the diagnol lines. Apply Xero Filters - Radiance to your tube with the following settings:

Now apply Eyecandy 500 Nature - Corona to the tube with the following settings:

Lower the opacity of the tube to about 85 and change the blend mode to Hard Light. Give the tube a drop shadow of H and V 0, Opacity 25, Blur 15.00.
Highlight your bottom layer (the gradient with the lens flares) Open up the Music Notes Deco 1 and 2 from the supplies. If you are using the same colors as I am, resize the GGS_Feel the Music_Music Notes Deco 1 by 60% smartsize. Copy and paste as a new layer onto your canvas. If you're not using the same colors as I am, recolor the music notes deco to your liking, resize by 60% smartsize, and copy and paste as a new layer onto your canvas.
Position the music notes to the right side of the tag. (see mine above for reference) Now apply Eyecandy Corona with the following settings:

(these settings use the same colors as the first one) Lower the opacity of the music notes to about 68, and change the blend mode to Hard Light.
Open up the GGS_Feel the Music_Music Notes Deco 2 from the supplies. If you are using the same colors as I am, resize them by 50%, smartsize. Copy and paste as a new layer onto your canvas. If you are not using the same colors, colorize them to your liking, resize by 50% smartsize, and copy and paste as a new layer onto your canvas.
Position them to the left of your canvas. (see mine above for reference) Apply Eyecandy Nature Corona with the following settings:

Lower the opacity of the music notes to about 68, and change the blend mode to Hard Light.
If you have any other scrappy bits or decorations that you would like to add, go ahead and do so. :-)
Open up your tube again. I didn't resize mine but you can if you like, just make sure it is bicubic so it keeps it's crispness. Copy and paste as a new layer onto your canvas. Position the tube to your liking. Apply Xero Filters Bad Dream XL with the following settings:

Give the tube a drop shadow of H 0, V -6, Opacity 60, Blur 20.00.
Now go to Image > Canvas Size. Change the width to 660 pixels and the height to 260 pixels. Make certain the diamond is depressed in placement and the top, bottom, right, left integers are at 0, and that Lock aspect ration is unticked. Highlight your top layer. Add a new raster layer to your working image.
Click on your foreground color in your materials palette. Make another gradient using your foreground and background colors, Style - Linear, Angle 45, Repeats 2, Invert unchecked. Fill your new layer with the new gradient. Apply Gaussian Blur, two times, radius 15. Highlight your bottom gradient layer, (the one with the lens flare). Go to selections > select all. Selections > float. Selections > defloat. Go to selections > modify > contract by 1. Highlight your top gradient layer and hit delete on your keyboard. Deselect. Give your border a drop shadow of H and V 0, Opacity 50, Blur 25.00.
Go to your materials palette and change your foreground to a light color from your tube (I used color #f7b8d4) and your background color to black. Add 3 new raster layers to your working image. Floodfill each new layer with your foreground color. Rename these layers AW 1, AW 2 and AW 3.
Highlight your AW 1 layer. Apply Filters Unlimited - Audio Wave with the following settings:

Now apply Transparency Eliminate Black. Lower the opacity to about 60.
Highlight layer AW 2. Apply Filters Unlimited Audio Wave, but slide the Amplitude number to 182. Apply Transparency - Eliminate Black. Lower the opacity to about 60.
Highlight layer AW 3. Apply Filters Unlimited Audio Wave, but slide the Amplitude number to 186. Apply Transparency Eliminate Black. Lower the opacity to about 60.
Highlight your main (big) tube layer. Duplicate it 2 times, so you have a total of 3. Name the tube layers T1, T2, and T3.
Highlight the T1 layer. Apply Xenofex 2 - Lightning with the following settings:

Highlight your T2 layer. Apply Lightning again, same settings, but hit the random seed button.
Highlight your T3 layer. Apply Lightning, same settings, but hit the random seed button.
Add your copyright info, watermark and your text. (I also animated my name using Xenofex 2 - Constellation, using 3 layers, hitting the random seed button, with the following settings:)
Now we are going to take everything to Animation Shop, but before we do, let's do a little checklist to make certain the layers are in the correct order. We have our lens flare gradient at the bottom of the layer palette, then we have our AW 1,2 and 3 layers. Then, we have our Corona Music Notes Deco. On top of the music notes, we have our diagonal white lines, and on top of the lines we should have our smaller diagonal tube. Drag the smaller tube layer below the diagonal white lines. Okay, so above that we have our T1,2 and 3 layers. Then the border layers, and our text on top.
Okay, now that we have cleared that up (lol), let's animate. Open up Jasc Animation Shop. In PSP, hide your AW 2 and AW3 layers. AW1 should be unhidden. Now hide your T2 and T3 layers. T1 should be unhidden. Right click your tag and copy merged. Paste as a new animation in Animation Shop.
Back to PSP. Hide your AW 1 layer. Unhide your AW 2 layer. AW 3 should still be hidden. Now hide your T1 layer, and unhide your T2 layer. T3 should still be hidden. Copy merged. Paste after frame 1 in Animation Shop.
Back to PSP. Hide your AW 2 layer. Unhide your AW3 layer. AW1 should still be hidden. Hide your T2 layer. Unhide your T3 layer. T1 should still be hidden. Copy merged. Paste after frame 2 in Animation Shop.
Okay, so now we are animation shop. Click through your frames to make sure you have all the appropriate bits in the appropriate places (LOL). If you do, Hold down CTRL + A. This selects all frames. Right click your animation and choose Frame Properties (or just hold down Alt + Enter) Change the display time to 20.
Optimize and save as gif.
Hurray you're done!! I hope you enjoyed this tutorial! If you have any questions, just send me an email. :-)
Saturday, December 31, 2011
Baby, it's Warm Inside

Supplies Needed:
2 tubes and/or close ups of choice. I am using the awesome the Warm Winter and the (free!!!) Holiday Stalker tubes and close ups of Ismael Rac. You can purchase these at his store here.
Scrap Kit. I am using Sugar Cookies and Candy Canes designed by me. If you're interested in purchasing it, you can at any one of my stores. (There is a list located to your right, below the artist's categories). Or you can stop by my scrap blog, for the add on freebie.
Plugins:
Xero Filters - Bad Dream XL, Fritillary, Porcelain XL, Radiance, and Ultraviolet (these are all free!)
DSB Flux - Linear Transmission (also free!)
Xenofex 2 - Crumple (opt.)
FM Tile Tools - Blend Emboss (also opt.)
*******************************************************************************************************************************************************************************
Ok! Let's get started! Open up my template. Duplicate by holding down shift + d. Close the original. Delete the credit info layer,the cold shadow layer, the outside shadow layer, the warm shadow layer, and the inside shadow layer.
Highlight the Gray Circle 1 layer. Go to selections > select all. Selections > float. Selections > defloat. Open up a paper (I used paper 25) from the kit. Resize by 50%, smartsize. Copy and paste as a new layer onto your canvas. Position the paper to your liking within the selection. Go to selections > invert. Hit delete on your keyboard. Deselect (CTRL + D). Give the layer a drop shadow of H 0, V -3, Opacity 50, Blur 12.00. Delete the template Gray Circle 1 layer.
Highlight the Gray Circle 2 layer. Select, float and defloat. Copy and paste the same paper you just used. Position to your liking within the selection. Selections > invert. Hit delete and deselect. Give the layer a drop shadow of H 0, V 3, Opacity 50, Blur 12.00. Delete the Cray Circle 2 layer.
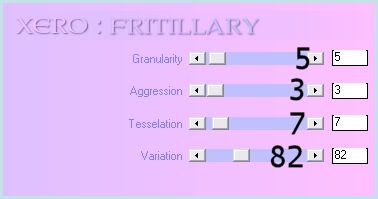
Highlight the Black Rounded Rectangle layer. Select, float and defloat. Add a new raster layer to your working image. Change your background color to #C3E2E8. Floodfill your new layer with your background color. Deselect. Apply Xero Filters - Fritillary with the following settings:
Now apply Xenofex 2 - Crumple with the following settings:

Give the layer a drop shadow of H 0, V 3, Opacity 45, Blur 8.00. Delete the black rounded rectangle template layer.
Highlight your Red Rectangle Fill layer. Select, float and defloat. Open up a paper from the kit. (I used paper 31) Resize the paper by 70%, bicubic. Copy and paste as a new layer onto your canvas. Position the paper to your liking within the selection. Selections > invert. Hit delete on your keyboard. Don't deselect yet!!
Open up your first tube/close up of choice. Resize as necessary, bicubic. Copy and paste as a new layer onto your canvas. Position it to your liking within the selection. Hit delete on your keyboard. Deselect.
Apply Xero Filters - Porcelain XL to your tube with the following settings:

Delete the Red Rectangle Shadow layer. Highlight the Red Rectangle Frame layer. Go to Adjust > Add/Remove Noise > Add Noise. Apply with the following settings:

Give the frame a drop shadow of H and V 0, Opacity 40, Blur 7.00. Delete the Red Rectangle Fill template layer.
Highlight Square Fill 1 layer. Select, float and defloat. Open up a paper from the kit. (I used paper 34) Resize by 70%, bicubic. Copy and paste as a new layer onto your canvas. Position the paper to your liking. Go to selections > invert. Hit delete on your keyboard. Deselect.
Open up your second tube of choice. Resize as necessary. Copy and paste as a new layer onto your canvas. Position the tube to your liking within the square fill. Give your tube a drop shadow of V 0, H -3, Opacity 50, Blur 13.00. Drag your tube layer above your Square 1 Frame layer. Grab your freehand selection, type point to point, feather set at 0.00. Carefully select around the area of the tube you don't want hanging out of your frame. Hit delete on your keyboard and deselect.
Duplicate your Square Fill 1 paper. Drag the duplicated paper layer above your Square Fill 2 layer. Go to image > mirror. Position the duplicated paper so it fits perfectly over your Square Frame 2 template layer.
Duplicate your Square Fill 1 layer tube. Drag it above your Square Frame 2 layer. Position the tube so it fits over the frame.
Delete the Square Fill 1 and 2 template layers, and both Square Frame shadow layers. Highlight right tube layer. Apply Xero Porcelain XL to your tube using the same settings you used earlier.
Highlight your left tube layer. Apply Xero Ultraviolet with the following settings:

Now apply Xero Bad Dream XL with the following settings:

Apply noise to both frames, same settings as before and give each frame a drop shadow of H and V 0, Opacity 40, Blur 7.00.
Highlight the Rounded Rectangle layer. Select, float and defloat. Add a new raster layer to your working image. Floodfill your new layer with color #B00001. Deselect. Apply Xero - Fritillary, same settings as before. Give the layer a drop shadow of H 0, V 0, Opacity 50, Blur 13.00. Delete the gray Rounded Rectangle template layer.
Highlight the Large Circle layer. Select, float and defloat. Open up a paper from the kit. (I used paper 33) Resize the paper by 70%, bicubic. Copy and paste as a new layer onto your canvas. Position to your liking within the selection. Go to selections > invert. Hit delete on your keyboard. Don't deselect yet!
Open up your third tube or close up of choice. Resize as necessary, bicubic. Copy and paste as a new layer onto your canvas. Position to your liking within the selection. Hit delete on your keyboard. Deselect. Apply Xero Radiance to your tube with the following settings:

Go to adjust > sharpness > unsharp mask. Apply with a radius of 5, strength 15, clipping 4. Give the tube a drop shadow of H -3, V 0, Opacity 40, Blur 8.00. Give the paper circle a drop shadow of H and V 0, Opacity 65, Blur 15.00. Delete the blue Large Circle template layer.
Highlight the Medium Circle layer. Select, float and defloat. Open up another paper from the kit. (I used paper 10) Resize by 70%, bicubic. Copy and paste as a new layer onto your canvas. Position to your liking within the selection. Selections > invert. Hit delete on your keyboard. Don't deselect yet.
Open up the same tube or close up you just used. Resize so it's 10% bigger than the last one (i.e if you resize it by 70%, bicubic, resize it by 80%, bicubic now) Copy and paste as a new layer onto your canvas. Position it to your liking within the selection. Hit delete on your keyboard. Deselect. Apply Radiance, same settings you just used. Apply unsharp mask, same settings. Give the tube a drop shadow of H -3, V 0, Opacity 40, Blur 7.00. Delete the green Medium Circle template layer and the Medium Circle Frame Shadow layer. Apply noise to the Medium Circle frame, same settings you used before and give it a drop shadow of H and V 0, Opacity 50, Blur 8.00.
Highlight the Small Circle layer. Select, float and defloat. Open up a paper from the kit. (I used paper 32). Resize by 60%, bicubic. Copy and paste as a new layer onto your canvas. Position to your liking within the selection. Selections > invert. Hit delete. Don't deselect yet.
Open up the same tube you've been using. Resize so it's 10% percent bigger than the medium circle tube. Copy and paste as a new layer onto your canvas. Position to your liking within the selection. Hit delete on your keyboard. Deselect. Apply Radiance, same settings. Apply unsharp mask, same settings. Give the tube a drop shadow of H -3, V 0, Opacity 40, Blur 6.00. Give the paper circle layer a drop shadow of H and V 0, Opacity 65, Blur 15.00. Delete the pink Small Circle template layer.
Highlight INSIDE back layer. Give it a drop shadow of H 2, V 0, Opacity 50, Blur 2.00.
Highlight the but it's warm layer. Give it a drop shadow of H 2, V 0, Opacity 50, Blur 2.00.
Highlight the OUTSIDE back layer, and give it a drop shadow of H 2, V 0, Opacity 50, Blur 2.00.
Highlight the it may be cold layer and give it a drop shadow of H 2, V 0, Opacity 50, Blur 2.00.
Open up 2 snowflakes from the kit. Resize by 25%, smartsize. Apply unsharp mask, same settings to both of them. Copy and paste them as new layers onto your canvas. Position one at the bottom right corner of your blue fritillary rounded rectangle layer and give it a drop shadow of H 2, V 0, Opacity 35, Blur 3.00. Position the other snowflake towards the upper left corner of the left square frame. Give it a drop shadow of H -2, V 0, Opacity 35, Blur 3.00.
Open up Ribbon Bow 2 from the kit. Resize by 60%, bicubic. Copy and paste as a new layer onto your canvas. Position it at the top of your circles. Give it a drop shadow of V 2, H -3, Opacity 40, Blur 6.00.
Open up button 3 from the kit. Resize by 50%, bicubic. Copy and paste as a new layer onto your canvas. Position it towards the upper left of your bottom left circle. Give it a drop shadow of H and V 0, Opacity 30, Blur 6.00.
Open up the star from the kit. Resize by 60%, bicubic. Copy and paste as a new layer onto your canvas. Give it a drop shadow of H and V 0, Opacity 30, Blur 6.00. Duplicate the star. Position one below your button slightly to it's right. Position the other star under your right square frame's tube's shoulder.
Open up mitten 1 from the kit. Resize by 22%, smartsize. Apply unsharp mask. Copy and paste as a new layer onto your canvas. Go to image > flip. Position it on the bottom left corner of the red fritillary rounded rectangle. Give the mitten a drop shadow of H and V -3, Opacity 30, Blur 6.00. Duplicate the mitten. Go to image > mirror.
Open up Ribbon Bow 1 from the kit. Resize by 60%, bicubic. Copy and paste as a new layer onto your canvas. Give it a drop shadow of H 2, V -3, Opacity 35, Blur 6.00. Mirror the ribbon bow. Position it so that it is peeking out from behind your bottom left circle. Duplicate the ribbon bow. Go to image > mirror. Then, image > flip.
Open up Heart Cookie 2 from the kit. Resize 25%, smartsize. Apply unsharp mask, same settings. Copy and paste as a new layer onto your canvas. Position it beneath the upper left corner of the red fritillary rounded rectangle. Give it a drop shadow of H -2, V 0, Opacity 30, Blur 6.00.
Highlight your top layer. Open up the LOVE word art from the kit. Resize by 25%, smartsize. Apply unsharp mask. Copy and paste as a new layer onto your canvas. Position it at the top of your circles as in my tag above. Give it a drop shadow of H 3, V 0, Opacity 35, Blur 5.00.
Add any other embellishments of your choosing.
Open up your main tube. Resize as necessary, bicubic. Copy and paste as a new layer onto your canvas. Position it to your liking. Apply Xero Radiance, same settings as before. Apply unsharp mask. Give it a drop shadow of H and V 0, Opacity 50, Blur 17.00,
Hide your white background layer. Merge your visible layers together. Duplicate the merged layer. On the bottom merged layer, go to adjust > blur > gaussian blur. Apply with a radius of 30. Apply DSB Flux - Linear Transmission with the following settings:

Go to adjust > brightness/contrast > brightness contrast. Apply with the following settings:

Now apply FM Tile Tools Blend Emboss with the following settings:

Crop and resize to your liking.
Add your copyright info, watermark and your text.
I hope you enjoyed this tutorial! If you have any questions, just give me a shout.
Subscribe to:
Posts (Atom)