Saturday, December 31, 2011
 Baby, it's Warm Inside

Supplies Needed:
2 tubes and/or close ups of choice. I am using the awesome the Warm Winter and the (free!!!) Holiday Stalker tubes and close ups of Ismael Rac. You can purchase these at his store here.
Scrap Kit. I am using Sugar Cookies and Candy Canes designed by me. If you're interested in purchasing it, you can at any one of my stores. (There is a list located to your right, below the artist's categories). Or you can stop by my scrap blog, for the add on freebie.
Plugins:
Xero Filters - Bad Dream XL, Fritillary, Porcelain XL, Radiance, and Ultraviolet (these are all free!)
DSB Flux - Linear Transmission (also free!)
Xenofex 2 - Crumple (opt.)
FM Tile Tools - Blend Emboss (also opt.)
*******************************************************************************************************************************************************************************
Ok! Let's get started! Open up my template. Duplicate by holding down shift + d. Close the original. Delete the credit info layer,the cold shadow layer, the outside shadow layer, the warm shadow layer, and the inside shadow layer.
Highlight the Gray Circle 1 layer. Go to selections > select all. Selections > float. Selections > defloat. Open up a paper (I used paper 25) from the kit. Resize by 50%, smartsize. Copy and paste as a new layer onto your canvas. Position the paper to your liking within the selection. Go to selections > invert. Hit delete on your keyboard. Deselect (CTRL + D). Give the layer a drop shadow of H 0, V -3, Opacity 50, Blur 12.00. Delete the template Gray Circle 1 layer.
Highlight the Gray Circle 2 layer. Select, float and defloat. Copy and paste the same paper you just used. Position to your liking within the selection. Selections > invert. Hit delete and deselect. Give the layer a drop shadow of H 0, V 3, Opacity 50, Blur 12.00. Delete the Cray Circle 2 layer.
Highlight the Black Rounded Rectangle layer. Select, float and defloat. Add a new raster layer to your working image. Change your background color to #C3E2E8. Floodfill your new layer with your background color. Deselect. Apply Xero Filters - Fritillary with the following settings:
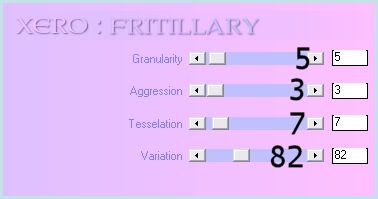
Now apply Xenofex 2 - Crumple with the following settings:

Give the layer a drop shadow of H 0, V 3, Opacity 45, Blur 8.00. Delete the black rounded rectangle template layer.
Highlight your Red Rectangle Fill layer. Select, float and defloat. Open up a paper from the kit. (I used paper 31) Resize the paper by 70%, bicubic. Copy and paste as a new layer onto your canvas. Position the paper to your liking within the selection. Selections > invert. Hit delete on your keyboard. Don't deselect yet!!
Open up your first tube/close up of choice. Resize as necessary, bicubic. Copy and paste as a new layer onto your canvas. Position it to your liking within the selection. Hit delete on your keyboard. Deselect.
Apply Xero Filters - Porcelain XL to your tube with the following settings:

Delete the Red Rectangle Shadow layer. Highlight the Red Rectangle Frame layer. Go to Adjust > Add/Remove Noise > Add Noise. Apply with the following settings:

Give the frame a drop shadow of H and V 0, Opacity 40, Blur 7.00. Delete the Red Rectangle Fill template layer.
Highlight Square Fill 1 layer. Select, float and defloat. Open up a paper from the kit. (I used paper 34) Resize by 70%, bicubic. Copy and paste as a new layer onto your canvas. Position the paper to your liking. Go to selections > invert. Hit delete on your keyboard. Deselect.
Open up your second tube of choice. Resize as necessary. Copy and paste as a new layer onto your canvas. Position the tube to your liking within the square fill. Give your tube a drop shadow of V 0, H -3, Opacity 50, Blur 13.00. Drag your tube layer above your Square 1 Frame layer. Grab your freehand selection, type point to point, feather set at 0.00. Carefully select around the area of the tube you don't want hanging out of your frame. Hit delete on your keyboard and deselect.
Duplicate your Square Fill 1 paper. Drag the duplicated paper layer above your Square Fill 2 layer. Go to image > mirror. Position the duplicated paper so it fits perfectly over your Square Frame 2 template layer.
Duplicate your Square Fill 1 layer tube. Drag it above your Square Frame 2 layer. Position the tube so it fits over the frame.
Delete the Square Fill 1 and 2 template layers, and both Square Frame shadow layers. Highlight right tube layer. Apply Xero Porcelain XL to your tube using the same settings you used earlier.
Highlight your left tube layer. Apply Xero Ultraviolet with the following settings:

Now apply Xero Bad Dream XL with the following settings:

Apply noise to both frames, same settings as before and give each frame a drop shadow of H and V 0, Opacity 40, Blur 7.00.
Highlight the Rounded Rectangle layer. Select, float and defloat. Add a new raster layer to your working image. Floodfill your new layer with color #B00001. Deselect. Apply Xero - Fritillary, same settings as before. Give the layer a drop shadow of H 0, V 0, Opacity 50, Blur 13.00. Delete the gray Rounded Rectangle template layer.
Highlight the Large Circle layer. Select, float and defloat. Open up a paper from the kit. (I used paper 33) Resize the paper by 70%, bicubic. Copy and paste as a new layer onto your canvas. Position to your liking within the selection. Go to selections > invert. Hit delete on your keyboard. Don't deselect yet!
Open up your third tube or close up of choice. Resize as necessary, bicubic. Copy and paste as a new layer onto your canvas. Position to your liking within the selection. Hit delete on your keyboard. Deselect. Apply Xero Radiance to your tube with the following settings:

Go to adjust > sharpness > unsharp mask. Apply with a radius of 5, strength 15, clipping 4. Give the tube a drop shadow of H -3, V 0, Opacity 40, Blur 8.00. Give the paper circle a drop shadow of H and V 0, Opacity 65, Blur 15.00. Delete the blue Large Circle template layer.
Highlight the Medium Circle layer. Select, float and defloat. Open up another paper from the kit. (I used paper 10) Resize by 70%, bicubic. Copy and paste as a new layer onto your canvas. Position to your liking within the selection. Selections > invert. Hit delete on your keyboard. Don't deselect yet.
Open up the same tube or close up you just used. Resize so it's 10% bigger than the last one (i.e if you resize it by 70%, bicubic, resize it by 80%, bicubic now) Copy and paste as a new layer onto your canvas. Position it to your liking within the selection. Hit delete on your keyboard. Deselect. Apply Radiance, same settings you just used. Apply unsharp mask, same settings. Give the tube a drop shadow of H -3, V 0, Opacity 40, Blur 7.00. Delete the green Medium Circle template layer and the Medium Circle Frame Shadow layer. Apply noise to the Medium Circle frame, same settings you used before and give it a drop shadow of H and V 0, Opacity 50, Blur 8.00.
Highlight the Small Circle layer. Select, float and defloat. Open up a paper from the kit. (I used paper 32). Resize by 60%, bicubic. Copy and paste as a new layer onto your canvas. Position to your liking within the selection. Selections > invert. Hit delete. Don't deselect yet.
Open up the same tube you've been using. Resize so it's 10% percent bigger than the medium circle tube. Copy and paste as a new layer onto your canvas. Position to your liking within the selection. Hit delete on your keyboard. Deselect. Apply Radiance, same settings. Apply unsharp mask, same settings. Give the tube a drop shadow of H -3, V 0, Opacity 40, Blur 6.00. Give the paper circle layer a drop shadow of H and V 0, Opacity 65, Blur 15.00. Delete the pink Small Circle template layer.
Highlight INSIDE back layer. Give it a drop shadow of H 2, V 0, Opacity 50, Blur 2.00.
Highlight the but it's warm layer. Give it a drop shadow of H 2, V 0, Opacity 50, Blur 2.00.
Highlight the OUTSIDE back layer, and give it a drop shadow of H 2, V 0, Opacity 50, Blur 2.00.
Highlight the it may be cold layer and give it a drop shadow of H 2, V 0, Opacity 50, Blur 2.00.
Open up 2 snowflakes from the kit. Resize by 25%, smartsize. Apply unsharp mask, same settings to both of them. Copy and paste them as new layers onto your canvas. Position one at the bottom right corner of your blue fritillary rounded rectangle layer and give it a drop shadow of H 2, V 0, Opacity 35, Blur 3.00. Position the other snowflake towards the upper left corner of the left square frame. Give it a drop shadow of H -2, V 0, Opacity 35, Blur 3.00.
Open up Ribbon Bow 2 from the kit. Resize by 60%, bicubic. Copy and paste as a new layer onto your canvas. Position it at the top of your circles. Give it a drop shadow of V 2, H -3, Opacity 40, Blur 6.00.
Open up button 3 from the kit. Resize by 50%, bicubic. Copy and paste as a new layer onto your canvas. Position it towards the upper left of your bottom left circle. Give it a drop shadow of H and V 0, Opacity 30, Blur 6.00.
Open up the star from the kit. Resize by 60%, bicubic. Copy and paste as a new layer onto your canvas. Give it a drop shadow of H and V 0, Opacity 30, Blur 6.00. Duplicate the star. Position one below your button slightly to it's right. Position the other star under your right square frame's tube's shoulder.
Open up mitten 1 from the kit. Resize by 22%, smartsize. Apply unsharp mask. Copy and paste as a new layer onto your canvas. Go to image > flip. Position it on the bottom left corner of the red fritillary rounded rectangle. Give the mitten a drop shadow of H and V -3, Opacity 30, Blur 6.00. Duplicate the mitten. Go to image > mirror.
Open up Ribbon Bow 1 from the kit. Resize by 60%, bicubic. Copy and paste as a new layer onto your canvas. Give it a drop shadow of H 2, V -3, Opacity 35, Blur 6.00. Mirror the ribbon bow. Position it so that it is peeking out from behind your bottom left circle. Duplicate the ribbon bow. Go to image > mirror. Then, image > flip.
Open up Heart Cookie 2 from the kit. Resize 25%, smartsize. Apply unsharp mask, same settings. Copy and paste as a new layer onto your canvas. Position it beneath the upper left corner of the red fritillary rounded rectangle. Give it a drop shadow of H -2, V 0, Opacity 30, Blur 6.00.
Highlight your top layer. Open up the LOVE word art from the kit. Resize by 25%, smartsize. Apply unsharp mask. Copy and paste as a new layer onto your canvas. Position it at the top of your circles as in my tag above. Give it a drop shadow of H 3, V 0, Opacity 35, Blur 5.00.
Add any other embellishments of your choosing.
Open up your main tube. Resize as necessary, bicubic. Copy and paste as a new layer onto your canvas. Position it to your liking. Apply Xero Radiance, same settings as before. Apply unsharp mask. Give it a drop shadow of H and V 0, Opacity 50, Blur 17.00,
Hide your white background layer. Merge your visible layers together. Duplicate the merged layer. On the bottom merged layer, go to adjust > blur > gaussian blur. Apply with a radius of 30. Apply DSB Flux - Linear Transmission with the following settings:

Go to adjust > brightness/contrast > brightness contrast. Apply with the following settings:

Now apply FM Tile Tools Blend Emboss with the following settings:

Crop and resize to your liking.
Add your copyright info, watermark and your text.
I hope you enjoyed this tutorial! If you have any questions, just give me a shout.
Subscribe to:
Post Comments (Atom)
0 comments:
Post a Comment