Friday, October 14, 2011
 Bright Eyes
This tutorial was written by me on 14 October 2011. Any similarities to other tutorials is purely coincidental.
Supplies Needed:
Tube or Image of choice. I am using the gorgeous artwork of Anna Marine. If you would like to use her artwork, you must purchase the appropriate license at CDO.
Scrap Kit. I am using Love Letters from Heaven made by me. You can purchase it here, here, here, here , here, here or here.
Gems Mask 166. You can grab it from her site here. Thank you!
Fonts of choice. I used Inspiration and P22 Kilkenny (both pay fonts)
Cluster frame made by me.
Supplies HERE
Plugins needed:
FM Tile Tools - Blend Emboss
Xero Filters - Porcelain XL (freeware)
Alien Skin Xenofex 2 - Constellation
****************************************************************************
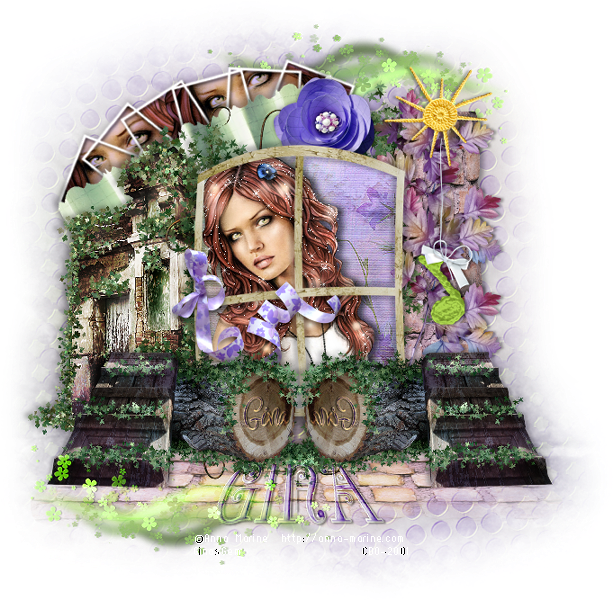
OK! Let's get started! Open up a new transparent image 800 x 800 pixels. Floodfill with white.
Open Frame 1 from the kit. Resize by 50%, bicubic. Copy and paste as a new layer onto your canvas. Grab your magic wand tool, tolerance and zero set to 0. Click inside all of the empty spaces of the frame, so that there are marching ants all around. Go to selections > modify > expand. Expand by 4.00.
Open up a paper from the kit. (I used paper 22) Resize by 60% bicubic. Copy and paste as a new layer onto your canvas. Position the paper to your liking within the selection. Go to selections > invert. Hit delete on your keyboard. Don't deselect yet!!
Open up your tube or image of choice. Resize as necessary, bicubic. Copy and paste as a new layer onto your canvas. Position to your liking within the selection. Hit delete on your keyboard. Deselect (CTRL +D).
Highlight your frame layer and drag it to the top of your layer palette. Give it a drop shadow of H -3, V 2, Opacity 40, Blur 9.00.
Open up the Ivy Trellis from the kit. Resize by 60%, bicubic. Copy and paste as a new layer onto your canvas. Give it a drop shadow of H 2, V -2, Opacity 35, Blur 6.00. Drag the trellis to right above your white background layer.
Open up the Ivy Covered Pillar from the kit. Resize by 40% bicubic. Copy and paste as a new layer onto your canvas. Position it to the left your frame. (See my tag for reference) Give it a drop shadow of H and V -3, Opacity 35, Blur 5.00. Drag the pillar layer right below your trellis layer.
Open up the Brick Wall from the kit. Resize by 50%, bicubic. Copy and paste as a new layer onto your canvas. Position it to the right of the frame. (see my tag for reference) Give it a drop shadow of H and V 3, Opacity 35, Blur 5.00. Drag it right below your pillar layer on your layer palette.
Highlight your the top layer of your layer palette. Open up the Ivy Covered Log with Door from the kit. Resize by 45%, bicubic. Copy and paste as a new layer onto your canvas. Position it at the bottom right of your frame. (see my tag for reference) Give it a drop shadow of H and V 3, Opacity 40, Blur 6.00. Duplicate the Log. Go to image > mirror.
Open up the paper flower 2 from the kit. Resize by 20%, bicubic. Copy and paste as a new layer onto your canvas. Position at the top right of the frame. (see my tag for reference) Give it a drop shadow of H 0, V -3, Opacity 35, Blur 8.00. Drag it to right below your paper layer on your layer palette.
Open up paper element 1 from the kit. Resize by 45%, bicubic. Go to image > free rotate. Rotate left by 25.00 degrees, both boxes unchecked!! Give it a drop shadow of H and V -3, Opacity 35, Blur 6.00. Drag the paper element layer below your brick wall layer on your layer palette.
Open up Tree Branch 1 from the kit. Resize by 30%, smartsize. Go to adjust > sharpness > unsharp mask. Apply with a radius of 5, strength 15, clipping 3. Copy and paste as a new layer onto your canvas. Go to image > free rotate. Rotate left by 90.00 degrees, both boxes unchecked! Give the branch a drop shadow of H and V 0, Opacity 35, Blur 8.00. Duplicate the tree branch. Position them to your liking on top of the brick wall.
Open up the crochet music note from the kit. Resize by 30%, bicubic. Copy and paste as a new layer onto your canvas. Go to image > mirror. Position the music note to your liking on top of the tree branches. Give it a drop shadow of H -3, V 3, Opacity 35, Blur 8.00.
Open up the crochet sun from the kit. Resize by 20%, bicubic. Copy and paste as a new layer onto your canvas. Position the sun at the top of the brick wall. (see my tag for reference) Give it a drop shadow of H -2, V 0, Opacity 35, Blur 6.00.
Open up the GG_Cluster Frame from the supplies. Copy and paste as a new layer onto your canvas. Position the frames below the paper element. (see my tag for reference) Grab your freehand selection tool, type point to point, feather set to 0.00. Select around the edges of the frames like this:

Open your tube or image again. Copy and paste as a new layer onto your canvas. Position it to your liking within the selection. Go to selections > invert. Hit delete on your keyboard. Copy and paste as a new layer onto your canvas. Position it next to your other tube layer and position it to your liking within the selection. Hit delete on your keyboard. Deselect (CTRL+D) Drag both tube layers beneath your cluster frames layer.
Highlight your top layer. Open up Ribbon 3 from the kit. Resize by 25%, smartsize. Apply unsharp mask, same settings as before. Position it to your liking on your frame. Give it a drop shadow of H and V 3, Opacity 40, Blur 8.00.
Open up the Brick Road from the kit. Resize by 75%, bicubic. Copy and paste as a new layer onto your canvas. Position it towards the bottom of your tag. (see my tag for reference) Drag the brick road layer to right above your white background layer.
Add any other embellishments of your choosing.
Hide your white background layer. Right click on your tag, and select copy merged. Highlight your white background layer and paste as a new layer. Center the copy merged layer behind your tag. Go to adjust > blur > gaussian blur. Apply with a radius of 30. Resize your blurred layer by 110 bicubic. Go to effects > artistic effects > halftone. Apply with the following settings:
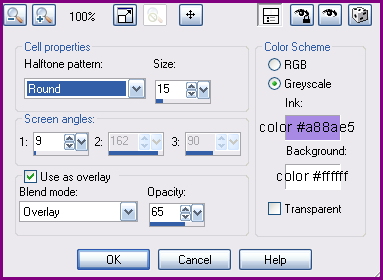
Source Luminance
Fit to Layer
Hide all mask
Delete the mask layer from your layer palette, answer yes to pop up box and merge the group. Now apply FM Tile Tools Blend Emboss with the following settings:
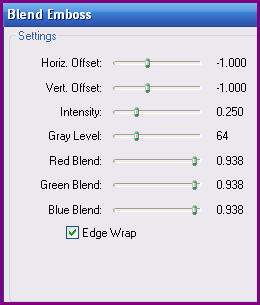
Apply Blend Emboss one more time to the mask layer.
Open up a Flower Swirl from the kit. Resize by about 50%, bicubic. Copy and paste as a new layer onto your canvas. Position the flower swirl to your liking. Give it a drop shadow of H 2, V 0, Opacity 35, Blur 4.00. Change the blend mode to Overlay. Duplicate the flower swirl. Go to image > mirror. Then, image > flip.
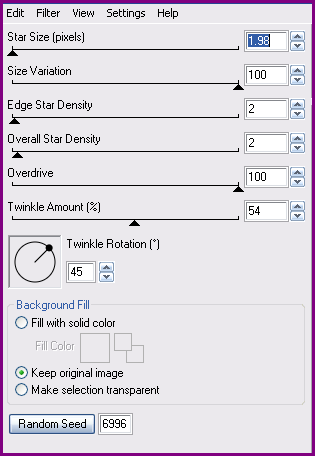
Highlight your main tube layer. Grab your freehand select tool, type point to point, feather set at 0. Select areas of your tubes hair. Apply Xenofex 2 Constellation with the following settings:
Set your foreground color to white, and the background color to a medium dark color from your tag. Type out your name using the Inspiration, or another script font. (make the text small) Position your name in the circle of the left log (see my tag for reference) Duplicate the text layer. Change the blend mode of the bottom layer to Multiply and the top layer to Overlay. Duplicate both text layers and mirror them.
Using the same colors you used for the script font, write out your name (large) using the P22 Kilkenny (or a similar font) Go to effects > geometric effects > perspective vertical. Apply with the following settings:
Give the text a drop shadow of H 1, V 0, Opacity 65, Blur 2.00. Position the text to your liking. Duplicate the text. Change the blend mode of the bottom layer to Multiply and the top layer to Overlay.
Crop and resize to your liking. Add your copyright info, and your watermark.
I hope you enjoyed this tutorial. If you have any questions, don't hesitate to give me a shout!
Subscribe to:
Post Comments (Atom)
0 comments:
Post a Comment