Wednesday, May 4, 2011
 Ye Olde Autumn Maiden
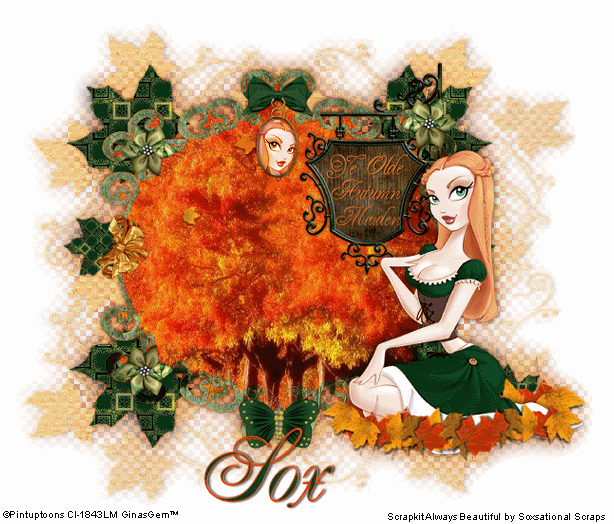
This tutorial was written by me on 10 October 2008. Any similarities to other tutorials is purely coincidental.
Supplies Needed:
Tube of choice. I am using the wonderful artwork of Rion Vernon. I got this tube when CILM ws still open. You can find him at CDO now.
Scrapkit is Always Beautiful by Soxsational Scraps. If you wish to purchase this beautiful emerald scrapkit you can here. Thank you, Tracey!!
Autumn Leaves. It should come with PSP, but I've included it just in case. lol
Mask by Vix Check out her wonderful site!!
Leaf shape (included)
Font of choice. I used Renaissance which can be downloaded here
Falling Leaves animation by me
Photo by www.sxc.hu
Plug Ins
Filters Unlimited 2.0 Paper Textures. If you don't have this filter any texture filter will work
Ok! Let's get started! Open up a new image 700 x 600 pixels. Floodfill with white. Open up the mat fromthe scrapkit. Resize by 75%, smartsize. Copy and paste onto your canvas. Go to Selections > Select all. Selections > Float. Defloat. Add a new raster layer to your working image.
Open up the photo. Copy. On your working image, paste into selection. Go to Selections > Modify > Contract by 6.00. Go to Selections > Invert. Promote selection to layer. On your bottom picture layer, hit delete. Deselect. (CTRL+D) On your promoted selection, change the blend mode to Luminace (Legacy) Give the matt layer a drop shadow of H and V 0, Opacity 65, Blur 12.00
Open the sign from the scrapkit. Resize by 50%, smartsize. Copy and paste onto your canvas. Position in one of the corners of the matt/picture. Give it a drop shadow of Ha nd V 0, Opacity 60, Blur 5.00. Duplicate the sign. Drag the duplicated layer to right above your white background. Grab your eraser tool. Highlight the top sign layer. Carefully erase certain parts of the sign so it looks as if it's intertwined with the matt. Hide your white background and merge your visible layers.
Open up a hanger of choice. Resize by 25%, smartsize. Position to your liking. Grab your magic wand tool, tolerance set at 20, feather set at 0. Click inside the hanger. Go to Selections > Modify > Expand by 10.00. Open your tube. Resize as necessary, bicubic. Copy and paste as a new layer onto your canvas. Position to your liking within the selection. Go to Selections > Invert. Hit delete on your keyboard. Deselect (CTRL+D). Change the blend mode of the tube to Luminance. Give the hanger a drop shadow of H and V 0, Opacity 50, Blur 5.00.
Open up the leaf shape. Resize by 90%, smartsize. Highlight your white background. Paste as new layer onto your canvas. Select, float and defloat. Open up a paper of choice. Paste as a new layer onto your canvas. Go to Selections > Invert. Hit delete on your keyboard. Deselect (CTRL+D) Delete the gray leaf layer. Give the leaf a drop shadow of H and V 0, Opacity 50, Blur 3.00. Position the leaf in the upper left hand corner of your matt. Duplicate the leaf and go to Image > Flip. Duplicate the leaf again. Resize by 45%, smartize. Go to Image > Free Rotate. Rotate left by 45.00. Position the smaller leaf in between the bigger ones.
Duplicate the 3 leaves on the left side and mirror each one of them and position on the other side of the matt.
Add any other embellishments of your choosing. Hide your white background and merge your visible layers.
Open up your tube. Resize as necessary, bicubic. Paste onto your canvas and position to your liking. Open up the autumn leaves. WIth your freehand selection tool, select around the leaves that you would like to use, and paste onto your canvas. Duplicate and resize as necessary, so it looks as if your tube is sitting in a bed of leaves. Merge the leaves and your tube layers together. Give this layer a drop shadow of H and V 0, Opacity 65, Blur 10.00.
Highlight your white background. Add a new raster layer. Choose a light to medium color from your tube. Floodfill the new layer with this color. Apply the Vix mask. Delete the mask, answer yes and merge the group. Resize the mask layer by 90%, smartsize. Position to your liking. Add a texture of choice to the mask layer. Give it a drop shadow of H 1, V 0, Opacity 20, Blur 3.00. Hide your white background and merge your visible layers.
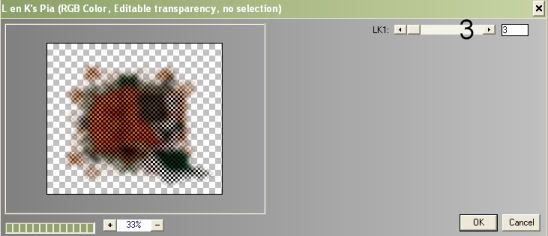
Duplicate your merged layer. Move it to the middle of your canvas. Go to Adjust > Blur > Gaussian Blur. Apply with a radius of 10.00. Apply the L and K filter Pia with the following settings:
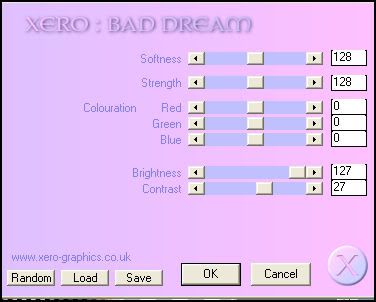
On the blurred layer apply Xero Bad Dream 2 x with the following settings:
Colorize this layer to a color of your choice and add a texture of choice. Give this layer the same drop shadow you gave your mask layer.
Add your copyright info, watermark, and your text. Crop and resize to your liking. If you are not animating, you are done.
If you are, Merge your visible layers. Copy and open up animation shop. Paste as a new animation in AS. Duplicate until you have a total of 25 frames. Open up the falling leaves animation. Select all frames (CTRL+A) Copy. Select all frames of your tag animation (CTRL+A) Go to Edit > Paste into selected frame.
Optimize and save as gif.
I hope you enjoyed this tutorial!
Subscribe to:
Post Comments (Atom)
0 comments:
Post a Comment