Wednesday, May 4, 2011
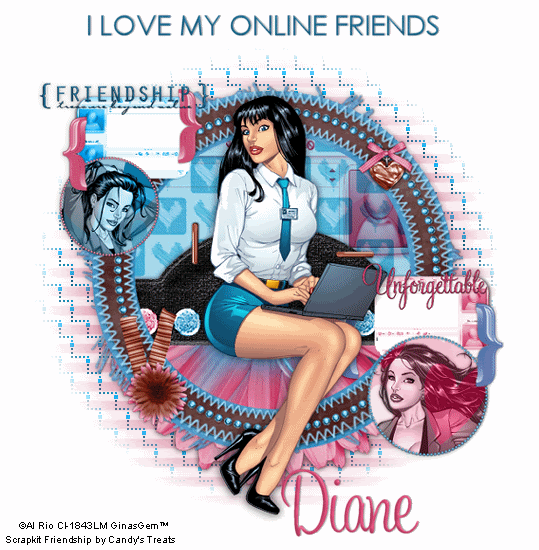
 I Love my Online Friends
This tutorial was written by me on 13 October 2008. Any similarities to other tutorials is purely cioncidental.
Supplies Needed:
3 tubes of choice. I am using the awesome artwork of Al Rio. I got this tube when CILM was still open. You can find him at several scrap stores including Twilight Scraps.
Scrapkit Friendship by Candy's Treats. If you wish to purchase this wonderful scrapkit you can here Don't forget to check out her blog for awesome freebies!!
Brackets by Lori of Taggers Scraps (look under brackets for download)
Mask by Weescotlass
Messenger box tubes made by me
Animation made with moxgraphics tiles
Font(s) of choice. I used Century Gothic and Sweetheart (pay fonts)
Ok! Let's get started! Open up the online friends template. Highlight the top layer. Add a new raster layer. Floodfill the new layer with a color of choice. Apply the mask. Delete the mask, answer yes and merge the group.
Open up frame2 from the scrapkit. Resize by 85%, smartsize. Paste as a new layer onto your canvas. Grab your magic wand tool, tolerance 30, feather 0.00. Click inside the empty space of the frame. Go to Selections > Modify > Expand by 6.00.
Open up a paper of choice. Resize by 69%, smartsize. Copy and paste onto your canvas. Go to Selections > Invert. Hit delete on your keyboard. Go to Selections > Invert (again). Open up the bigger messenger box JPG. Copy. On your working image, add a new raster layer. Paste the messenger box into the selection. Deselect. Colorize the messenger box layer to a color of choice and change the blend mode to Multiply. Drag the frame layer above your paper and messenger box layers. Give your frame a drop shadow of H and V 0, Opacity 65, Blur 8.00.
Highlight your messenger box layer. Open up the foldedflower2 from the scrapkit. Resize by 90%, smartsize. Copy and paste as a new layer onto your canvas. Position to your liking within the frame. Give it a drop shadow of H and V 0, Opacity 50, Blur 5.00.
Open up a staple of choice from the kit. Resize by 75%, smartsize. Copy and paste onto your canvas. Give the staple a drop shadow of H and V 0, Opacity 50, Blur 3.00. Duplicate the staple. On the duplicated staple, go to Image > Free Rotate. Rotate Left by 90.00 degrees, both boxes unchecked. Position the staples to your liking.
Open up a paper of choice. On your materials palette, make it your background. Grab your preset tool, ellipse. Choose circle in the tools palette. Hide your foreground color on your materials palette. Draw out a small circle. Convert it to a raster layer. Position to your liking. Using another paper as a background. Draw out another circle. Convert it to a raster layer. Position to your liking. Open up one of your tubes. Resize as necessary, bicubic. On one of your small paper circles, Go to Selections > Select All. Select > Float. Defloat. Paste your tube onto your canvas. Position to your liking. Go to Selections > Invert. Hit delete on your keyboard. Deselect. Give your tube the same drop shadow you gave your staples. Give your paper circle a drop shadow of H and V 0, Opacity 60, Blur 6.00. Change the blend mode of the tube to Luminance. Repeat the same steps with the other circle.
Open up the blings from the kit. Resize as necessary (smartsize) so that they frame your circles. Open up the messenger tube (small grey one) Copy and paste onto your canvas. Resize if necessary. Position to your liking. Duplicate and mirror. Position to your liking. Colorize the small messenger boxes to your liking.
Open up brackets of choice. Resize by about 25%, smartsize. Give it a drop shadow of H and V 0, Opacity 50, Blur 5.00. Duplicate and mirror. Position the brackets so it looks as if they are framing the small messenger boxes. Open up another bracket of choice. Repeat the above steps.
Add any other embellishments, and wordart of your choosing.
Open up your main tube. Resize as necessary. Paste onto your canvas and position to your liking. Give your tube a drop shadow of H and V 0, Opacity 65, Blur 10.00.
Add your copyright info, watermark and text. Hide your white background and all of your animation layers. Merge your visible layers. Crop and resize to your liking. Now to animate.
Unhide your white background. Unhide your frame 1 layer. Copy merged. Open up Animation Shop. Paste as a new animation.
Back to Paint Shop Pro. Hide your frame 1 layer, and unhide your frame 2 Layer. Copy merged and paste after frame 1 in AS.
In PSP, hide your frame 2 layer and unhide your frame 3 layer. Copy merged. Paste after frame 2 in AS.
Back in PSP, hide your frame 3 layer, and unhide your frame 4 layer. Copy merged and paste after frame 3 in AS.
Back in PSP, hide your frame 4 layer and unhide your frame 5 layer. Copy merged. Paste after frame 4 in AS.
Back to PSP, hide your frame 5 layer and unhide your frame 6 layer. Copy merged and paste after frame 5 in AS.
Back in PSP, hide your frame 6 layer and unhide your frame 7 layer. Copy merged and paste after frame 6 in AS.
In PSP, hide your frame 7 layer and unhide your frame 8 layer. Copy merged and paste after frame 7 in AS.
Optimize and save as GIF.
I hope you enjoyed this tutorial. If you have any questions, just leave me a shout. :-)
Subscribe to:
Post Comments (Atom)
0 comments:
Post a Comment