Wednesday, May 4, 2011
 Purrrfect

This tutorial was written by me on 16 October 2008. Any similarities to other tutorials is purely coincidental.
Supplies Needed:
Tube of choice. I am using the sexy artwork of Keith Garvey. I got this tube when he was still with MPT. You can find him PSP Tubes Emporium now.
Scrapkit. I am using the sexily purple scrapkit Lacy's Naughty and Nice by Scraps by Jessica. If you wish to purchase this scrapkit you can here Thank you Jessica!
Template 35 by Ali by Designs by Ali (download it at her blog as well other great freebie goodies!!!)
Fonts of choice. I used Ennobled Pet and Roselyn (pay fonts)
Plug Ins
Eyecandy 4000 Jiggle (for animation)
Ok! Let's begin! Open Ali's template. Hit Shift + D to copy. Close the original without saving any changes. Highlight your copy. This is now your working image. Delete the credits. Go to Image > Canvas Size. Change the canvas size to width 700 pixels by 500 pixels. Add a new raster layer. Drag it to the very bottom of your layer palette. Floodfill with white.
Highlight the toadies back layer. Go to Selections > Select all. Selections > float. Defloat. Open up a paper of choice from the scrapkit. Copy and paste as a new layer onto your canvas. Go to Selections > Invert. Hit delete on your keyboard. Deselect (CTRL+D)
Highlight the back layer. Select, float and defloat. Open up another paper of choice. Copy and paste as a new layer onto your canvas. Deselect (DTRL+D) Delete the black Back layer. Give the paper Back layer a drop shadow of, H and V 0, Opacity 45, Blur 12.00.
Highlight the big circle layer. Select, float and defloat. Open up another paper of choice from the scrapkit. Paste as a new layer onto your canvas. Selections > Invert. Hit delete on your keyboard. Deselect. Delete the gray big circle layer.
Highlight the Circle Frame layer. Select, float and defloat. Open up another paper from the scrapkit. Copy and paste as a new layer onto your canvas. Selections > Invert. Hit delete on your keyboard. Deselect. Delete the gray circle frame layer.
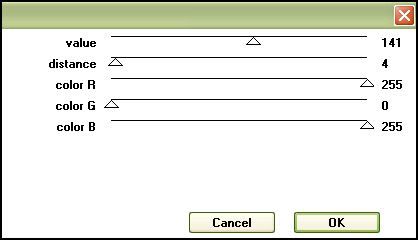
Highlight the top circle layers. Make a gradient in your layer palette, using 2 colors of choice--Style Linear, angle 45, repeats 2.00. Add a new raster layer to your working image. Floodfill the selection with your gradient. Deselect. Apply Xero Color Dot with the following settings:
Open up a couple of flowers from the scrapkit. Resize by 20%, smartsize. Position to your liking. Give them a drop shadow of H and V 0, Opacity 60, Blur 4.00.
Add any other embellishments of your choosing.
Open up your main tube. Resize bicubic if necessary. Copy and paste as a new layer onto your canvas. Give your tube a drop shadow of H and V 0, Opacity 70, Blur 12.00.
If you wish for your tube to look as if she is 'intertwined within the circle', duplicate the circle frame. Make certain that one circle frame is right above her and one right below her.
Grab your eraser tool, size 15, opacity 38. Carefully erase parts of the TOP circle layer so it looks as if your tube is hanging half in and out of the circle.
Hide your white background. Merge your visible layers together.
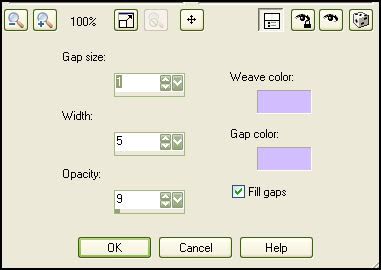
Duplicate the template/tag layer. On the bottom layer, go to Adjust > Blur > Gaussian Blur. Radius of 15. Go to Effects > Textures > Weave with the following setting (choosing your own color)
Add your copyright info, watermark and text. Merge all layers together. If you are not animating, you are done.
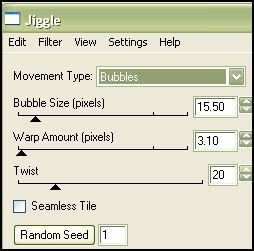
If you want to animate, zoom in REALLY close to yout tube's hair. Grab your freehand selection tool, point to point , feather set at 0.00. Carefully select SMALL peices of your tubes hair. (maybe 3 or 4 different sections) When you are done, apply Eyecandy 4000 Jiggle with the following settings:
Deselect. Copy. Open up Animation Shop. Paste as a new animation.
Back to PSP. Undo 2 times. Apply Eyecandy Jiggle, except this time hit the random seed button. Copy and paste after current frame in AS .
Repeat 2 more times so you have a total of 4 frames. Select all frames (CTRL +A) Change the frame properties to 20.
Optimize and save as gif.
I hope you enjoyed this tutorial. If you have any questions, just leave me a shout. :)
Subscribe to:
Post Comments (Atom)
0 comments:
Post a Comment