Wednesday, May 4, 2011
 Starlit Dreams
This tutorial was written by me on 9 October 2008. Any similarities to other tutorials is purely coincidental.
Supplies Needed
Tube of choice. I am using the fantastical artwork of Selina Fenech. I got this tube when CILM was still open. I don't know where you can find her art now so just use a tube you like instead.
Scrapkit Starlight by Candy's Treats. If you wish to purchase this ethereal scrapkit you can here
Template #55 by Missy. You can download this template as well as lots of others at Divine Intentionz
Fantasy Backgrounds by PSP Playground
Mask by Weescotlass
Font of choice. I used Cecily which you can download here
Plug Ins
Filters Unlimited 2.0 (if you don't have this filter, any other texture filter will do)
Ok! Let's get started! Open up Missy's Template. Hold Shift +D to duplicate. Delete the credits. Go to Image > Canvas Size. Resize Width: 650 Pixels. Height 500 pixels. Floodfill the background layer with white.
Highlight the oval shape layer. Go to Selections > Select all. Selections > Float. Defloat. Open up Paperstarlight 2 paper. Copy and paste onto your canvas. Position to your liking within the oval. Go to Selections > Invert. Hit delete on your keyboard. Deselect (CTRL+D) Delete the gray oval shape layer. On the paper oval, Go to Adjust > Brightness/Contrast. Apply with brightness set to 144, Contrast set to 48. Apply a texture of choice to the oval. Duplicate the oval paper layer. Colorize to a different color if you wish. Resize by 80%, smartsize (all layers unchecked!!) Give both ovals a drop shadow of H and V 0, Opacity 60%, Blur 15.00. Positon both ovals to your liking.
Highlight thin rectangle 1 layer. Select, float and defloat. Open up a paper of choice and paste as new layer onto your canvas. Go to Selections > Invert. Hit delete on your keyboard. Deselect. Delete the gray thin rectangle1 layer. Highlight the paper rectangle layer. Give it a drop shadow of H and V 0. Opacity 50, Blur 8.00. Open up a ric rac of choice from the scrapkit. Resize by 40%, smartsize. Position in your thin rectangle to your liking. Give the ric rac a drop shadow of H and V 0, Opacity 40, Blur 4.00.
Repeat the above steps with the thin rectangle2 layer.
Highlight the background 1layer. Select, float and defloat. Open up a paper of choice from the scrapkit. Paste onto your canvas. Go to Selections > Invert. Hit delete on your keyboard. Do not deselect!! Go to Selections > Invert. (again) Add a new raster layer. Open up one of your fantasy images. Copy and paste into selection on your working image. Deselect (CTRL+D) Change the blend mode of the fantasy image to hardlight. Delete the gray background1 layer.
Highlight the frame 1 layer. Select, float and defloat. Open up another paper of choice from the scrapkit. Copy and paste onto your canvas. Go to Selections > Invert. Hit delete on your keyboard. Deselect. Give the paper frame layer a drop shadow of H and V 0, Opacity 60, 8.00.
Repeat the above steps with background 2, and frame 2, but use your other fantasy image.
Open up a knotted ribbon of choice. Resize by 20%, smartsize. Copy and paste onto your canvas. Position to your liking. Give it a drop shadow of H and V 0, Opacity 50, Blur 3.00. Repeat with another knotted ribbon of choice.
Open up a flower of choice. Resize by 25%, smartsize. Paste onto your canvas and position to your liking. Give it the same drop shadow you gave your knotted ribbon. Repeat with another flower of choice.
Highlight your white background. Choose 2 colors from your tube. Make a gradient, style Linear, angle 45, repeats 4. Add a new raster layer. Floodfill the new raster layer with your gradient. Apply the mask. Delete the mask, answer yes and merge the group. Apply a texture of your choice to your mask. Give the mask a drop shadow of H and V 0, Opacity 20, Blur 8.00.
Add any other embellishments of your choosing.
Open up your tube. Resize if necessary, bicubic. Paste onto your canvas and position to your liking. Give it a drop shadow of H and V 0, Opacity 70, Blur 10.00.
Add any wordart of your choosing. Add your copyright info, text and watermark. Crop and resize to your liking. If you are not animating, you are done.
If you are, highlight your mask layer. Apply VM Natural Sparkle with the following settings:
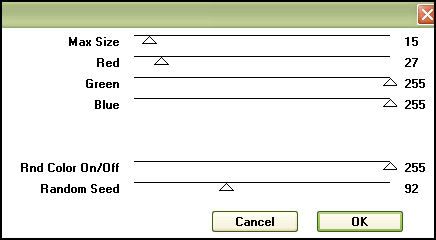
Copy merged. Open up Animation Shop. Paste as a new animation. Back to PSP. Go to Edit > Undo Sparkle. Apply VM Sparkle again but this time slide the random seed button. Copy merged and paste after the first frame in AS.
Repeat the above step one more time so you have a total of 3 frames. Select all frames in AS. (CTRL+A) Change the frame properties to 13.
Optimize and save as gif.
I hope you enjoyed this tutorial. If you have any questions, give me a shout or send me an email. ;-)
Subscribe to:
Post Comments (Atom)
0 comments:
Post a Comment