Thursday, May 5, 2011
 Winter Frost
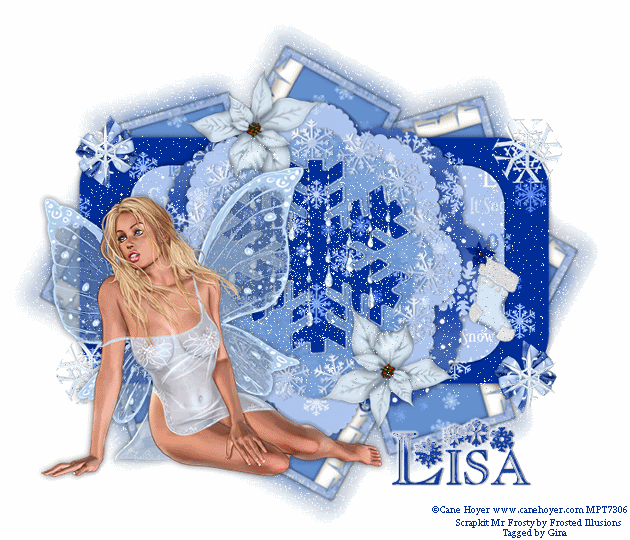
This tutorial was written by me on 23 November 2008. Any similarities to other tutorials is purely coincidental.
Supplies Needed:
Tube of choice. I am using the sexy artwork of Cane Hoyer. If you wish to use this same tube, you must purchase a license with MPT
Scrapkit. I am using the lovely winter scrap Mr Frosty by Frosted Illusions. If you wish to purchase this grogeous scrap you can here Thank you, Lisa!
Template 48 made by me, which you can get here
Snow Animation (included in supplies)
Font of choice. I used Flakes which you can download here
Plugins
Xenofex 2 Constellation
Let's get started! Open up my template. Hold down SHIFT + D to duplicate. Close the original. Delete the credit info layer.
Highlight the rounded rectangle 1 layer. Go to selections > select all. Selections > float. Selections > defloat. Open up a paper of choice from the kit. Resize by 68%, smartsize. Copy and paste onto your canvas. Go to selections > invert. Hit delete on your keyboard. Deselect (CTRL+D) Give the layer a drop shadow of H and V 0, Opacity 60, Blur 10.00. Delete the gray rounded rectangle layer.
Highlight the rounded rectangle 2 layer. Select, float and defloat. Open up another paper of choice from the kit. Resize by 68%, smartsize. Copy and paste as a new layer onto your canvas. Selections > invert. Hit delete. Deselect. Give the layer a drop shadow of H and V 0, Opacity 60, Blur 8.00. Delete the white rounded rectangle.
Highlight the scalloped shape 1 layer. Select, float and defloat. Open up a paper of choice from the kit. Resize by 68%, smartsize. Copy and paste as a new layer onto your canvas. Selections > invert. Hit delete. Deselect. Give the layer a drop shadow of H and V 0, Opacity 60, Blur 12.00. Delete the medium gray scalloped shape.
Highlight the scalloped shape 2 layer. Select, float and defloat. Open up a paper of choice from the kit. Resize, 68%, smartsize. Copy and paste as a new layer onto your canvas. Selections > invert. Hit delete. Deselect. Give the layer a drop shadow of H and V 0, Opacity 10.00. Delete the dark gray scalloped shape layer.
Highlight the scalloped shape 3 layer. Select, float and defloat. Open up a paper of choice from the kit. Resize, 68%, smartsize. Copy and paste onto your canvas. Selections > invert. Hit delete and deselect. Give the layer a drop shadow of H and V 0, Opacity 60, Blur 8.00. Delete the white scalloped layer.
Highlight the snowflake wreathe layer. Select, float and defloat. Open up a paper from the kit ( a lighter paper works best) Resize by 68%, smartsize. Copy and paste onto your canvas. Selections > invert. Hit delete. Deselect. Give the wreathe a drop shadow of H 1, V -1, Opacity 30, Blur 2.00. Delete the gray snowflake wreathe.
Highlight the snowflake fill layer. Select, float and defloat. Open up a paper of choice from the kit. Resize, 68%, smartsize. Copy and paste onto your canvas. Selections > invert. Hit delete. Do NOT deselect.
Open up an ice of choice. Resize by 45%, smartsize. Copy and paste onto your canvas. Position to your liking within the selection. Hit delete and deselect. Give the ice the same drop shadow you gave your snowflake wreathe. Delete the gray snowflake fill layer.
Highlight the snowflake frame layer. Select, float and defloat. Open up a paper of choice from the kit. Resize by 68%, smartsize. Copy and paste onto your canvas. Selections > invert. Hit delete. Deselect. Give it a drop shadow of H and V 0, Opacity 60, Blur 5.00. Delete the gray snowflake frame.
Open up a flower of choice from the kit. Resize by 35%, smartsize. Copy and paste onto your canvas. Give it a drop shadow of H and V 0, Opacity 50, Blur 5.00. Duplicate the flower. Go to image > mirror. Then, image > flip. Position them to your liking.
Open up a bow of choice. Resize by 15%, smartsize. Copy and paste onto your canvas. Give it a drop shadow of H and V 0, Opacity 50, Blur 5.00. Duplicate the bow. Go to image > mirror. Then image > flip. Position them underneathe your smaller snowflakes.
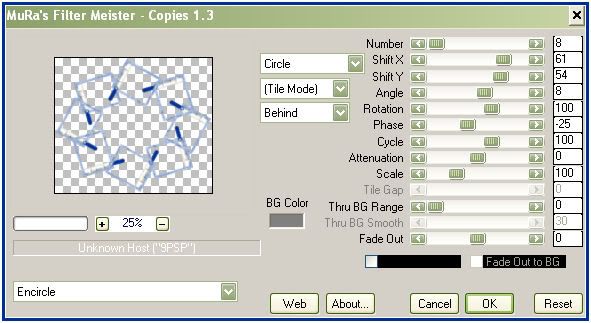
Open up a frame of choice from the kit. Resize by 25%, smartsize. Grab your magic wand tool, tolerance set at 20, feather set at 0.00. Click inside the empty space of the frame. Go to selections > modify > expand by 3.00. Open up a paper of choice from the kit. Resize by 50%, smartsize. Copy and paste as a new layer onto your canvas. Selections > invert. Hit delete. Deselect. Drag your paper below your frame layer. Merge your paper and frame layer together. Apply Mura Meister Copies with the following settings:
Drag the encircled frame layer to right above your your white background. Resize by 95%, smartsize. Center it behind your tag.
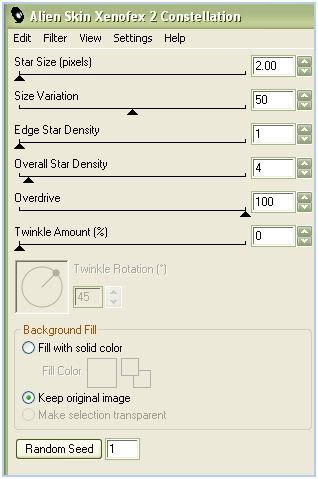
Duplicate the encircle layer. On the bottom layer, go to adjust > blur > gaussian blur. Apply with a radius of 10.00. Apply Xenofex 2 Constellation with the following settings:
Highlight your unblurred encircled frame layer. Resize by 95%, smartsize. Hide your white background and merge your visible layers. Resize your merged layer by 90%, bicubic.
Open up your tube. Resize bicubic, as necessary. Give your tube a drop shadow of H and V 0, Opacity 60, Blur 10.00.
Crop and resize to your liking.
Add your copyright info, water mark and your text.
Hide your text layers and your tube layers. Merge your tag layer and your white background together. Copy.
Open up animation shop and paste as a new animation. Duplicate until your have a total of 20 frames. Select all frames (CTRL+A)
Open up the snow animation. Select all frames (CTRL+A) Copy. Highlight your tag animation. Go to edit > paste into selected frame. Position and left click. Repeat this steps as many times as you wish.
Back in psp. Hide your white background and tag merged layer. Copy merged. Paste as a new animation in AS. Duplicate until you have a total of 20 frames. Select all frames (CTRL+A) Copy.
Highlight your tag snow animation. Go to edit > paste into selected frame. Position and left click your mouse.
Optimize and save as gif.
I hope you enjoyed this tutorial. If you have any questions, just give me a shout!
Subscribe to:
Post Comments (Atom)
0 comments:
Post a Comment