Thursday, May 5, 2011
 First Snow
This tutorial was written by me on 19 November 2008. Any similarities to other tutorials is purely coincidental.
Supplies Needed:
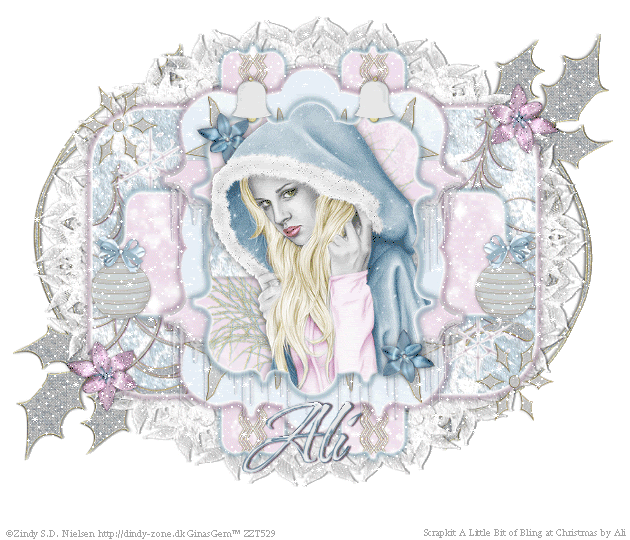
Tube of choice. I am using the lovely artwork of Zindy S.D. Nielsen. If you wish to use her artwork, you must purchaase a license at her store here
Scrapkit. I used the amazing A Litte Bit of Bling at Christmas by Ali. If you wish to purchase this awesome kit, you can here. Thank you, Ali!!
Template 41 made by me which you can download from my blog
Mask by Essex Girl
Falling Snow Animation
Font of choice. I used Waterbrush ROB (pay font)
Plugins:
Eyecandy 5 Impact Gradient Glow
Eyecandy Nature Snow Drift
Animation Shop (opt)
Let's get started! Open up my template. Duplicate by holding down Shift + D. Close the original. Delete the credits layer.
Highlight the rounded rectangle layer. Go to selections > select all. Selections > float. Selections > defloat. Open up a paper of choice from the kit. ( I used paper 1) Resize by 68%, smartsize. Copy and paste as a new layer onto your canvas. Go to selections > invert. Hit delete. Do NOT deselect.
Open up a bling christmas tree (I used tree 1) from the kit. Resize by 45%, smartsize. Don't close the tree yet. Copy and paste onto your canvas. Position the in the left bottom corner of the rectangle (see my tag for reference) Hit delete.
Activate the tree and mirror it. Copy and paste onto your canvas and position it in the right upper corner of the rectangle. (see my tag for reference) Deselect.
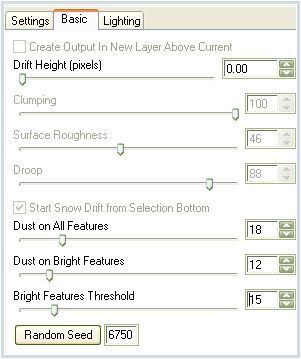
Highlight your rounded rectangle. Apply Eyecandy Snow Drift with the following settings:
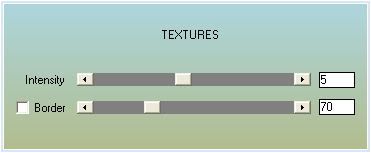
Now apply AAA Textures with the following settings:
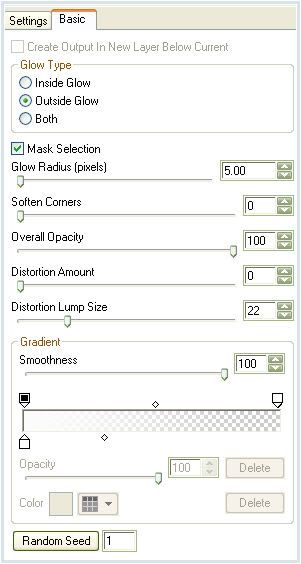
Now, apply Eyecandy Gradient Glow with the following settings:
Go to effects > 3D Effects Drop shadow. Apply with H and V 0, Opacity 80, Blur 8.00, Color #b0629d. Apply another drop shadow with H and V 0, Opacity 50, Blur 10.00, Color Black. Delete the gray rounded rectangle.
Highlight one of your bling trees. Give it a drop shadow of H 1, V 0, Opacity 70, Blur 2.00, Color #b0629d. Highlight your other tree and give it the same drop shadow.
Highlight the rectangle layers. Select, float and defloat. Open up a paper of choice ( I used paper 2) Resize by 68%, smartsize. Copy and paste onto your canvas. Selections > invert. Hit delete. Deselect. Apply Gradient Glow, same settings as before. Apply a drop shadow of H and V 0, Opacity 80, Blur 8.00, Color #3298c4. Apply another drop shadow of H and V 0, Opacity 35, Blur 8.00, Color Black. Highlight the gray rectangle layer. Select, float and defloat again. Highlight your paper rectangles.
Open up a bling ribbon from the kit ( I used ribbon 2) Resize by 45%, smartsize. Rotate the ribbon by 90.00, right. Copy and paste onto your canvas. Duplicate the ribbon. Position them in the middle of the rectangles. Selections > invert. Hit delete. Deselect. Give both ribbons a drop shadow of H and V 0, Opacity 35, Blur 5.00, Color Black. Delete the gray rectangles.
Highlight the horizontal rectangle. Select, float and defloat. Open up a paper from the kit ( I used paper 11) Resize by 68%, smartsize. Copy and paste onto your canvas. Selections > invert. Hit delete. Deselect. Apply Gradient Glow, same settings as before. Give the layer a drop shadow of H and V 0, Opacity 80, Blur 8.00, Color #3298c4. Give it another drop shadow of H and V 0, Opacity 40, Blur 10.00, Color Black. Delete the gray horizontal rectangle.
Highlight the bracket 1 layer. Select, float and defloat. Open up a paper of choice ( I used paper 15) Resize by 60%, smartsize. Copy and paste onto your canvas. Selections > invert. Hit delete. Deselect. Apply Gradient Glow, same settings. Apply a drop shadow of H and V 0, Opacity 80, Blur 8.00, Color #b0629d. Give the layer another drop shadow of H and V 0, Opacity 50, Blur 10.00, Color Black. Delete the gray bracket.
Highlight the stripes layer. Select, float and defloat. Open up a paper from the kit ( I used paper 17) Resize by 60%, smartsize. Copy and paste onto your canvas. Selections > invert. Hit delete. Deselect. Give the layer a drop shadow of H and V 0, Opacity 50, Blur 5.00, Color Black. Delete the black stripes.
Open up a bling leaf of choice ( I used Leaf 2) Resize by 15%, smartsize. Copy and paste onto your canvas. Give the layer a drop shadow of H and V 0, Opacity 40, Blur 4.00, Color Black. Duplicate the leaves 3x for a total of 4 frames. Position them in the four corners of the bigger bracket. (see my tag for reference)
Highlight the icicles layer. Give it a drop shadow of H and V 0, Opacity 25, Blur 5.00, Color Black. Give the same drop shadow to the icicles 2 layer.
Highlight the bracket 2 layer. Select, float and defloat. Open up a paper from the kit (I used paper 14) Resize by 55%, smartsize. Copy and paste onto your canvas. Selections > invert. Hit delete. Do NOT deselect.
Open up a bling tree of choice ( I used tree 1). Resize by 70%, smartsize. Copy and paste onto your canvas. Position to your liking within the bracket. Hit delete. Deselect. Give your tree a drop shadow of H 2, V 0, Opacity 75, Blur 3.00, Color #3298c4.
Highlight your paper bracket. Apply Gradient Glow, same settings. Apply a drop shadow of H and V 0, Opacity 80, Blur 8.00, Color # 3298c4. Apply another drop shadow of H and V 0, Opacity 50, Blur 8.00, Color Black. Delete the white bracket.
Highlight the strip layer. Open up a paper from the kit. (I used paper 9) Resize by 55%, smartsize. Copy and paste onto your canvas. Selections > invert. Hit delete. Deselect. Give the layer a drop shadow of H and V 0, Opacity 50, Blur 5.00, Color Black. Delete the black strip.
Open up a christmas ball of choice. (I used xmas ball 5) Resize by 15%, smartsize. Copy and paste onto your canvas. Give the ball a drop shadow of H and V 0, Opacity 50, Blur 5.00, Color Black. Duplicate the ball. Position them to your liking or see my tag for reference.
Open up a bow of choice (I used bow 6) Resize by 10%, smartsize. Copy and paste onto your canvas. Give the bow a drop shadow of H and V 0, Opacity 50, Blur 4.00, Color Black. Duplicate the bow. Go to image > mirror. Position the bows so they look as if they are holding the xmas balls in place.
Open up a bell of choice. (I used bell 2) Resize by 10%, smartsize. Copy and paste onto your canvas. Give the bell a drop shadow of H and V 0, Opacity 50, Blur 5.00, Color Black. Duplicate the bell. Position to your liking or see my tag for reference.
Open up a flower of choice. (I used flower 4) Resize by 15%, smartsize. Copy and paste onto your canvas. Give the flower a drop shadow of H and V 0, Opacity 50, Blur 5.00, Color Black. Duplicate the flower. Go to image > mirror. Then, image > flip. Position them to your liking or see my tag for reference.
Open up another flower. (I used flower 5) Resize by 20%, smartsize. Copy and paste onto your canvas. Apply Noise:
Random
Monochrome
10
Give the flower a drop shadow of H and V 0, Opacity 50, Blur 5.00, Color Black. Duplicate the flower. Go to image > mirror. Then, image > flip. Position the flowers in the left bottom corner and the right upper corner of the rounded rectangle.
Open up a bling of choice (I used bling 11) Resize by 15%, smartsize. Copy and paste onto your canvas. Give it a drop shadow of H and V 0, Opacity 40, Blur 4.00, Color Black. Duplicate the bling. Position them in the left upper corner and the right bottom corner of the rounded rectangle.
Highlight your white background. Add a new raster layer. Change your background color to #e8e8e8. Floodfill your new layer with this color. Apply sg_lace-with-love mask with the following settings:
Source Luminance
Fit to Canvas
Hide all mask.
Delete the mask from your layer palette. Answer yes to the pop up box and merge the group. Resize the mask by 90%, smartsize (all layers unchecked!!) Apply Eyecandy Snow Drift, same settings as before. Apply AAA Textures, same settings. Give the mask a drop shadow of H 1, V 0, Opacity 45, Blur 2.00, Color Black. Give the mask another drop shadow of H 0, V -1, Opacity 20, Blur 2.00, Color Black.
Highlight your white background. Open up a christmas swirl of choice. (I used swirl 1) Resize by 85%, smartsize. Copy and paste onto your canvas. Give the swirl a drop shadow of H 2, V 0, Opacity 60, Blur 3.00, Color Black. Duplicate the swirl. Go to image > mirror. Then, image > flip. Position the swirls to your liking or see my tag for reference.
Open up your tube. Resize as necessary, bicubic. Highlight the your smaller bracket layer. Select, float and defloat. Copy your tube and paste onto your canvas. Position your tube to your liking within the bracket. Selections > invert. Hit delete. Deselect, give your tube a drop shadow of H and V 0, Opacity 60, Blur 10.00, Color Black. Merge your tube and smaller bracket layer together. Hide your merged tube and bracket layer. Merge all visible layers.
Crop and resize to your liking.
Add your copyright info, watermark and your text. If you are not animating, save JPG or PNG.
If you are animating, copy the merged layer with your white background. Paste as a new animation in AS. Duplicate until you have a total of 10 frames. Select all frames (CTRL+A)
Open up the falling snow mng file. Select all frames (CTRL+A) Copy. Highlight your tag animation. Go to edit > paste into selected frame. Left click your mouse to position.
Back in Paint Shop Pro. Highlight your tube and smaller bracket layer. Copy. Paste as a new animation in AS. Duplicate until you have a total of 10 frames. Select all frames (CTRL+A) Highlight the snow tag animation. Go to edit > paste into selected frame. Position carefully and click your left mouse button.
Optimize and save as gif.
I hope you enjoyed this tutorial! If you have any questions, just give me a shout! :-)
Subscribe to:
Post Comments (Atom)
0 comments:
Post a Comment