Monday, May 2, 2011
 Wickedly Sexy
This tutorial was written by me on 27 January 2011. Any similarities to other tutorials is purely coincidental.
Supplies Needed:
Tube and close up of choice. I am using the sexy artwork of Ismael Rac. If you would like to use his artwork, you must purchase the appropriate license at his store here.
Supplies Needed:
Tube and close up of choice. I am using the sexy artwork of Ismael Rac. If you would like to use his artwork, you must purchase the appropriate license at his store here.
Scrap kit. I used Wicked Intentionz designed by me. If you would like to purchase this kit, you can here, here, here, here or here.
Template 197 made by me. You can download it here.
Font of choice. I used Copperplate Gothic Light. (pay font)
Plugins:
Eyecandy 4000 - Gradient Glow
Toadies - 3D Checkers (freeware)
Visman Manipulation Extravaganza - Transmission (freeware)
Xero Filters - Fritillary, Bad Dream XL, Greyscaler (freeware)
No other supplies needed
~*~*~*~*~*~*~*~*~*~*~*~*~*~*~*~*~*~*~*~*~*~*~*~*~*~*~*~*~*~*~*~*~*~*~*~*~*~*~*~*~*~*~*~*~*~*~*~*~*~*~*~*~*~*~*~*~*~*~*~*~*~*~*~*~*~*~*~*~*~*~*~*~*~*~*
OK! Let's get started. Open up my template. Duplicate by holding down shift + d. Delete the credit info layer. Highlight the thin rectangles layer. Go to selections > select all. Selections > float. Selections > defloat. Open up a paper from the kit. (I used paper 17) Resize by 90%, bicubic. Copy and paste as a new layer onto your canvas. Go to selections > invert. Hit delete on your keyboard. Deselect. Apply Eyecandy 4000 - Gradient Glow, color white, with the following settings:

Repeat the white gradient glow one more time. Apply Gradient Glow again, same settings, but change the color to black. Give the layer a drop shadow of H and V 0, Opacity 45, Blur 7.00. Delete the black thin rectangles template layer.
Highlight the Sexy Word Art layer. Apply Gradient Glow, color white, same settings as above. Repeat the Gradient Glow one more time.
Highlight the Diamond Line 1 layer. Select, float and defloat. Add a new raster layer to your working image. Go to your materials palette and change your foreground to #B01818 and your background color to #000000. Click on your foreground color and choose the gradient tab. Make a gradient, Style Linear, Angle 90, Repeats 12, Invert box UNCHECKED. Floodfill your new raster layer with your gradient. Deselect. Give the layer a drop shadow of H and V -1, Opacity 65, Blur 2.00. Delete the black diamond 1 template layer.
Highlight the Diamond Line 2 layer. Select, float and defloat. Add a new raster layer to your working image. Click on the gradient. Check the invert box. Floodfill your new layer with the gradient. Deselect. Give the layer a drop shadow of H and V 1, Opacity 65, Blur 2.00. Delete the black diamond line 2 layer.
Highlight the Large Circle 1 layer. Select, float and defloat. Add a new raster layer to your working image. Change your foreground color to #555555, and your background color to #000000. Click on your gradient tan, and make a gradient - Style - Rectangular, Repeats 0, Horizontal 28, Vertical 61:
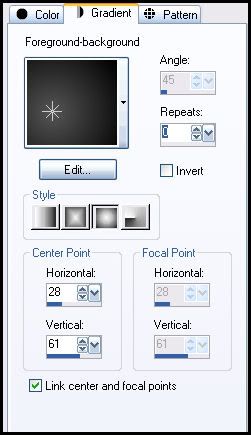
Floodfill your new layer with your gradient. Deselect. Apply Xero Filters - Fritillary with the following settings:
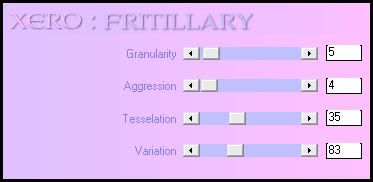
Apply Gradient Glow (same settings) color white, 2 times. Apply Gradient Glow (same settings) color #821711 2 times. Give the layer a drop shadow of H -4, V 3, Opacity 50, Blur 10.00. Duplicate the fritillary circle. Go to image > mirror. Then, image > flip. Delete both large circle 1 and 2 template layers.
Highlight the Oval layer. Select, float and defloat. Open up a paper from the kit. (I used paper 1) Resize by 80%, bicubic. Copy and paste as a new layer onto your canvas. Selections > invert. Hit delete on your keyboard. Deselect. Apply Gradient Glow, same settings, color white, 2 times. Now apply Gradient Glow, same settings, color black, one time. Give the layer a drop shadow of H and V 0, Opcity 45, Blur 15.00. Delete the black oval template layer.
Highlight frame fill 1 layer. Select, float and defloat. Apply Toadies 3D Checkers with the following settings:
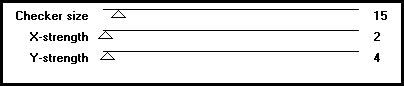
Don't deselect yet!
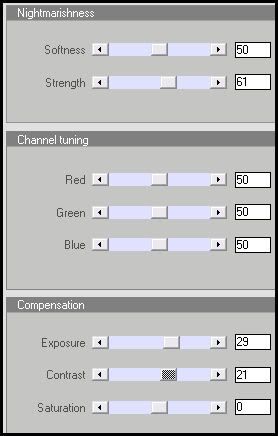
Open up your image of close up of choice. Resize as necessary bicubic. Copy and paste as a new layer onto your canvas. Position it to your liking within the selection. Selections > invert. Hit delete on your keyboard. Deselect. Apply Xero Bad Dream XL to your image/close up, 2 times, with the following settings:
Open up your image of close up of choice. Resize as necessary bicubic. Copy and paste as a new layer onto your canvas. Position it to your liking within the selection. Selections > invert. Hit delete on your keyboard. Deselect. Apply Xero Bad Dream XL to your image/close up, 2 times, with the following settings:
Give your tube a drop shadow of H and V 0, Opacity 45, Blur 5.00. Change the blend mode of your image/close up to Luminance.
Highlight frame fill 2 layer. Select, float and defloat. Apply Toadies 3D Checkers, same settings as before. Open up the image/close up you just used. Mirror it. Copy and paste as a new layer onto your canvas. Position it to your liking within the selection. Hit delete on your keyboard. Deselect. Apply Xero Bad Dream, same settings as before 2 times. Give the image/close up a drop shadow of H and V 0, Opacity 45, Blur 5.00. Change the blend mode to Luminance.
Highlight the frame 1 layer. Apply Gradient Glow, same settings as before, color black, 2 times. Now apply Gradient Glow, same settings, color 821711, only once. Give the frame a drop shadow of H and V 0, Opacity 45, Blur 6.00.
Highlight the frame 2 layer and repeat all of the above steps.
Highlight the rectangle layer. Select, float and defloat. Open up a paper from the kit. (I used paper 12) Resize by 65%, bicubic. Copy and paste as a new layer onto your canvas. Selections > invert. Hit delete on your keyboard. Don't deselect yet!
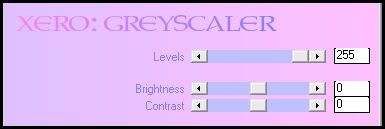
Open up your tube/close up. Resize as necessary, bicubic. Copy and paste as a new layer onto your canvas. Position to your liking within the selection. Hit delete on your keyboard. Deselect. Apply Xero Filters Greyscaler with the following settings:
Highlight the frame 1 layer. Apply Gradient Glow, same settings as before, color black, 2 times. Now apply Gradient Glow, same settings, color 821711, only once. Give the frame a drop shadow of H and V 0, Opacity 45, Blur 6.00.
Highlight the frame 2 layer and repeat all of the above steps.
Highlight the rectangle layer. Select, float and defloat. Open up a paper from the kit. (I used paper 12) Resize by 65%, bicubic. Copy and paste as a new layer onto your canvas. Selections > invert. Hit delete on your keyboard. Don't deselect yet!
Open up your tube/close up. Resize as necessary, bicubic. Copy and paste as a new layer onto your canvas. Position to your liking within the selection. Hit delete on your keyboard. Deselect. Apply Xero Filters Greyscaler with the following settings:
Apply Xero Bad Dream XL, same settings as before, 2 times. Give the tube a drop shadow of H and V 0, Opacity 45, Blur 5.00.
Highlight the paper rectangle. Apply Gradient Glow, color white, same settings as before, 2 times. Now apply Gradient Glow, same settings, color black 2 times. Give the layer a drop shadow of H and V 0, Opacity 40, Blur 6.00. Delete the rectangle 1 template layer.
Highlight the angled rectangle layer. Select, float and defloat. Open up a paper from the kit. (I used paper 3) Resize by 80%, bicubic. Copy and paste as a new layer onto your canvas. Selections > invert. Hit delete on your keyboard. Deselect. Apply Gradient Glow, same settings, color #821771, 2 times. Give the layer a drop shadow of H and V 0, Opacity 55, Blur 8.00. Delete the angled rectangle template layer.
Highlight the rectangle 2 layer. Select, float and defloat. Open up the same paper you used for the rectangle 1 layer. Resize, 65%, bicubic. Copy and paste as a new layer onto your canvas. Selections > invert. Hit delete on your keyboard. Deselect. Apply Gradient Glow, color white, 2 times. Apply Gradient Glow, color black, 2 times. Give the layer a drop shadow of H and V 0, Opacity 40, Blur 6.00. Duplicate your rectangle 1 tube layer. Go to image > mirror. Drag your duplicated mirrored tube above your paper rectangle 2 layer. Delete the rectangle 2 template layer.
Highlight your small circle 1 layer. Select, float and defloat. Add a new raster layer to your working image. Go to your materials palette. Change your foreground color to #B11A17 and your background color to #000000. Click on the gradient tab and make a gradient - Style Sunburst, Repeats 0, H and V 50:
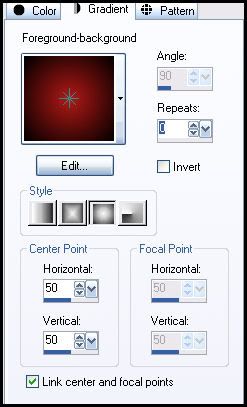
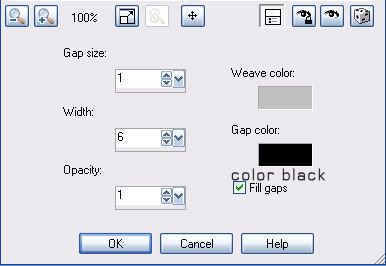
Floodfill your new layer with your gradient. Deselect. Go to effects > texture effects > weave. Apply with the following settings:
Now apply gradient glow, same settings, color black, only one time! Give the layer a drop shadow of H and V 0, Opacity 40, Blur 6.00. Duplicate the gradient circle layer. Go to image > mirror. Delete both the small circle 1 and 2 template layers.
Highlight the circle frame fill layer. Select, float and defloat. Add a new raster layer to your working image. Go to your materials palette. Change your foreground layer to #404040 and your background layer to #000000. Click on the gradient tab and make a gradient, Style - Linear, Angle 45, Repeats 1, Invert checked. Floodfill your new layer with the gradient. Don't deselect yet.
Open up your tube. Resize, if necessary, bicubic. Copy and paste as a new layer onto your canvas. Position to your liking within the selection. Selections > invert. Hit delete on your keyboard. Deselect.
Apply Xero Bad Dream XL, same settings as before, 2 times to your tube. Apply Xero - Greyscaler, same settings as before. Lower the opacity to about 36.
Highlight your circle frame layer. Apply Gradient Glow, same settings, color black, 2 times. Now apply Gradient Glow, color #821711, only once. Give the circle frame a drop shadow of h and V 0, Opacity 40, Blur 6.00.
Delete the circle frame fill template layer.
Open up a staple from the kit. Resize by 55%, smartsize. Copy and paste as a new layer onto your canvas. Position to your liking at the top of the angled rectangle. Give it a drop shadow of H and V -2, Opacity 35, Blur 3.00.
Open up a chicken wire from the kit. Resize by 45%, smartsize. Copy and paste as a new layer onto your canvas. Position it above your left rectangle tube, so the ends match up with the top and left side of the rectangle. Give it a drop shadow of H and V -2, Opacity 50, Blur 4.00. Duplicate the chicken wire. Go to image > mirror. Duplicate the mirrored chicken wire. Go to image > flip. Duplicate the flipped chicken wire. Go to image > mirror.
Open up a winged element from the kit. Resize by 30%, smartsize. Copy and paste as a new layer onto your canvas. Mirror it. Position it on the upper right fritillary circle. Give it a drop shadow of H -3, V -2, Opacity 35, Blur 4.00. Duplicate the winged element. Go to image > mirror. Then, image > flip.
Highlight your bottom rectangle frame layer. Open up a bottle cap from the kit. Resize by 50%, bicubic. Copy and paste as a new layer onto your canvas. Position it at the bottom right corner of the frame. Give it a drop shadow of H and V 0, Opacity 40, Blur 6.00.
Open up the Star Mesh Accent from the kit. Resize by 20%, smartsize. Copy and paste as a new layer onto your canvas. Position it next to the bottle cap. Give it a drop shadow of H and V 2, Opacity 35, Blur 3.00. Drag the star layer below your bottle cap layer.
Highlight your top rectangle frame layer. Open up a metal button fromt he kit. Resize by 35%, smartsize. Copy and paste as a new layer onto your canvas. Position it at the upper left corner of the frame. Give it a drop shadow of H and V 0, Opacity 40, Blur 6.00.
Open up the heart mesh accent from the kit. Resize by 30%, smartsize. Copy and paste as a new layer onto your canvas. Position next to the metal button. Give it a drop shadow of H and V -2, Opacity 35, Blur 3.00.
Add any other embellishments of your choosing.
Hide your white background layer. Copy merged your visible layers. Paste as a new layer onto your canvas. Drag your copy merged layer to right above your white background layer. Go to adjust > blur > gaussian blur. Apply with a radius of 10. Apply VM Extravaganza Transmission with the following settings:
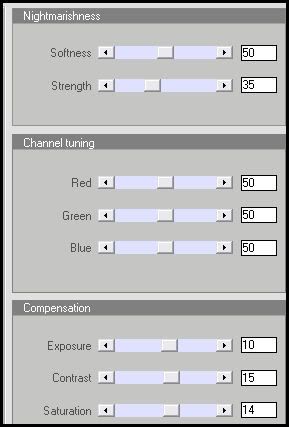
Highlight your top layer. Open up your main tube. Resize, as necessary, bicubic. Copy and paste as a new layer onto your canvas. Apply Xero Bad Dream XL with the following settings:
Give the tube a drop shadow of H and V 0, Opacity 65, Blur 20.00. Position the tube to your liking.
Add your copyright info, watermark and text.
Highlight the wicked word art layer. Drag it below your circle frame layer. Select, float and defloat. Add a new raster layer to your working image. Go to your materials palette and change your foreground color to #821711 and your background color to #DD1C1D. Make a gradient - Style Linear, Angle 45, Repeats 1. Floodfill your new layer with the gradient. Deselect.
If you are not animating, save as JPG or PNG.
If you are animating, Copy merged your tag. Open up Animation Shop. Paste as a new animation in AS. Back to Paint Shop Pro.
Delete the red gradient wicked word art layer. Select the white wicked word art layer. Select, float and defloat. Add a new raster layer to your working image. Go to your materials palette, and click on the gradient you just made. Change the Repeats value from 1 to 3. Floodfill your new raster layer with the gradient. Deselect. Copy merged. Paste after frame 1 in AS.
Back to PSP. Delete the red gradient wicked word art layer. Select the white wicked word art layer. Select, float and defloat. Add a new raster layer. Go to your materials palette, and click on the gradient. Change the Repeats value from 3 to 5. Floodfill your new layer with the gradient. Deselect. Copy merged. Paste after frame 2 in AS.
Back to PSP. Delete the red gradient wicked word art layer. Select the white wicked word art layer. Select, float and defloat. Add a new raster layer to your working image. Click on the gradient in your materials palette. Change the Repeats value from 5 to 7. Floodfill your new layer with your gradient. Deselect. Copy merged. Paste after frame 3 in AS.
In Animation Shop, select all frames (CTRL + A). Change the frame properties to 15.
Optimize and save as gif.
I hope you enjoyed this tutorial. If you have any questions, just give me a shout.
Subscribe to:
Post Comments (Atom)
0 comments:
Post a Comment