Monday, May 2, 2011
 Irish Pride

This tutorial was written by me on 10 March 2011. Any similarities to other tutorials is purely coincidental.
Supplies Needed:
Tube and close up of choice. I am using the awesome artwork of Keith Garvey. I purchased this tube through MPT, but you can now find his artwork at PSP Tubes Emporium.
Scrap kit of choice. I am using Eriu made by me. You can purchase it here, here, here, here , here or here.
Mask019 by Becky (included in supplies)
Mask 363 by Vix. (included in supplies)
Lady Frame 3 by urban fairytales. You can download it from her site here. You get a few frames in the download, and it's labeled Lady Frames.
Royalty free photo of sky. I got mine at SXC.
Font of choice. I used Celtic
Plugins Needed:
Xero Filters - Bad Dream XL (freeware)
Richard Rosenman Filters - Pixelate and Smart De-Interlacer (freeware)
Mura Meister Copies - Encircle (freeware)
FM Tile Tools - Blend Emboss
Alien Skin - Xenofex 2 - Rip Open and Crumple
Supplies HERE
****************************************************************************
OK! Let's get started! Open up a new transparent image 800 x 800 pixels. Floodfill with white.
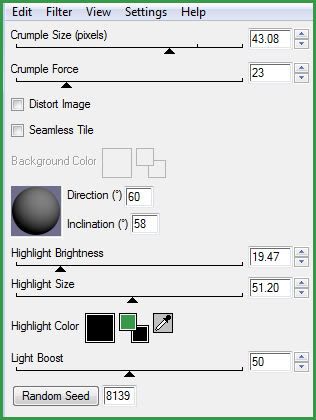
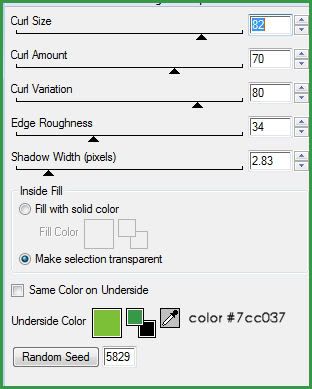
Set your foreground color to white, and your background color to null. Grab your Ellipse tool, mode circle, Line style Solid, Width set to 8.00. Hide your white background, so you can see what you are doing. Draw out a medium to largish circle. (If it's too big, you can always resize it later) Go to Objects > Align > Center in Canvas. Highlight the circle layer on your layer palette and convert to a raster layer. Apply Alien Skin - Xenofex 2 - Crumple with the following settings:
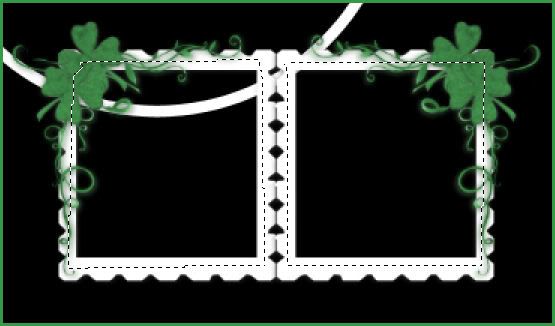
Open up Urban Fairytale's Lady Frame 3. Copy and paste as a new layer onto your canvas. Duplicate the frame. Go to image > mirror. Position the Lady Frames underneath and slightly to the right of the circle frame like this:
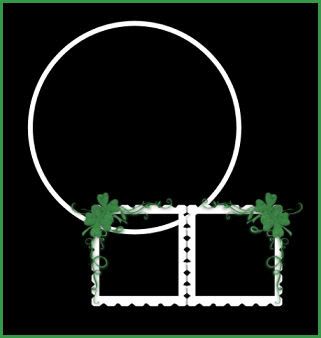
I put the black background so it would be easier for you to see. . . so no you don't need a black background of any kind. lol Hide your white background layer and your circle frame layer and merge the 2 Lady Frame layers together.
Highlight your circle frame. Grab your magic wand tool, feather set to 0. Click the empty space inside the circle so that there are marching ants all round it. Go to selections > modify > expand by 3.00. Open up a paper from the kit. (I used paper 25) Resize by 65%, bicubic. Copy the paper and paste as a new layer onto your canvas. Go to selections > invert. Hit delete on your keyboard. Don't deselect yet.
Open up another paper from the kit. (I used paper 31) Resize by 65%, bicubic. Copy and paste as a new layer onto your canvas. Position the paper so that it covers a little more than the top half of the first paper like this:
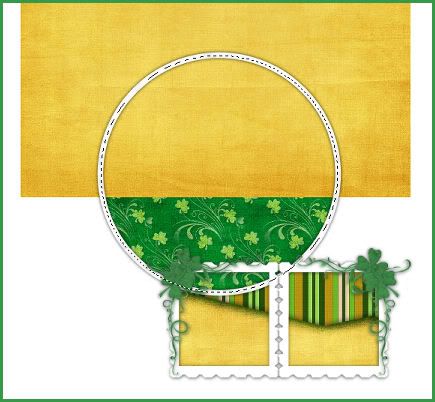
Hit delete on your keyboard. Don't deselect yet!
Open up your close up. Resize as necessary, bicubic. Remember to leave it large enough so that it will also fit into the Lady Frames. (see my tag for reference) Copy and paste as a new layer onto your canvas. Position it to your liking within the selection. Duplicate your close up layer. Hide your top close up layer and highlight your bottom one. Hit delete on your keyboard. Now you can deselect. (CTRL+D) Hide the bottom close up layer for now. We will get back to them shortly.
Highlight the "half" paper layer. Grab your freehand selection tool, Selection type - point to point, feather set at about 30. Select around the bottom edge of the half paper like this:
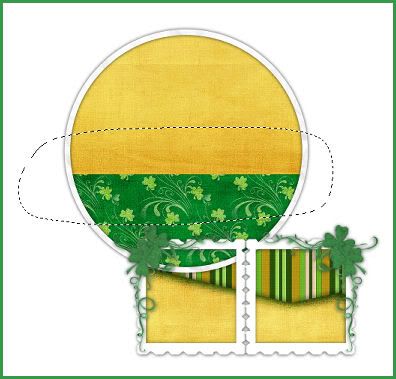
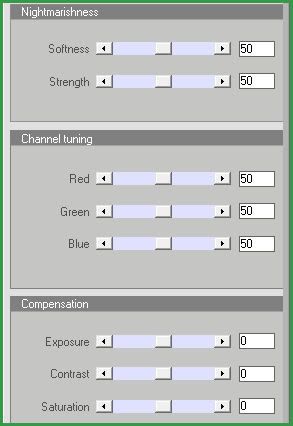
Apply Xenofex 2 - Rip Open with the following settings:
Deselect. Delete any stray curls using your eraser tool. Give the ripped paper a drop shadow of H 0, V 7, Opacity 65, Blur 15.
Repeat Bad Dream XL one more time. Now go to adjust > sharpness > unsharp mask. Apply with a radius of , strength 15, clipping 2. Give your close up a drop shadow of H and V 0, Opacity 65, Blur 15.00. Highlight your bottom paper layer (the full paper) and go to selections > select all > selections > float. Go to selections > invert. Highlight the ripped open paper layer and hit delete on your keyboard. Now highlight your close up layer and hit delete. This will delete any of the drop shadow that is hanging out of your frame. Drag your circle frame layer to the top of your layer palette and give it a drop shadow of H and V 0, Opacity 70, Blur 7.00.
Highlight your merged lady frames layer. Drag it to the top of your layer palette. Grab your freehand selection tool, selection type point to point, feather set at 0. Select around your lady frames like this:
Open up a paper from the kit (I used paper 6) Resize by 60%, bicubic. Copy and paste as a new layer onto your canvas. Position the paper to your liking within the selection. Go to selections > invert. Hit delete on your keyboard. Don't deselect yet! Unhide your hidden close up layer. Hit delete on your keyboard. Deselect. Drag your close up layer above your lady frames paper layer, and your lady frames layer above the close up layer. Highlight your lady frames close up layer and apply Xero Bad Dream XL, same settings as before. Repeat Bad Dream one more time. Apply unsharp mask, same settings as before. Give the close up a drop shadow of H and V 0, Opacity 65, Blur 15.00. Highlight the lady frames paper layer. Select, float and defloat. Selections > invert. Highlight your lady frames close up layer. Hit delete on your keyboard. (This is to delete any overhang from the close up's drop shadow) Highlight your merged lady frames layer and give it a drop shadow of H and V 0, Opacity 40, Blur 7.00.
Hide your white background layer, your circle frame layer, and your lady frames layer. Copy merged. Paste as a new layer onto your canvas. Drag your copy merged layer to the top of your layer palette. Go to adjust > blur > gaussian blur. Apply with a radius of 5.00. Apply Richard Rosenman - Pixelate with the following settings:
Drag the blurred pixelated layer beneath your circle frame layer. Lower the opacity to about 70, and change the blend mode to Burn. Duplicate. Hide your bottom Burn layer. Highlight your lady frames paper layer. Select, float and defloat. Selections > invert. Highlight your top Burn layer and hit delete on your keyboard. Deselect. Highlight your bottom circle frame layer (the full one) and select, float, and defloat. Selections > invert. Unhide and highlight your bottom Burn layer. Hit delete on your keyboard. Deselect.
Open up the grassy knoll from the kit. Resize by 45%, bicubic. Copy and paste as a new layer onto your canvas. Apply Bad Dream XL to the grass. Give it a drop shadow of H 0, V 4, Opacity 35, Blur 7.00. Duplicate the grassy knoll. Go to image > mirror. Position the grass below the lady frames, side by side. (see my tag for reference) Drag both grass layers to right above your white background layer.
Highlight your top layer. Open up a shamrock bouquet of choice from the scrap kit. Resize by 25%, smartsize. Apply unsharp mask, same settings as before. Copy and paste as a new layer onto your canvas. Position in the center of the merged Lady Frames. Give it a drop shadow of H 2, V 0, Opacity 50, Blur 4.00.
Open up a pile of coins from the kit. Resize by 15%, smartsize. Go to adjust > sharpen. Copy and paste as a new layer onto your canvas. Position in front of the shamrock bouquet. Give it a drop shadow of H 0, V 3, Opacity 50, Blur 7.00.
Open up a shamrock necklace from the kit. Resize by 20%, smartsize. Apply unsharp mask, same settings as before. Copy and paste as a new layer onto your canvas. Position to your liking on the Lady Frames. Give it a drop shadow of H 1, V 0, Opacity 35, Blur 3.00.
Open up a shamrock party favor of choice from the kit. Resize by 20%, smartsize. Apply unsharp mask, same settings. Copy and paste as a new layer onto your canvas. Position to your liking on the lady frames. Give it a drop shadow of H -1, V 0, Opacity 35, Blur 3.oo.
Open up a Beer Mug of choice from the kit. Resize by 15%, smartsize. Apply unsharp mask. Copy and paste as a new layer onto your canvas. Position it at the bottom right corner of the Lady Frames. Give it a drop shadow of H 3, V 2, Opacity 35, Blur 7.00.
Open up the whiskey from the kit. Resize by 20%, smartsize. Apply unsharp mask. Copy and paste as a new layer onto your canvas. Go to image > mirror. Position it at the bottom left corner of the Lady Frames. Give it a drop shadow of H -3, V 2, Opacity 35, Blur 7.00.
Open up a horseshoe from the kit. Resize by 10%, smartsize. Apply unsharp mask. Copy and paste as a new layer onto your canvas. Position it next to the whiskey. Give it a drop shadow of H and V 0, Opacity 30, Blur 6.00.
Open up a fantasy bouquet from the kit. Resize by 15%, smartsize. Apply unsharp mask. Copy and paste as a new layer onto your canvas. Position it to your liking on the grass, Give it a drop shadow of H 3, V 0, Opacity 40, Blur 5.00. Grab your eraser tool, size set at 35, Opacity set to 25. Fade out the bottom of the flower bouquet so it looks as if it is growing out of the grass.
Open up the mushrooms from the kit. Resize by 13%, smartsize. Apply unsharp mask. Copy and paste as a new layer onto your canvas. Position it to your liking on the grass. Give it a drop shadow of H -3, V 0, Opacity 40, Blur 7.00. Grab your eraser tool, same settings as before and fade out the bottom of the mushrooms slightly.
Open up the bird from the kit. Resize by 15% smartsize. Apply unsharp mask. Copy and paste as a new layer onto your canvas. Position to your liking on the grass. Give it a drop shadow of H and V 0, Opacity 35, Blur 7.00.
Open up a ribbon bow from the kit. Resize by 25%, smartsize. Apply unsharp mask. Copy and paste as a new layer onto your canvas. Position it to your liking on the circle frame. Give it a drop shadow of H 0, V 2, Opacity 40, Blur 5.00.
Open up the button from the kit. Reszie by 25%, smartsize. Copy and paste as a new layer onto your canvas. Position it to your liking on the circle frame. Give it a drop shadow of H 0, V -2, Opacity 40, Blur 5.00.
Highlight your white background layer. Open up shamrock doodle 1 from the kit. Resize by 50%, smartsize. Copy and paste as a new layer onto your canvas. Go to image > free rotate. Rotate right by 45.00 degrees, both boxes unchecked!!
Apply Mura Meister Copies with the following settings:
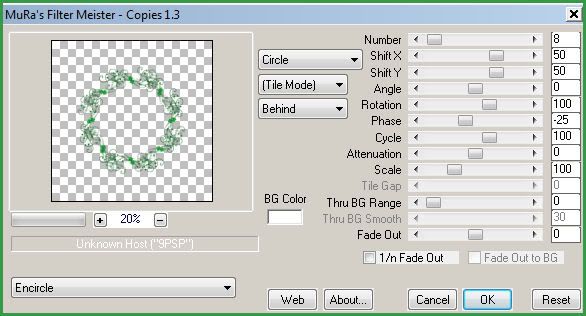
Resize the encircled shamrock doodle by 70%, bicubic. Give it a drop shadow of H 2, Opacity 50, Blur 5.00. Center it behind your circle frame.
Highlight your white background layer. Open up sky photo of choice. Resize as necessary. Copy and paste as a new layer onto your canvas. Apply Beck Mask 19 with the following settings:
Source Luminance
Fit to Canvas
Hide all mask
Delete the mask from your layer palette, answer yes to the pop up box and merge the group. Resize the sky background layer by 95%, bicubic. Apply FM Tile Tools twice to the sky background with the following settings:

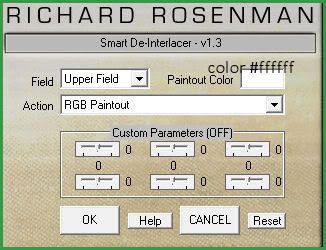
Highlight your white background layer. Open up a paper from the kit. Copy and paste as a new layer onto your canvas. Apply Becky Mask 19 same settings as before. Resize the paper mask layer by 95%, bicubic. Apply Richard Rosenman Smart De- Interlacer with the following settings:
Highlight your sky background mask layer. Open up a paper from the kit, Copy and paste as a new layer onto your canvas. Apply Vix Mask 363. Use the same settings you used for the Becky Mask. Resize the VIx Mask layer by 95%, bicubic. Center it behind your tag layer and give it a drop shadow of H 2, V 0, Opacity 30, Blur 3.00.
Add any other embellishments of your choosing.
Open up your tube. Resize as necessary, bicubic. Copy and paste as a new layer onto your canvas. Apply Xero Bad Dream XL, same settings as before (only one time) Apply unsharp mask, same settings as before. Give your tube a drop shadow of H and V 0, Opacity 65, Blur 15.00. Position your tube to your liking.
Crop and resize to your liking. Add your copyright info, watermark and your text.
I hope you enjoyed this tutorial! If you have questions or concerns, don't hesitate to email me.
Subscribe to:
Post Comments (Atom)
0 comments:
Post a Comment