Tuesday, May 3, 2011
 Wedding Gaze
This tutorial was written by me on 10 April 2009. Any similarities to other tutorials is purely coincidental.
Supplies Needed:
Tube of choice. I am using the gorgeous artwork of Jennifer Janesko. I bought this art when CILM was still open. You can now find her art at CDO.
From this Moment scrapkit by Just a Girl's Designs. If you would like to purchase this exquisite kit, you can here. Thank you, Tamara!!
Template 147 made by me which you can get here.
VixMask 287 which you can download from her site HERE.
Font of choice. I used Champignon which you can download here.
Plugins:
Xero Filters - Porcelain
Xenofex 2 - Constellation
Animation Shop (opt)
*~*~*~*~*~*~*~*~*~*~*~*~*~*~*~*~*~*~*~*~*~*~*~*~*~*~*~*~*~*~*~*~*~*~*~*~*~*~*~*~*~*~*~*~*~*~*
Ok! Let's get started! Open up my template. Duplicate by holding down shift + d. Close the original. Delete the credit info layer.
Highlight the doodle leaves layer. Go to selections > select all. Selections > float. Selections > defloat. Open up a paper from the kit. Resize by 75%, smartsize. Copy and paste as a new layer onto your cavnas. Go to selections > invert. Hit delete on your keyboard. Deselect (CTRL+D). Go to adjust > add/remove noise > add noise. Apply with Random and Monochrome checked, Value set at 20. Give the layer a drop shadow of H 2. V 0, Opacity 55, Blur 2.00. Delete the gray doodles leaves layer.
Highlight the frame fill layer. Select, float and defloat. Open up a paper from the kit. Resize by 50%, smartsize. Copy and paste as a new layer onto your canvas. Go to selections > invert. Hit delete. Don't deselect yet!
Open your tube. Resize as necessary, bicubic, to fit in the selection. Copy and paste as a new layer onto your canvas. Position to your liking. Hit delete. Deselect. Give your tube a drop shadow of H and V 0, Opacity 65, Blur 12.00. Delete the gray frame fill layer.
Highlight the frame layer. Select, float and defloat. Open up a paper from the kit. Resize by 50%, smartsize. Copy and paste onto your canvas. Selections > invert. Hit delete and deselect. Apply an inner bevel with the following settings:
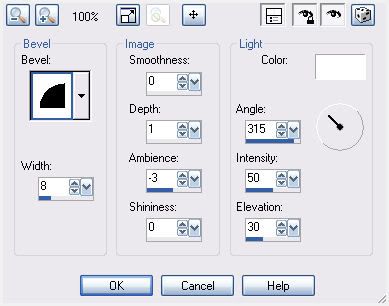
Give the layer a drop shadow of H 2, V -1, Opacity 65, Blur 3.00. Delete the gray frame layer.
Highlight the left fill layer. Select, float and defloat. Open up a paper from the kit. Resize by 40%, smartsize. Copy and paste as a new layer onto your canvas. Position within the selection. Selections > invert. Hit delete. Don't deselect.
Open up your tube. Resize (bicubic) so that the eyes of your tube fit within within the selection. Copy and paste onto your canvas. Position to your liking within the selection. Hit delete and deselect. Apply Porcelain to your tube with the following settings:
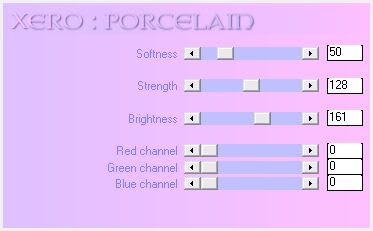
Change the blend mode of your tube to Multiply. Delete the gray left fill layer.
Highlight your left deco layer. Select, float and defloat. Open up a paper from the kit. Resize by 40%, smartsize. Copy and paste onto your canvas. Position within the selection. Selections > invert. Hit delete and deselect. Apply noise, Random and Monochrome, Value set at 10. Give it a drop shadow of H and V 0, Opacity 65, Blur 3.00. Delete the white left deco layer.
Highlight the left frame layer. Select, float and defloat. Open up a paper from the kit. Resize by 40%, smartsize. Copy and paste onto your canvas. Position to your liking within the selection. Selections > invert. Hit delete and deselect. Apply an inner bevel, same settings as before. Give it a drop shadow of H and V 0, Opacity 60, Blur 4.00. Delete the gray left frame layer.
Repeat all of the above steps with the right fill, right deco, and right frame layers. Duplicate your left tube layer. Mirror it. Position it on top of the right paper, so that it fits within the frame.
Highlight your leaves doodle layer. Open up the gazebo from the kit. Resize by 80%, smartsize. Copy and paste onto your canvas. Apply Porcelain to the gazebo, same settings as before. Give it a drop shadow of H and V 0, Opacity 70, Blur 10.00. Position it behind the frame, so that the top of it is peaking out from above. (see my tag for reference)
Open up the bouquet from the kit. Resize by 25% smartsize. Copy and paste onto your canvas. Go to image > free rotate. Rotate left by 65.00, both boxes unchecked. Give it a drop shadow of H 2, V -2, Opacity 45, Blur 2.00. Duplicate. Go to image > mirror. Position the bouquets as in my tag above.
Open up the doodle from the kit. Copy and paste onto your canvas. Select, float and defloat. Open up a paper from the kit. Resize by 70%, smartsize. Copy and paste onto your canvas. Selections > invert. Hit delete and deselect. Give the paper doodle a drop shadow of H -2, V 0, Opacity 55, Blur 2.00. Duplicate the paper doodle. Go to image > mirror. Position as in my tag above. Delete the original doodle layer.
Highlight your top layer. Open up the parasol from the kit. Resize by 25%, smartsize. Copy and paste onto your canvas. Give it a drop shadow of H 2, V 0, opacity 65, Blur 2.00. Duplicate. Go to image > mirror. Position as in my tag above.
Open up the lace rosebud from the kit. Resize by 15%, smartsize. Copy and paste onto your canvas. Give it a drop shadow of H 2, V 0, Opacity 65, Blur 3.00. Duplicate. Go to image > mirror. Position them as the base of the parasols.
Open up a flower from the kit. Resize by 15%, smartsize. Copy and paste onto your canvas. Give it a drop shadow of H2, V -1, Opacity 55, Blur 3.00. Duplicate. Go to image > mirror. Position them in between the two smaller frames.
Open up another flower from the kit. Resize by 20%, smartsize. Copy and paste onto your canvas. Give it a drop shadow of H and V 0, Opacity 60, Blur 4.00. Position in the middle of the other two flowers.
Open up the wedding bands from the kit. Resize by 25%, smartsize. Copy and paste onto your canvas. Give it a drops hadow of H and V 0, Opacity 60, Blur 3.00. Position on top of the middle flower.
Open up a chamagne glass of choice. Resize by 25%, smartsize. Copy and paste onto your canvas. Give it a drop shadow of H 1, V 0, Opacity 20, Blur 2.00. Duplicate. Go to image > mirror. Position them next to the outer flowers.
Open up the butterfly from the kit. Resize by 45%, smartsize. Copy and paste onto your canvas. Give it a drop shadow of H and V 0, Opacity 50, Blur 4.00. Position to your liking on the frame.
Open up a bow from the kit. Resize by 15%, smartsize. Copy and paste onto your canvas. Give it a drop shadow of H and V 0, Opacity 50, Blur 4.00. Position to your liking on the frame.
Add any other embellishments of your choosing.
Highlight your white background. Open up a paper from the kit. Copy and paste onto your canvas. Apply Vix Mask with the following settings:
Source Luminance
Fit to Canvas
Hide all Mask
Delete the mask, answer yes and merge the group. Resize the mask by 90%, smartsize. Go to adjust > blur > gaussian blur. Apply with a radius of 5.00. Apply noise, random and monochrome, value set at 10. Give the layer a drop shadow of H and V 0, Opacity 10, Blur 5.00.
Open up another paper from the kit. Copy and paste onto your canvas. Apply the mask again, same settings. Resize by 90%, smartsize.
Crop and resize to your liking.
Add your copyright info, watermark and your text. If you are not animating, save as JPG or PNG.
If you are animating, highlight your top mask layer. Apply Xenofex 2 Constellation with the following settings:
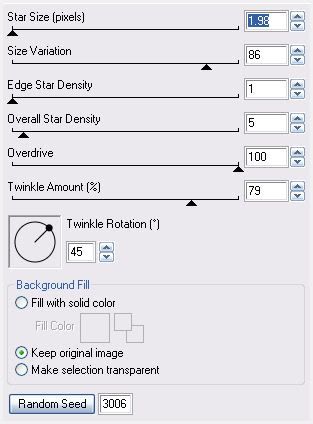
Give the layer a drop shadow of H 2, V 0, Opacity 15, Blur 2.00. Copy merged. Open up Animation Shop. Paste as a new animation in AS.
Back to PSP. Go to edit > undo drop shadow. Edit > undo contellation. Apply constellation again, same settings, but hit the random seed button. Give thel ayer a drop shadow of H 2, V 0, Opacity 15, Blur 2.00. Copy merged. Paste after current frame in AS.
Repeat the above steps 3 more times for a total of 5 frames.
Select all frames (CTRL+A). Change the frame properties to 13.
Optimize and save as gif.
I hope you enjoyed this tutorial! If you have any questions, just give me a shout.
Subscribe to:
Post Comments (Atom)
0 comments:
Post a Comment