Tuesday, May 3, 2011
 Timeless Beauty
This tutorial was written by me on 7 April 2009. Any similarities to other tutorials is purely coincidental.
Supplies Needed:
2 tubes of choice. I am using the stunning artwork of Jennifer Janesko. I bought this art when CILM was still open. You can now get her art at CDO.
Timeless scrapkit by Cinnamon Scraps. If you wish to purchase this exquisite kit, you can here. Thank you, Laura!!
Font of choice. I used P22 Zaner One. (pay font)
Plugins:
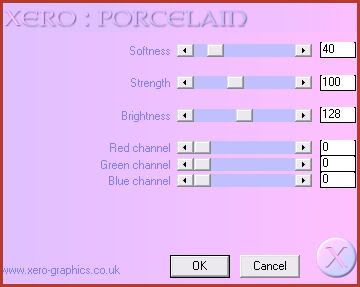
Xero Filters - Porcelain
Two Moon Filters - Cut Glass
Animation Shop (opt)
*~*~*~*~*~*~*~*~*~*~*~*~*~*~*~*~*~*~*~*~*~*~*~*~*~*~*~*~*~*~*~*~*~*~*~*~*~*~*~*~*~*~
Ok! Let's get started! Open up a new transparent image 800 (width) x 600 (height) pixels. Floodfill with white.
Open up frame 6 from te kit. Resize by 80%, smartsize. Copy and paste onto your canvas. Go to selections > select all. Selections > float. Selections > defloat. Open up a paper of choice from the kit. Copy and paste it onto your canvas. Go to selections > invert. Hit delete on your keyboard. Deselect (CTRL+D). Drag the paper layer beneath your frame layer. Highlight the frame layer and change the blend mode to either Luminance or Luminance (Legacy) You decide which you like best. :-)
Hide your white background, and merge the paper and frame layers together. Still on your merged frame layer, grab your magic wand tool, tolerance set at 30, feather set at 0. Click inside the empty space of the frame. Go to selections > modify > expand by 5.00. Open up another paper from the kit. Resize by 70%, smartsize. Copy and paste the paper onto your canvas as a new layer. Go to selections > invert. Hit delete. Don't deselect.
Open up your main tube. Resize as necessary, bicubic. Copy and paste your tube onto your canvas. Position to your liking within the frame. (try to position it more towards the left, so that you leave space for the heart we will add later.) Hit delete and deselect. Give your tube a drop shadow of H 4, V -3, Opacity 70, Blur 8.00. Highlight your frame layer and drag it to the top of your layer palette. Give your frame a drop shadow of H 3, V -2, Opacity 70, Blur 7.00. Give it another drop shadow of H -3, V 0, Opacity 45, Blur 5.00.
Hide your white background, and merge your visible layers.
Open up heart 1 from the kit. Resize by 68%, smartsize. Copy and paste onto your canvas. Position it on the left side of the frame. (see my tag for refarance). Grab your magic wand tool, tolerance set at 75, feather set at 10.00. Click your heart so that there are marching ants all around it.
Open up your second tube of choice. Resize as necessary, bicubic. Copy and paste onto your canvas. Position to your liking within the heart. Go to selections > invert. Hit delete. Deselect. Give your tube a drop shadow of H and V 0, Opacity 60, Blur 6.00. Duplicate your tube layer. Change the blend mode of the bottom tube layer to Soft Light. Highlight your top tube layer and change the blend mode to overlay.
Hide your merged frame layer and your white background and merge your heart and smaller tube layers together.
Open up flower 5 from the kit. Resize by 30%, smartsize. Copy and paste onto your canvas. Give it a drop shadow of H 2, V -1, Opacity 55, Blur 3.00. Duplicate the flower. Flip the duplicated flower. Position them on the right side of the frame, so that they are almost completely on top of each other.
Open up butterfly 1 from the kit. Resize by 30%, smartsize. Copy and paste onto your canvas. Give it a drop shadow of H and V 0, Opacity 60, Blur 4.00. Place on top of the flowers.
Open up string 1 from the kit. Resize by 30%, smartsize. Copy and paste onto your canvas. Give it a drop shadow of H 2, V 0, Opacity 35, Blur 4.00. Position to your liking on the heart.
Open up flower 1 from the kit. Resize by 25%, smartsize. Copy and paste onto your canvas. Give it a drop shadow of H 2, V 1, Opacity 60, Blur 3.00. Position to your liking on the string.
Open up bow 4 from the kit. Resize by 205, smartsize. Copy and paste onto your canvas. Give it a drop shadow of H -2, V , Opacity 55, Blur 3.00. Position to your liking on the heart.
Open up the envelope from the kit. Resize by 25%, smartsize. Copy and paste onto your canvas. Give it a drop shadow of H and V 0, Opacity 60, Blur 7.00. Position the envelope at the bottom of the frame. Center it. Duplicate the envelope. On the bottom envelope layer, go to image > free rotate. Rotate right by 12.00, both boxes unchecked.
Highlight your top layer. Open up string 2 from the kit. Resize by 25%, smartsize. Copy and paste onto your canvas. Give it a drop shadow of H -2, V 0, Opacity 50, Blur 3.00. Position on the left end of the top envelope.
Open up button 2 from the kit. Resize by 10%, smartsize. Copy and paste onto your canvas. Give it a drop shadow of H and V 0, Opacity 50, Blur 4.00. Position to your liking on the string.
Open up heart 2 from the kit. Resize by 25%, smartsize. Copy and paste onto your canvas. Give it a drop shadow of H 2, V 0, Opacity 50, Blur 3.00. Position on the right end of the top envelope.
Open up the note paper from the kit. Resize by 18%, smartsize. Copy and paste onto your canvas. Give it a drop shadow of H and V 0, Opacity 50, Blur 5.00. Position in between the envelopes.
Open up the clock from the kit. Resize by 30%, smartsize. Copy and paste onto your canvas. Give it a drop shadow of H and V 0, Opacity 50, Blur 5.00. Position next to your note paper in between the envelopes.
Open up flower 4 from the kit. Resize by 30%, smartsize. Copy and paste onto your canvas. Give it a drop shadow of H and V 0, Opacity 50, Blur 6.00. Position behind both envelopes, to the right so it peeks out a bit.
Open up the journaling from the kit. Don't resize. Copy and paste onto your canvas. Give it a drop shadow of H and V 0, Oapcity 70, Blur 10.00. Duplicate. Mirror the duplicated journaling layer. Position them side by side, so that they overlap a bit. Drag both journaling layers to right above your white background. (see my tag for reference)
Open up flower 2 from the kit. Don't resize. Copy and paste onto your canvas. Give it a drop shadow of H and V 0, Opacity 65, Blur 8.00. Duplicate the flower. Mirror the duplicated flower. Position them beneath the journaling layers so that they are peeking out a bit. (see my tag for reference)
Open up branches 2 from the kit. Resize by 65%, smartsize. Copy and paste onto your canvas. Go to image > mirror. Give it a drop shadow of H -2, V -1, Opacity 55, Blur 2.00. Position on the left side of the frame. Drag the branches 2 layer beneath your merged frame layer. (see my tag for reference)
Add any other embellishments of your choosing.
Hide your white background. Merge your visible layer. Resize your merged layer by 80%, bicubic. Apply Xero Porcelain with the following settings:
Go to adjust > sharpness > Unsharp Mask. Apply with the following settings:
Radiance - 5
Strength - 25
Clipping - 1
Open up a diamond swirl of choice. Resize by 65%, smartsize. Copy and paste onto your canvas. Go to adjust > sharpen. Give it a drop shadow of H 2, V 0, Opacity 55, Blur 2.00. Duplicate. Go to image > mirror. Then, image > flip. Position as in my tag above. Drag both diamond swirl layers beneath your merged layer.
Crop and resize to your liking.
Add your copyright info, watermark and your text. If you are not animating, save as JPG or PNG.
If you are animating, highlight your merged tag layer. Apply Two Moon - Cut Glass with the following settings:

Copy merged. Open up Animation Shop. Paste as a new animation in AS.
Back to PSP. Go to edit > undo Cut Glass. Apply the filter again, but change the size to 8. Copy merged. Paste after frame 1 in AS.
Back to PSP. Edit > undo. Apply cut glass again, but change the size to 9. Copy merged. Paste after frame 2 in AS.
Back to PSP. Edit > undo. Apply the filter again, but change the size to 10. Copy merged. Paste after frame 3 in AS.
Select all frames (CTRL+A). Change the frame properties to 20.
Optimize and save as gif.
I hope you enjoyed this tutorial! If you have any questions, just give me a shout.
Subscribe to:
Post Comments (Atom)
0 comments:
Post a Comment