Friday, May 6, 2011
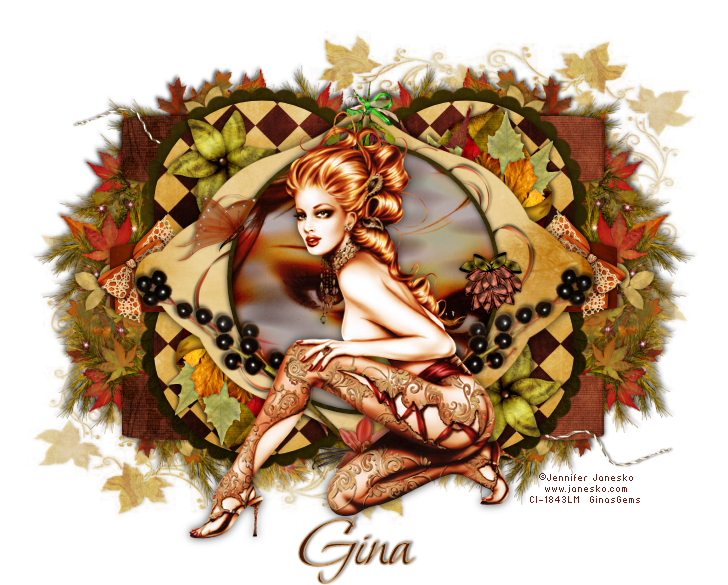
 Vintage Autumn
This tutorial was written by me on 13 September 2009. Any similarities to other tutorials is purely coincidental.
Supplies needed:
Tube and close up of choice. I am using the exquisite artwork of Jennifer Janesko. I got this tube when CILM was still open. You can find her at CDO now.
Scrapkit. I used Vintage Autumn made by me. If you would like to purchase it, you can here, here, here, here, here or here.
Template 185 made by me. You can download it from my blog here.
Mask 238 by Vix. You can download it from her site here. Thank you!
Font of choice. I used Bonheur Royale. This is a pay font so I can't supply.
Plugins:
Eyecandy 5 Textures - Texture Noise
No other supplies needed
*~*~*~*~*~*~*~*~*~*~*~*~*~*~*~*~*~*~*~*~*~*~*~*~*~*~*~*~*~*~*~*~*~*~*~*~*~*~*~*~*~*~*~*~*~*~*~*~*~*~*~*~*~*~*~*~*~*~*~*~*~*~*~*~*~*~*~*~*~*~*~*
Ok! Let's get started! Open up my template. Duplicate by holding down shift + d. Close the original. Delete the credit info layer.
Highlight the rounded rectangle 1 layer. Go to selections > select all. Selections > float. Selections > defloat. Open up a paper from the kit. (I used Paper 12) Resize the paper by 65%, smartsize. Copy and paste as a new layer onto your canvas. Go to selections > invert. Hit delete on your keyboard. Deselect (CTRL+D). Give the layer a drop shadow of H and V 0, Oapcity 75, Blur 10.00. Delete the gray rounded rectangle 1 layer.
Highlight the rounded rectangle 2 layer and repeat the same steps using the same paper.
Highlight the scalloped circle shape layer. Select, float and defloat. Open up another paper from the kit. (I used Paper 24) Resize by 65%, smartsize. Copy and paste as a new layer onto your canvas. Selections > invert. Hit delete and deselect. Give the layer a drop shadow of H and V 0, Oapcity 85, Blur 15.00. Delete the gray scalloped circle shape layer.
Highlight the circle shape layer. Select, float and defloat. Open up a paper from the kit. (I used Paper 31) Resize by 65%, smartsize. Copy and paste as a new layer onto your canvas. Selections > invert. Hit delete. Deselect. Give the layer a drop shadow of H and V 0, Opacity 80, Blur 12.00. Delete the gray circle shape layer.
Highlight the middle rounded rectangle layer. Select, float and defloat. Open up another paper from the kit. (I used Paper 22) Resize by 65%, smartsize. Copy and paste as a new layer onto your canvas. Selections > invert. Hit delete on your keyboard, and deselect. Give the layer a drop shadow of H and V 0, Opaciyt 75, Blur 12.00. Delete the gray middle rounded rectangle layer.
Highlight the bracket shape layer. Select, float and deflaot. Open up a paper from the kit. (I used Paper 20) Copy. Add a new raster layer to your working image. Paste your paper into the selection. Deselect. Give the layer a drop shadow of H and V 0, Oapcity 80, Blur 15.00. Delete the black bracket shape layer.
Highlight the circle fill layer. Select, float and defloat. Open up a paper from the kit. (I used Paper 21). Resize by 50%, smartsize. Copy and paste as a new layer onto your canvas. Selections > invert. Hit delete on your keyboard. Don't deselect yet.
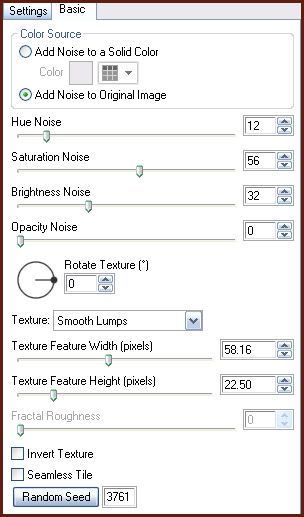
Open up your close up of choice. Resize as necessary, bicubic. Copy and paste as a new layer onto your canvas. Position to your liking within the selection. Hit delete. Deselect. Change the blend mode of the close up layer to Hard Light and lower the opacity to about 65. Apply Eyecandy 5 Texture Noise with the following settings:
Delete the gray circle fill layer.
Highlight the circle frame layer. Select, float and defloat. Open up a paper from the kit. Resize by 60%, smartsize. Copy and paste as a new layer onto your canvas. Selections > invert. Hit delete and deselect. Give the layer a drop shadow of H and V 0, Opacity 75, Blur 8.00. Delete the white circle frame layer.
Open up an autumn wreathe of choice from the kit. Resize by 68%, smartsize. Copy and paste as a new layer onto your canvas. Position to the right of your tag. Drag it beneath all of your other layers to right above your white background. Give it a drop shadow of H 2, V -2, Opacity 65, Blur 5.00. Duplicate the wreathe. Go to image > mirror. They should be positioned side by side as in my tag above.
Open up the ribbon wrapped twine from the kit. Resize by 70%, smartsize. Copy and paste as a new layer onto your canvas. Give it a drop shadow of H -2, V -1, oapcity 65, Blur 3.00. Position it on top of the top rounded rectangle to the left. (see my tag for reference) Duplicate. Go to image > mirror. Then, image > flip.
Highlight the circle shape layer. Open up a foliage bag from the kit. Resize by 60%, smartsize. Copy and paste as a new layer onto your canvas. Give it a drop shadow of H and V 0, Opacity 70, Blur 8.00. Position it at the top right of the circle shape so that the leaves are peeking out from behind the bracket shape layer. Duplicate. Go to image > mirror. Then, image > flip. (see my tag for reference)
Open up a vintage flower of choice. Resize by 35%, smartsize. Copy and paste as a new layer onto your canvas. Give it a drops hadow of H and V 0, Opacity 70, Blur 8.00. Position it at the top left of the circle shape. Duplicate. Go to image > mirror. Then, image > flip.
Highlight the bracket shape. Open up a satin curl from the kit. Resize by 35%, smartsize. Copy and paste as a new layer onto your canvas. Give it a drop shadow of H -2, V 0, Opacity 60, Blur 4.00. Position it at the left of the bracket so it is peeking out from behind the circle. Duplicate. Go to image > mirror. Then, image > flip. (see my tag for reference)
Open up a lace bow from the kit. Resize by 30%, smartsize. Copy and paste as a new layer onto your canvas. Give it a drop shadow of H and V 0, Opacity 65, Blur 6.00. Position it at the right end of the middle rounded rectangle. Duplicate. Go to image > mirror.
Hihglight your top layer. Open up the berry branch from the kit. Resize by 45%, smartsize. Copy and paste as a new layer onto your canvas. Go to image > free rotate. Rotate left by 35.00, both boxes unchecked. Go to adjust > sharpness > unsharp mask. Apply with radius - 5, strength 25, clipping 2. Give the berries a drop shadow of H 2, V -2, Opacity 65, Blur 5.00. Duplicate. Go to image > mirror. Position the berry branches as in my tag above.
Open up the decorated foliage from the kit. Resize by 25%, smartsize. Copy and paste as a new layer onto your canvas. Give it a drop shadow of H and V 0, Opacity 65, Blur 6.00. Position at the top of the circle frame.
Open up a folded afuxio flower from the kit. Resize by 15%, smartsize. Copy and paste as a new layer onto your canvas. Go to image > flip. Give it a drop shadow of H and V 0, Opacity 65, Blur 6.00. Position it to your liking on the circle frame.
Open up a flutterby from the kit. Resize by 22%, smartsize. Copy and paste as a new layer onto your canvas. Give it a drop shadow of H and V 0, Opacity 60, Blur 4.00. Position to your liking.
Add any other embellishments of your choosing.
Highlight your white background. Open up a paper from the kit. Don't resize. Copy and paste as a new layer onto your canvas. Apply Vix Mask 238 with the following settings:
Source Luminance
Fit to Canvas
Hide all mask
Delete the mask from your layer palette, answer yes to the pop up box and merge the group. Resize the mask layer by 65%, smartsize. Give it a drop shadow of H -2, V 0, Opacity 50, Blur 4.00. Position the mask to the top right of your canvas (see my tag for reference) Duplicate the mask layer. Go to image > mirror. Then, image > flip.
Open up your main tube. Resize as necessary, bicubic. Copy and paste as a new layer onto your canvas. Give it a drop shadow of H and V 0, Opacity 75, Blur 15.00. Arrange to your liking.
Crop and resize to your liking.
Add your copyright info, watermark and your text.
Save as JPG or PNG.
I hope you enjoyed this tutorial! If you have any questions, just give me a shout.
Subscribe to:
Post Comments (Atom)
0 comments:
Post a Comment