Thursday, May 5, 2011
 Snow Sexy
This tutorial was written by me on 20 November 2010. Any similarities to other tutorials is purely coincidental.
Supplies Needed:
Tube of choice. I am using the lovely artwork of Jessica Dougherty. I got this tube when CILM was still open. You can find her CDO now.
Scrap kit. I am using Winter Fairytale made by me. If you would like to purchase this kit, you can here, here, here, here , here or here.
Template 194 made by me. You can get it here.
Falling Snow Animation. I got this through a yahoo group. If it belongs to you, please let me know so I can credit it properly, or take it out of my supplies.
Plug ins:
Eyecandy 4000 - Gradient Glow
Eyecandy 5 Nature - Snow Drift
AAA Filters - Textures (freeware)
Jasc Animation Shop (opt)
Supplies HERE
~*~*~*~*~*~*~*~*~*~*~*~*~*~*~*~*~*~*~*~*~*~*~*~*~*~*~*~*~*~*~*~
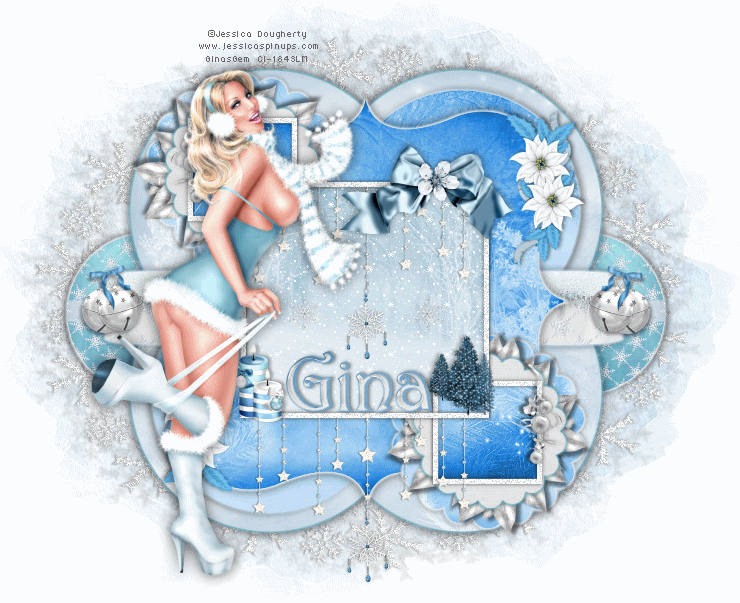
Ok! Let's get started! Open up my template. Duplicate by holding down shift + d. Close the original. Delete the credit layer.
Highlight the small circle 1 layer. Go to selections > select all. Selections > float. Selections > defloat. Open up a paper from the kit. (I used paper 20) Resize by 50%, bicubic. Copy and paste as a new layer onto your canvas. Position the paper to your liking within the selection. Hit delete. Deselect (CTRL+D). Apply Eyecandy Gradient Glow with the following settings:

Give the layer a drop shadow of H -3, V 0, Opacity 50, Blur 8.00. Duplicate the layer. Go to image > mirror. Delete the small circle 1 and 2 template layers.
Highlight the Thin Rectangle layer. Select, float and defloat. Open up a paper from the kit. (I used paper 18) Resize the paper by 50%, bicubic. Copy and paste as a new layer onto your canvas. Move the paper to the left end of the thin rectangle. Line it up so the snowflakes match the small circles paper. Go to selections > invert. Hit delete on your keyboard. Deselect. Duplicate the layer. Go to image > mirror. Delete the thin rectangle template layer.
Highlight the Circle Shape layer. Select, float and defloat. Open up a paper from the kit. (I used paper 7) Resize the paper by 70%, bicubic. Copy the paper. Add a new raster layer to your working image. Right click your working image, making certain your new raster layer is highlighted, and Paste into selection. Deselect. Apply Gradient Glow, same settings, but use color #75c1ce. Give the layer a drop shadow of H and V 0, Opacity 75, Blur 15.00. Delete the Circle Shape template layer.
Highlight the Medium Circle 1 layer. Select, float and defloat. Open up a paper from the kit (I used paper 1) Resize by 50%, smartsize. Copy. Add a new raster layer to your working image. On your new layer, paste into selection. Deselect. Apply Gradient Glow, same settings, color #fffff. Give the layer a drop shadow of H -3. V 0, Opacity 50, Blur 10.00.
Highlight the Rounded Rectangle layer. Select, float and defloat. Open up a paper from the kit. (I used paper 19) Resize the paper, 70%, bicubic. Copy and paste as a new layer onto your canvas. Selections > invert. Hit delete on your keyboard. Deselect. Apply Gradient Glow, same settings, color #cee4f9. Give the layer a drop shadow of H and V 0, Opacity 50, Blur 10.00. Delete the Rounded Rectangle template layer.
Highlight the Bracket Shape layer. Select, float and defloat. Open up a paper from the kit. (I used paper 2) Resize by 65%, smartsize. Copy the paper. Add a new raster layer to your working image. Paste into selection. Deselect. Apply Gradient Glow, same settings, color #fffff. Give the layer a drop shadow of H and V 0, Opacity 65, Blur 10.00. Delete the Bracket Shape template layer.
Highlight the Scalloped Circle 1 layer. Select, float and defloat. Open up a paper from the kit. (I used paper 3) Resize by 50%, smartsize. Copy the paper. Add a new raster layer to your working image, and paste into selection. Deselect. Apply Gradient, Glow, same settings, color #fffff. Give the layer a drop shadow of H and V 0, Opacity 50, Blur 8.00.
Highlight the Scalloped Circle 3 layer. Select, float and defloat. Open up a paper from the kit. (I used paper 22) Resize by 50%, bicubic. Copy and paste as a new layer onto your canvas. Position the paper to your liking within the selection. Selections > invert. Hit delete and deselect. Apply Gradient Glow, same settings, color #75c1ce. Give the layer a drop shadow of H and V 0, Opacity 50, Blur 6.00.
Repeat the same steps with the Scalloped Circle 4 layer. Delete the Scalloped Circle 3 and 4 template layers.
Highlight the Large Frame Fill layer. Select, float and defloat. Open up a paper from the kit. (I used paper 5) Resize by 50%, bicubic. Copy the paper. Add a new raster layer to your working image. Paste into selection. Deselect. Delete the Large Frame Fill template layer.
Highlight the Small Frame Fill 1 layer. Select, float and defloat. Open up a paper from the kit. (I used paper 2) Resize by 47%, bicubic. Copy and paste as a new layer onto your canvas. Go to selections > invert. Hit delete and deselect.
Repeat the above steps with the Small Frame Fill 2 layer. Delete the Small Frame Fill 1 and 2 template layers.
Highlight the Small Frame 1 layer. Give it a drop shadow of H and V 0, Opacity 55, Blur 6.00. Apply the same drop shadow to the Small Frame 2 layer.
Highlight the Large Frame Fill layer and give it a drop shadow of H and V 0, Opacity 55, Blur 7.00.
Highlight the rounded rectangle layer. Select, float and defloat. Open up the icicles from the kit. Resize by 40%, bicubic. Copy and paste as a new layer onto your canvas. Position the icicles in the left corner of the rounded rectangle. Selections > invert. Hit delete and deselect. Give the icicles a drop shadow of H 0, V 3, Opacity 35, Blur 4.00. Duplicate. Go to image > mirror.
Open up a Bells from the kit. Resize by 15%, smartsize. Apply unsharp mask, Radius 5, Strength 20, Clipping 2. Copy the bells and paste as a new layer onto your canvas. Give them a drop shadow of H -3, V 0, Opacity 40, Blur 5.00. Position at the upper left corner of the rounded rectangle. Duplicate. Go to image > mirror.
Open up a leaves from the kit. Resize by 25%, smartsize. Apply unsharp mask, same settings. Copy and paste as a new layer onto your canvas. Give it a drop shadow of H and V 0, Opacity 40, Blur 6.00. Position the leaves on top of the bottom bigger scalloped circle. Duplicate the leaves. Go to image > mirror. Position the leaves on top of the other leaves, slightly to the left. Duplicate the mirrored leaves. Go to image > free rotate. Rotate right by 90.00 degrees, both boxes unchecked. Position the rotated leaves on top of the other 2 leaves slightly up. Duplicate the rotated leaves. Go to image > flip. Position the flipped leaves on top of the other leaves, slightly down.
It should look like this:
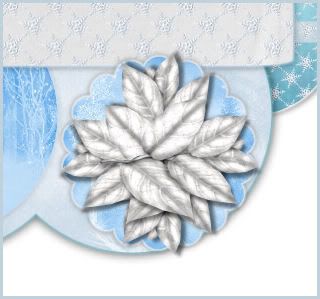
Duplicate all 4 of the leaves layers and go to image > mirror. Then, image > flip with each of the layers. You should now have this same formation on top of the bigger upper scalloped circle layer.
Highlight the Bracket Shape layer. Open up one of the Christmas Flowers. Resize by 35%, smartsize. Apply Unsharp Mask, same settings as before. Copy and paste as a new layer onto your canvas. Give it a drop shadow of H and V 0, Opacity 40, Blur 6.00. Go to image > mirror. Position the Christmas Flower as in my tag above. Duplicate. Go to image > mirror. Then image, flip.
Highlight your Large Frame layer. Open up a Baubles Cluster from the kit. Resize by 15%, smartsize. Apply Unsharp Mask. Copy and paste as a new layer onto your canvas. Give it a drop shadow of H -3, V 0, Opacity 35, Blur 6.00. Position the baubles at the upper left corner of the upper small frame. Duplicate the baubles cluster. Go to image > mirror. Position the duplicated baubles at the upper right corner of the bottom smaller frame.
Open up a Star Bling from the kit. Resize by 25%, smartsize. Apply unsharp mask - Radius 5, Strength 25, Clipping 5. Copy and paste as a new layer onto your canvas. Position at the top of the large frame in the center (see my tag for reference) Give the layer a drop shadow of H 1, V 0, Opacity 30, Blur 3.00. Duplicate the star bling. Center the duplicate bling at the bottom of the Large Frame.
Open up a Snowflake Ornament from the kit. Resize by 15%, smartsize. Apply unsharp mask, same settings as the star bling. Copy and paste as a new layer onto your canvas. Give it a drop shadow of H 1, V 0, Opacity 25, Blur 2.00. Position it at the bottom of the top center star bling string. Duplicate the Snowflake Ornament. Position at the bottom of the bottom center star bling string.
Open up a candles from the kit. Resize by 15%, smartsize. Apply Unsharp Mask, radius 5, strength 15, clipping 2. Copy and paste as a new layer onto your canvas. Give the candles a drop shadow of H 3, V 0, Opacity 40, Blur 4.00. Position at the bottom left corner of the Large Frame.
Open up the evergreen trees with lights. Resize by 12%, smartsize. Apply Unsharp mask, same settings as before. Copy and paste as a new layer onto your canvas. Give the trees a drop shadow of H -3, V 0, Opacity 45, Blur 4.00. Position the trees at the bottom right corner of the Large Frame.
Open up a bow from the kit. Resize by 30%, smartsize. Apply Unsharp Mask, same settings. Copy and paste as a new layer onto your canvas. Give it a drop shadow of H -3, V -1, Opacity 45, Blur 6.00. Position to your liking on the Large Frame.
Open up a blossom from the kit. Resize by 10%, smartsize. Apply Unsharp Mask. Copy and paste as a new layer onto your canvas. Position in the center of the bow. Give the blossom a drop shadow of H and V 0, Opacity 25, Blur 5.00.
Add any other embellishments of your choosing.
Add any other embellishments of your choosing.
Highlight your white background layer. Open up paper 22 from the kit. Apply Vix Christmas Mask 6 with the following settings:
Source Luminance
Fit to Canvas
Fit to Canvas
Hide all Mask
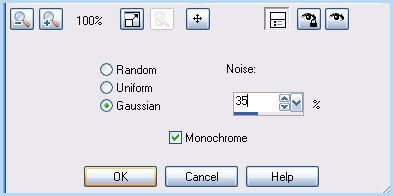
Delete the mask from your layer palette, answer yes to the pop up box and merge the group. Go to adjust > add/remove noise > add noise. Use the following settings:
Give the mask layer a drop shadow of H 2, V 0, Opacity 50, Blur 3.00. Center the mask behind your tag.
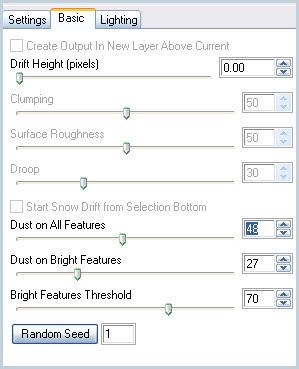
Highlight your white background layer. Open up paper 3 from the kit. Copy and paste as a new layer onto your canvas. Apply Vix Mask 109, same settings as before. Delete the mask, answer yes, and merge the group. Apply Eyecandy Nature Snow Drift with the following settings:
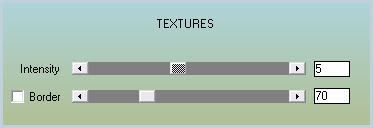
Now apply AAA Filters - Textures with the following settings:
Center the mask behind your tag and give it a drop shadow of H and V 0, Opacity 15, Blur 5.00.
Highlight your top layer. Open up your tube. Resize as necessary, bicubic. Copy and paste as a new layer onto your canvas. Give the tube a drop shadow of H and V 0, Opacity 65, Blur 15.00. Position the tube to your liking.
Add your copyright info, watermark, and your text. If you are not animating, save as JPG or PNG.
If you are animating, hide your tube, bow, blossom, bauble clusters, evergreen trees, candles, both star blings, both snowflake ornaments, both small frame, and large frame layers. Merge the rest of your layers together. You should have something like this:
If you are animating, hide your tube, bow, blossom, bauble clusters, evergreen trees, candles, both star blings, both snowflake ornaments, both small frame, and large frame layers. Merge the rest of your layers together. You should have something like this:

Copy your merged layer. Open up Animation Shop. Paste as a new animation. Duplicate until you have a total of 10 frames. Open up the falling snow animation mng file. Select all frames (CTRL+A) Copy the snow. Select your tag animation. Select all frames (CTRL+A) Go to edit > paste into selected frame. Paste the snow animation over the large frame fill area.
Back to Paint Shop Pro. Hide your merged layer ad unhide all of your hidden layers. Copy merged. Paste as a new animation in Animation Shop. Duplicate until you have a total of 10 frames. Select all frames (CTRL+A) Copy. Highlight your tag with snow animation. Select all frames (CTRL+A) Go to edit > paste into selected frame. Paste and position carefully so everything lines up. Crop and resize (bicubic) as you like. Optimize and save as gif.n
I hope you enjoyed this tutorial! If you have any questions, just give me a shout!
Subscribe to:
Post Comments (Atom)
0 comments:
Post a Comment