Monday, May 9, 2011
 Eat Your Heart Out

This tutorial was written by me on 9 May 2011. Any similarities to other tutorials is purely coincidental.
Supplies Needed:
2 tubes of choice. I am using the awesome artwork of Rion Vernon. I bought these tubes when CILM was still open. You can find his work at CDO now.
Scrap kit. I am using Eat Your Heart Out made by me. You can find it here, here, here, here, here, or here.
Plugins:
Penta Filters - Dot and Cross - this is part of the Garbage Collection (freeware)
*~*~*~*~*~*~*~*~*~*~*~*~*~*~*~*~*~*~*~*~*~*~*~*~*~*~*~*~*~*~*~*~*~*~*~*~*~*~*~*~*~*~*~*~*~*~*
OK! Let's get started! Open up a new transparent image 800 width by 600 height. Floodfill with white.
Open up Frame 1 from the kit. Resize by 30%, smartsize. Go adjust > sharpness > unsharp mask. Apply with radius 5, strength 15, clipping 2. Copy and paste the frame as a new layer onto your canvas. Position the frame to the right of the frame. Give it a drop shadow of H 0, V 0, Opacity 65, Blur 18.00. Duplicate the frame. Go to image > mirror. Position the frames side by side so that the bottom sticks are touching.
Grab your freehand selection tool, type point to point, feather set at about 8.00. Select around the edges of the left frame like this:
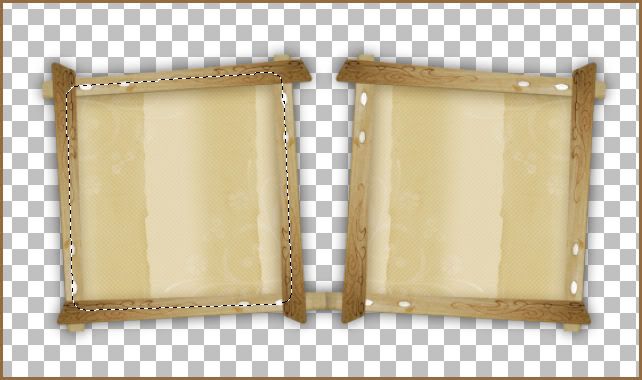
Open up a paper from the kit. (I used paper 12) Resize the paper by 50%, bicubic. Copy and paste as a new layer onto your canvas. Position the paper to your liking within the selection. Go to selections > invert. Hit delete on your keyboard, 2 to 3 times. Deselect. (CTRL +D) Duplicate the paper. Go to image > mirror. Position the mirrored paper so that it fits into the right frame.
Open up the berries from the kit. Resize by 30%, smartsize. Apply unsharp mask, same settings as before. Copy and paste as a new layer onto your canvas. Position in between the frames, at the top. Give it a drop shadow of H -3, V 2, Opacity 35, Blur 8.00.
Open up Boranical Flower 1 from the kit. Resize by 25%, smartsize. Apply Unsharp Mask, same settings as before. Copy and paste as a new layer onto your canvas. Position it at the bottom right corner of the right frame. Give it a drop shadow of H and V 0, Opacity 30, Blur 8.00. Duplicate the flower. Go to image > mirror. Then, image > flip. Position the duplicated flower at the upper left corner of the left frame.
Open up the jelly center cookies from the kit. Resize by 25%, smartsize. Apply unsharp mask, same settings you just used. Copy and paste as a new layer onto your canvas. Position it in the center of the bottom botanical flower. Give them a drop shadow of H 0, V 3, Opacity 30, Blur 6.00.
Open up a ribbon butterfly from the kit. Resize by about 25%, smartsize. Apply Unsharp mask. Copy and paste as a new layer onto your canvas. Position it in the center of the upper botanical flower. Give the butterfly a drop shadow of H 0, V -3, Opacity 30, Blur 6.00.
Open up the chocolate cupcake from the kit. Resize by 25%, smartsize. Apply unsharp mask. Copy and paste as a new layer onto your canvas. Position it at the bottom left corner of the left frame. Give it a drop shadow of H and V 0, Opacity 30, Blur 10.00.
Open up a ribbon bw from the kit. Resize by about 20%, smartsize. Copy and paste as a new layer onto your canvas. Position the bow on top of your chocolate cupcake. Give it a drop shadow of H and V 0, Opacity 25, Blur 5.00.
Open up the strawberries from the kit. Resize by 20%, smartsize. Copy and paste as a new layer onto your canvas. Position them in between the two frames where they meet at the bottom. Give the strawberries a drop shadow of H and V 0, Opacity 35, Blur 8.00.
Open up the lemon peel from the kit. Resize by 6%, smartsize. Copy and paste as a new layer onto your canvas. Position it at the top of the strawberries. Give it a drop shadow of H 0, V 2, Opacity 20, Blur 5.00.
Open up a poppy from the kit. Resize by 20%, smartsize. Copy and paste as a new layer onto your canvas. Go to image > flip. Give the poppy a drop shadow of H and V 0, Opacity 35, Blur 8.00. Position them at the bottom of the strawberries. Drag the poppy layer to right below your strawberries layer.
Highlight your right frame layer. Open up your first tube of choice. Resize as necessary, bicubic. Copy and paste as a new layer onto your canvas. Position the tube to your liking. Give your tube a drop shadow of H and V 0, Opacity 65, Blur 18.00. Grab your freehand selection tool, type point to point, feather set at 0.00. Select very carefully around the bottom and side edges along the frames, and around any bottom parts of the tube you don't want hanging over the frame. Hit delete on your keyboard. Deselect. (CTRL+D)
Highlight your left frame layer. Repeat the above steps with your second tube. Drag both tube layers to the top of your layer palette.
Highlight your white background layer. Open up flower spray 1 from the kit. Resize by 50%, smartsize. Apply unsharp mask. Copy and paste as a new layer onto your canvas. Go to imate free > rotate. Rotate right by 45.00, both boxes unchecked!! Give the flowers a drop shadow of H -2, V 2, Opacity 35, Blur 4.00. Position the flower spray towards the left edge of the left frame. Duplicate. Go to image > mirror. Then, image > flip.
Open up Splatter Deco 4 from the kit. Resize by 50%, smartsize. Copy and paste as a new layer onto your canvas. Go to image > free rotate. Rotate right by 90.00 degrees, both boxes unchecked!! Give it a drop shadow of H 1, V 0, Opacity 35, Blur 3.00. Duplicate. Go to image > mirror. Then, image > flip. Position them in between your frames, beneath them.
Open up Splatter Deco 2 from the kit. Resize by 85%, smartsize. Copy and paste as a new layer onto your canvas. Position towards the bottom of the frames. Give it a drop shadow of H 0, V 1, Opacity 35, Blur 3.00. Duplicate. Go to image > flip.
Open up Flower Spray 2 from the kit. Resize by 70%, smartsize. Copy and paste as a new layer onto your canvas. Give it a drop shadow of H -1, V 0, Opacity 30, Blur 2.00. Center it behind your frames.
Open up the Flower and Truffly Spray from the kit. Resize by 75%, smartsize. Copy and paste as a new layer onto your canvas. Give it a drop shadow of H 1, V 0, Opacity 30, Blur 2.00. Center it behind your frames.
Add any other embellishments of your choosing. Hide your white background layer and merge your visible layers together. Duplicate the merged layer. On the bottom layer, go to adjust > blur > gaussian blur. Apply with a radius of 25. Apply Penta Filters, Dot and Cross with the following settings:
Highlight your white background layer. Open up a paper from the kit. (I used paper 15) . Copy and paste as a new layer onto your canvas. Apply Vix Mask 264 with the following settings:
Source Luminance
Hide all Mask
Fit to Layer
Hide all Mask
Fit to Layer
Delete the mask from your layer palette, answer yes to the pop up box and merge the group. Give the mask a drop shadow of H -2, V 0, Opacity 35, Blur 4.00.
Add your copyright text, watermark, and your text. Resize and crop to your liking. Delete the white background layer and save as PNG.
I hope you enjoyed this tutorial! If you have any questions, just give me a shout!
Subscribe to:
Post Comments (Atom)
0 comments:
Post a Comment