Monday, May 2, 2011
 Toxic Rock
This tutorial was written by me on 21 October 2010. Any similarities to other tutorials is purely coincidental.
Supplies Needed:
4 or 5 tubes of choice. I am using the awesome artwork of Keith Garvey. I purchased this tube when he was still with MPT. If you would like to purchase his work now, you can with PSP Emporium.
Scrap kit. I am using Wicked Intentionz which was designed by me. If you would like to purchase it, you can here, here, here, here , here or here.
Vix Mask 147, which I got from her wonderful blog here. Thank you, Vix!
Becky Mask 22. Unfortunately, her site is now closed. :(
Font of choice. I used Bank Gothic (pay font)
Plug ins:
Xero Filters - Bad Dream XL (freeware)
Unplugged Tools - Interlace
FM Tile Tools - Blend Emboss
L & K Filters - Pia (freeware)
Alien Skin Eye Candy 5 Textures - Texture Noise (optional for Animation)
Alien Skin Eyecandy 4000 - Gradient Glow
Jasc Animation Shop (opt)
Supplies HERE
~*~*~*~*~*~*~*~*~*~*~*~*~*~*~*~*~*~*~*~*~*~*~*~*~*~*~*
OK! Let's get started! Open up a new transparent image 800(w) x 700(h). Floodfill with white. Go to your materials palette and change your foreground color to white, background to nill. Grab your ellipse tool (circle). Change the width to 15. Draw out a largish circle. Go to objects > align in center of canvas. Click on the circle frame layer in your layer palette and convert to Raster Layer.
Grab your magic wand tool, feather set to 0.00, tolerance set to 100. Click inside the empty space of the circle so that there are marching ants all around it. Go to selections > modify > expand by 5.00. Open up a paper of choice from the kit. Resize 55% bicubic. Copy and paste as a new layer onto your canvas. Go to selections > invert. Hit delete on your keyboard. Don't deselect yet!
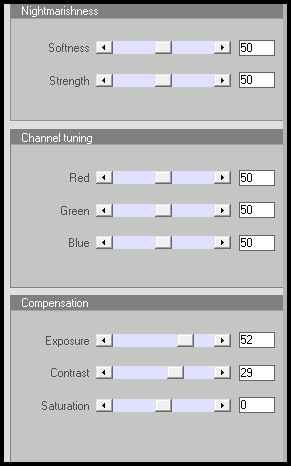
Open your main tube. Resize as necessary, bicubic. Copy and paste as a new layer onto your canvas. Position to your liking within the selection. Hit delete on your keyboard. Deselect (CTRL+D). Apply Xero Bad Dream XL with the following settings:
Repeat. Now, give your tube a drop shadow of H and V 0, Opacity 90, Blur 15.00. Highlight your white frame layer and give it a drop shadow of H and V 0, Opacity 65, Blur 5.00. Drag the white frame layer to the top of your layer palette.
Open up a folded frame from the kit. (I used the black one). Resize by 70%, smartsize. Copy and paste as a new layer onto your canvas. Position the frame at the bottom of your circle (see my tag above for reference). Grab your magic wand tool, same settings as before. Click inside the first and third empty spaces of the frame. Go to selections > modify > expand by 8. Open up a paper 33 from the kit. Resize by 50%, smartsize. Copy and paste as a new layer onto your canvas. Position with the selections. Go to selections > invert. Hit delete on your keyboard. Don't deselect yet.
Open up your second tube of choice. Resize as necessary, bicubic. Copy and paste as a new layer onto your canvas. Position to your liking within the first empty space of your frame. Hit delete on your keyboard. Don't deselect yet.
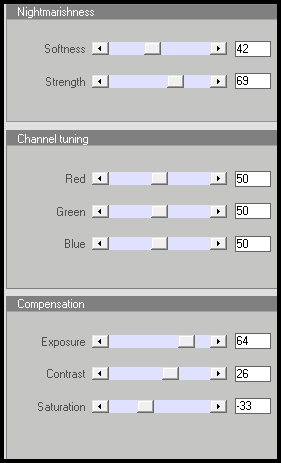
Open up your third tube of choice. Resize as necessary, bicubic. Copy and paste as a new layer onto your canvas. Position to your liking within the third empty space of the frame. Hit delete. Deselect. Apply Xero Filters - Bad Dream XL to your tubes layer with the following settings:
Now go to adjust > sharpness > unsharp mask. Apply with Radius - 5, Strength - 15, Clipping - 2. Give the layer a drop shadow of H -3, V -1, Opacity 65, Blur 5.00.
Highlight your folded frame layer. Still on the folded frame layer, grab your magic wand tool, same settings as before. Click inside the second and last empty spaces of the folded frame. Go to selections > modify > expand by 8.00. Open up paper 34 from the kit. Resize by 50%, smartsize. Copy and paste as a new layer onto your canvas. Go to selections > invert. Hit delete on your keyboard. Don't deselect yet.
Open up your fourth tube of choice. Resize as necessary, bicubic. Copy and paste as a new layer onto your canvas. Position to your liking within the second space of the frame. Hit delete on your keyboard. Don't deselect yet.
Open up your last tube of choice. Resize as necessary, bicubic. Copy and paste as a new layer onto your canvas. Position to your liking within the last space of the frame. Hit delete. Deselect. Apply Xero Bad Dream XL, same settings as before. Apply Unsharp Mask, same settings. Give the tubes a drop shadow of H 3, V 1, Opacity 65, Blur 5.00.
Highlight your folded frame layer. Drag it above the tubes, and papers layers. Give it a drop shadow of H 0, V -4, Opacity 60, Blur 12.00.
Highlight the red folded frames paper layer. Apply L & K Filters - Pia with the following settings:

Highlight the white paper layer. Apply Pia, same settings.
Highlight your top layer.
Open up a guitar from the kit. Resize by 35%, smartsize. Copy and paste as a new layer onto your canvas. Go to image > free rotate. Rotate left by 12.00 degrees, both boxes unchecked. Go to adjust > sharpness > sharpen. Position it along the bottom right of the folded frame. Give it a drop shadow of H -3, V 2, Opacity 60, Blur 7.00. Duplicate the guitar. Go to image > mirror. Position the duplicated guitar along the top left corner of the folded frame.
Open up the Chains from the kit. Resize by 30%, smartsize. Copy and paste as a new layer onto your canvas. Go to image > free rotate. Rotate right by 90.00 degrees, both boxes unchecked. Go to image > mirror. Give the chains a drop shadow of H 2, V -2, Opacity 65, Blur 5.00. Position in the right upper corner of the folded frame. Duplicate the chains. Go to image > mirror. Then, image > flip. Position the duplicated chains in the left bottom corner of the folded frame.
Open up the lock from the kit. Resize by 25%, smartsize. Copy and paste as a new layer onto your canvas. Position to your liking on the right chain. Give it a drop shadow of H 2, V 2, Opacity 50, Blur 3.00.
Open up the skeleton bunny. Resize by 20%, smartsize. Copy and paste as a new layer onto your canvas. Position as in my tag above. Give it a drop shadow of H -3, V 0, Opacity 50, Blur 4.00.
Open up a candle from the kit. Resize by 35%, smartsize. Copy and paste as a new layer onto your canvas. Position it next to the skeleton bunny. Give it a drop shadow of H 0, V , Opacity 55, Blur 5.00.
Open up the dark angel bowl from the kit. Resize by 20%, smartsize. Copy and paste as a new layer onto your canvas. Position it on the right side of the candle. Give it a drop shadow of H 3, V 0, Opacity 50, Blur 4.00.
Open up the skull head from the kit. Resize by 20%, smartsize. Copy and paste as a new layer onto your canvas. Position as in my tag above. Give it a drop shadow of H 2, V1, Opacity 50, Blur 4.00.
Open up a bottle cap from the kit. Resize by 31%, smartsize. Copy and paste as a new layer onto your canvas. Go to adjust > sharpness > sharpen. Give it a drop shadow of H and V 0, Opacity 70, Blur 6.00. Position on top of the bottom left chains.
Highlight your top layer. Open up a wing element. Resize by 30%, smartsize. Copy and paste as a new layer onto your canvas. Position as in my tag above. Give it a drop shadow of H -, V -2, Opacity 55, Blur 6.00. Duplicate. Go to image > mirror.
If you are animating, highlight your top star mask layer. Apply Eyecandy 5 Texture Noise with the following settings:

Right click your image and Copy Merged. Open up Jasc Animation Shop. Paste as a new animation in AS.
Go back to PSP. Go to edit > undo texture noise. Apply Texture Noise again, hitting the random seed button. Copy merged. Paste after your current frame in AS.
Repeat the above steps 2 more times for a total of 4 frames.
Select all frames (CTRL + A). Change the frame properties to 13. Optimize and save as gif.
I hope you enjoyed this tutorial. If you have any questions, just give me as a shout.
Grab your magic wand tool, feather set to 0.00, tolerance set to 100. Click inside the empty space of the circle so that there are marching ants all around it. Go to selections > modify > expand by 5.00. Open up a paper of choice from the kit. Resize 55% bicubic. Copy and paste as a new layer onto your canvas. Go to selections > invert. Hit delete on your keyboard. Don't deselect yet!
Open your main tube. Resize as necessary, bicubic. Copy and paste as a new layer onto your canvas. Position to your liking within the selection. Hit delete on your keyboard. Deselect (CTRL+D). Apply Xero Bad Dream XL with the following settings:
Go to adjust > sharpness > unsharp mask. Apply with Radius 5, Strength 15, Clipping 2.
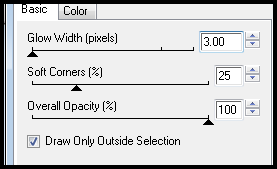
Still on your tube layer, apply Eyecandy 4000 Gradient Glow, color white, with the following settings:
Repeat. Now, give your tube a drop shadow of H and V 0, Opacity 90, Blur 15.00. Highlight your white frame layer and give it a drop shadow of H and V 0, Opacity 65, Blur 5.00. Drag the white frame layer to the top of your layer palette.
Open up a folded frame from the kit. (I used the black one). Resize by 70%, smartsize. Copy and paste as a new layer onto your canvas. Position the frame at the bottom of your circle (see my tag above for reference). Grab your magic wand tool, same settings as before. Click inside the first and third empty spaces of the frame. Go to selections > modify > expand by 8. Open up a paper 33 from the kit. Resize by 50%, smartsize. Copy and paste as a new layer onto your canvas. Position with the selections. Go to selections > invert. Hit delete on your keyboard. Don't deselect yet.
Open up your second tube of choice. Resize as necessary, bicubic. Copy and paste as a new layer onto your canvas. Position to your liking within the first empty space of your frame. Hit delete on your keyboard. Don't deselect yet.
Open up your third tube of choice. Resize as necessary, bicubic. Copy and paste as a new layer onto your canvas. Position to your liking within the third empty space of the frame. Hit delete. Deselect. Apply Xero Filters - Bad Dream XL to your tubes layer with the following settings:
Now go to adjust > sharpness > unsharp mask. Apply with Radius - 5, Strength - 15, Clipping - 2. Give the layer a drop shadow of H -3, V -1, Opacity 65, Blur 5.00.
Highlight your folded frame layer. Still on the folded frame layer, grab your magic wand tool, same settings as before. Click inside the second and last empty spaces of the folded frame. Go to selections > modify > expand by 8.00. Open up paper 34 from the kit. Resize by 50%, smartsize. Copy and paste as a new layer onto your canvas. Go to selections > invert. Hit delete on your keyboard. Don't deselect yet.
Open up your fourth tube of choice. Resize as necessary, bicubic. Copy and paste as a new layer onto your canvas. Position to your liking within the second space of the frame. Hit delete on your keyboard. Don't deselect yet.
Open up your last tube of choice. Resize as necessary, bicubic. Copy and paste as a new layer onto your canvas. Position to your liking within the last space of the frame. Hit delete. Deselect. Apply Xero Bad Dream XL, same settings as before. Apply Unsharp Mask, same settings. Give the tubes a drop shadow of H 3, V 1, Opacity 65, Blur 5.00.
Highlight your folded frame layer. Drag it above the tubes, and papers layers. Give it a drop shadow of H 0, V -4, Opacity 60, Blur 12.00.
Highlight the red folded frames paper layer. Apply L & K Filters - Pia with the following settings:
Highlight the white paper layer. Apply Pia, same settings.
Highlight your top layer.
Open up a guitar from the kit. Resize by 35%, smartsize. Copy and paste as a new layer onto your canvas. Go to image > free rotate. Rotate left by 12.00 degrees, both boxes unchecked. Go to adjust > sharpness > sharpen. Position it along the bottom right of the folded frame. Give it a drop shadow of H -3, V 2, Opacity 60, Blur 7.00. Duplicate the guitar. Go to image > mirror. Position the duplicated guitar along the top left corner of the folded frame.
Open up the Chains from the kit. Resize by 30%, smartsize. Copy and paste as a new layer onto your canvas. Go to image > free rotate. Rotate right by 90.00 degrees, both boxes unchecked. Go to image > mirror. Give the chains a drop shadow of H 2, V -2, Opacity 65, Blur 5.00. Position in the right upper corner of the folded frame. Duplicate the chains. Go to image > mirror. Then, image > flip. Position the duplicated chains in the left bottom corner of the folded frame.
Open up the lock from the kit. Resize by 25%, smartsize. Copy and paste as a new layer onto your canvas. Position to your liking on the right chain. Give it a drop shadow of H 2, V 2, Opacity 50, Blur 3.00.
Open up the skeleton bunny. Resize by 20%, smartsize. Copy and paste as a new layer onto your canvas. Position as in my tag above. Give it a drop shadow of H -3, V 0, Opacity 50, Blur 4.00.
Open up a candle from the kit. Resize by 35%, smartsize. Copy and paste as a new layer onto your canvas. Position it next to the skeleton bunny. Give it a drop shadow of H 0, V , Opacity 55, Blur 5.00.
Open up the dark angel bowl from the kit. Resize by 20%, smartsize. Copy and paste as a new layer onto your canvas. Position it on the right side of the candle. Give it a drop shadow of H 3, V 0, Opacity 50, Blur 4.00.
Open up the skull head from the kit. Resize by 20%, smartsize. Copy and paste as a new layer onto your canvas. Position as in my tag above. Give it a drop shadow of H 2, V1, Opacity 50, Blur 4.00.
Open up a bottle cap from the kit. Resize by 31%, smartsize. Copy and paste as a new layer onto your canvas. Go to adjust > sharpness > sharpen. Give it a drop shadow of H and V 0, Opacity 70, Blur 6.00. Position on top of the bottom left chains.
Highlight your top layer. Open up a wing element. Resize by 30%, smartsize. Copy and paste as a new layer onto your canvas. Position as in my tag above. Give it a drop shadow of H -, V -2, Opacity 55, Blur 6.00. Duplicate. Go to image > mirror.
Open up jewel element 4 from the kit. Resize by 30%, smartsize. Apply Unsharp Mask - Radiance 5, Strength 15, Clipping 2. Copy and paste as a new layer onto your canvas. GIve it a drop shadow of H and V o, Opacity 50, Blur 5.00. Position to your liking on the folded frame.
Add any other embellishments of your choosing.
Highlight your white background layer. Open up a liquid metal frame from the kit. Resize by 95%, bicubic. Copy and paste as a new layer onto your canvas. Go to image > free rotate. Rotate right by 45 degrees, both boxes unchecked. Give it a drop shadow of H 0, V 2, Opacity 65, Blur 2.00. Position it towards the upper left of the mask. (see my tag for reference) Duplicate the liquid frame. Go to image > mirror. Then, image > flip.
Open up a wing element from the kit. Resize by 85%, bicubic. Copy and paste as a new layer onto your canvas. Go to image > flip. Give it a drop shadow of H -5, V 5, Opacity 75, Blur 8.00. Position it towards the bottom left corner of the folded frame. (see my tag for reference) Duplicate. Go to image > mirror. Then, image > flip.
Highlight your white background layer again. Open up a paper from the kit. (I used paper 32) Copy and paste as a new layer onto your canvas. Apply Becky Mask 022 with the following settings:
Source Luminance
Fit to Canvas
Hide all Mask
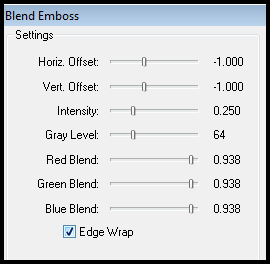
Delete the mask from your layer palette, answer yes to the pop up box and merge the group. Apply FM Tile Tools Blend Emboss 2 times with the following settings:
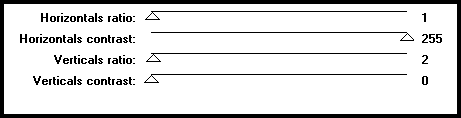
Open up another paper from the kit. (I used paper 1) Copy and paste as new layer onto your canvas. Apply Vix Mask, same settings you just used. Delete the mask from your layer palette, and merge the group. Apply Unplugged Tools - Interlace with the following settings:
Repeat Interlace. Duplicate the star mask layer. On the bottom layer. Go to adjust > blur > gaussian blur. Apply with a radius of 10. Apply Interlace to the blurred layer. Go to adjust > sharpness > sharpen.
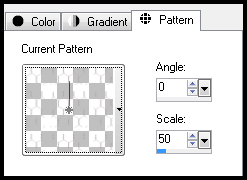
Highlight the top (unblurred) star mask layer. Go to selections > float. Selections > defloat. Add a new raster layer to your working image. Open up a chicken wire from the kit. Resize by 50%, smartize. Make sure the Resize all layers option is checked. Go to your materials palette, and click on the pattern tab. Find the GGS_Wicked Intentionz_Chicken Wire in the drop down menu. Choose it as your pattern with these settings:
Floodfill your new layer with the chicken wire pattern. Do it several times until you can see the chicken wire. Deselect. Apply gradient glow, color of choice, with the same settings as before.
Resize and crop to your liking.
Add your copyright info, watermark and your text. If you are not animating, save as PNG or JPG.
If you are animating, highlight your top star mask layer. Apply Eyecandy 5 Texture Noise with the following settings:

Right click your image and Copy Merged. Open up Jasc Animation Shop. Paste as a new animation in AS.
Go back to PSP. Go to edit > undo texture noise. Apply Texture Noise again, hitting the random seed button. Copy merged. Paste after your current frame in AS.
Repeat the above steps 2 more times for a total of 4 frames.
Select all frames (CTRL + A). Change the frame properties to 13. Optimize and save as gif.
I hope you enjoyed this tutorial. If you have any questions, just give me as a shout.
Subscribe to:
Post Comments (Atom)
0 comments:
Post a Comment