Monday, May 2, 2011
 Fading Autumn Sun
Supplies Needed:
Tube of choice. I am using the adorable artwork of Suzanne Woolcott. If you would like to use her artwork, you must purchase the appropriate license here.
Scrap kit. I am using November Harvest made by me. If you would like to purchase it, you can here, here, here, here , here or here.
Sunset Animation or Sunset and Mask Animation (the sunset and mask animation was made using Gems Mask 52 and UF Mask 61, and a paper and sun made by me)
Star twink animation. If this is your animation, please let me know so I can give it proper credit, or take it out of my supplies.
For those NOT animating: You will need to get Gems Mask 52 and UF Mask 61, from their blogs. Thank you, ladies!
Font of Choice. I used Kristen ITC (pay font)
Filters needed:
Xero Filters - Tekstya and Bad Dream XL (freeware)
Jasc Animation Shop (opt)
Supplies HERE
*~*~*~*~*~*~*~*~*~*~*~*~*~*~*~*~*~*~*~*~*~*~*~*~*~*
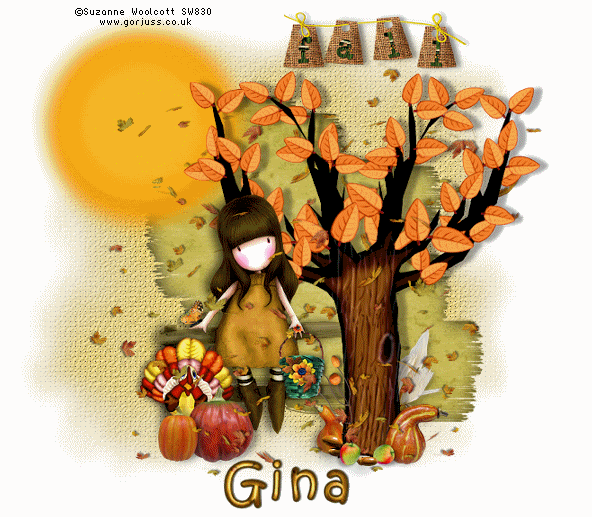
OK! Let's get started! Open up a new transparent image 700 x 600 pixels. Floodfill with white. Open up an autumn tree of choice from the kit. Resize by 75% smartsize. Go to adjust > sharpness > unsharp mask. Apply with radius 5, strength 15, clipping 2. Copy and paste as a new layer onto your canvas. Position towards the right of your canvas. Give the tree a drop shadow of H 4, Vertical 0, Opacity 60, Blur 5.00.
Open up your tube of choice. Resize as necessary, bicubic. Copy and paste as a new layer onto your canvas. Position to your liking next to the tree. Apply Xero Bad Dream XL with the following settings:
Apply unsharp mask, same settings as before.
Open up pumpkin 2 from the kit. Resize by 15%, smartsize. Apply unsharp mask, same settings. Copy and paste as a new layer onto your canvas. Give it a drop shadow of H 3, V 2, Opacity 35, Blur 5.00. Position towards the bottom left of your canvas. (see my tag above for reference).
Open up pumpkin 1 from the kit. Resize by 25%, smartsize. Apply unsharp mask. Copy and paste as a new layer onto your canvas. Give it a drop shadow of H -3, V -2, Opacity 35, Blur 5.00. Position the pumpkin to the left of bigger one, so that they overlap slightly. (see my tag above for reference)
Open up a quilted turkey from the kit. Resize by 20%, smartsize. Apply unsharp mask, same settings. Copy and paste as a new layer onto your canvas. Position towards the left of the smaller pumpkin. Drag the turkey layer beneath both pumpkin layers. (see my tag for reference)
Open up Squash 1 from the kit. Resize by 13%, smartsize. Apply unsharp mask. Copy and paste as a new layer onto your canvas. Go to image > mirror. Position at the bottom right of the tree. (see my tag for reference) Give it a drop shadow of H 3, V 1, Opacity 40, Blur 5.00.
Open up Squash 2 from the kit. Resize by 10%, smartsize. Apply unsharp mask. Copy and paste as a new layer onto your canvas. Position at the bottom left of the tree trunk. (see my tag for reference) Give it a drop shadow of H -3, V 1, Opacity 40, Blur 5.00. Drag the squash layer below your tree layer.
Highlight your top layer. Open the acorns from the kit. Resize by 15%, smartsize. Apply unsharp mask. Copy and paste as a new layer onto your canvas. Position them at the bottom of the tree trunk (center them in front of it) Give them a drop shadow of H 0, V 2, Opacity 35, Blur 4.00.
Open up the apple from the kit. Resize by 8%, smartsize. Apply unsharp mask. Copy and paste as a new layer onto your canvas. Position the apple in front of the acorns, just slightly to the left. Give it a drop shadow of H -2, V 2, Opacity 30, Blur 5.00. Duplicate the apple. Resize the duplicated apple by 95%, bicubic. Go to image > free rotate. Rotate right by 90 degrees, both boxes unchecked. Position the duplicated apple to the right of tha acorns. Drag the rotated apple layer below your acorns layer.
Open up the berry branch from the kit. Resize by 20%, smartsize. Apply unsharp mask. Copy and paste as a new layer onto your canvas. Go to image > mirror. Give it a drop shadow of H -2, V 0, Opacity 45, Blur 4.00. Position it behind the left apple.
Open up the corn from the kit. Resize by 50%, smartsize. Apply unsharp mask. Copy and paste as a new layer onto your canvas. Go to image > free rotate. Rotate left by 90 degrees, both boxes unchecked. Give it a drop shadow of H 3, V 0, Opacity 40, Blur 5.00. Position it behind the squash (see my tag for reference)
Open the fabric leaves deco 1 from the kit. Resize by 20%, smartsize. Apply unsharp mask. Copy and paste as a new layer onto your canvas. Give it a drop shadow of H 2, V 0, Opacity 50, Blur 2.00. Duplicate. Go to image > mirror. Position them to your liking.
Open up fabric leaves deco 2. Resize, 20%, smartsize. Apply unsharp mask. Copy and paste as a new layer onto your canvas. Give it a drop shadow of H 0, V 2, Opacity 50, Blur 2.00. Duplicate. Go to image > mirror. Position them to your liking.
Highlight your top layer. Open up the stringed fall word art from the kit. Resize by 30%, smartsize. Apply unsharp mask. Copy and place as a new layer onto your canvas. Position in the upper right corner of your canvas. Give it a drop shadow H 3, V 2, Opacity 50, Blur 8.00.
Add any other embellishments of your choosing.
~~~~~~~~~~~~~~~~~~~~If you are animating, scroll down until you reach the 4 asteriks line. ~~~~~~~~~~~~~~~~~~~~
If you are NOT animating, highlight your white background layer. Open up a paper of choice from the kit. Copy and paste as a new layer onto your canvas. Apply Gems Mask 52 with the following settings:
Source Luminance
Fit to Canvas
Hide all Mask
Delete the mask from your layer palette, answer yes to the pop up box and merge the group. Resize the mask by 95%, bicubic. Go to adjust > blur > gaussian blur. Apply with a radius of 10.
Crop and resize to your liking. This is important to resize now, because if you do it after you weave, the dots will become blurry!!! :-)
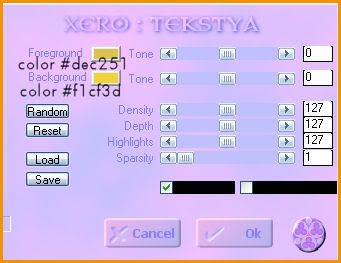
Apply Xero filters - Tekstya with the following settings:
Repeat one more time.
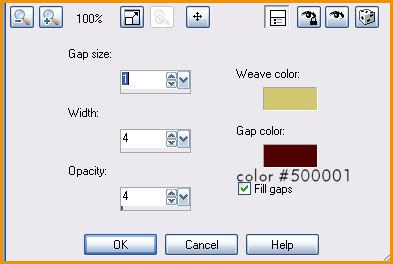
Now go to effects > texture effects > weave. Apply with the following settings:
Highlight your white background layer. Open up another paper from the kit. Copy and paste as a new layer onto your canvas. Apply UF Mask 61 with the following settings:
Source Luminance
Fit to Canvas
Hide all Mask
Invert Transparency ticked
Delete the mask, answer yes and merge the group. Resize the layer by 65%, bicubic. Go to selections > select all. Selections > float. Selections > defloat. Highlight the tekstya mask layer. Hit delete on your keyboard. Don't deselect yet!
Add a new raster layer. Go to effects > 3D effects > cut out. Apply with the following settings:
Deselect. Drag the cut out below the tekstya mask layer.
Highlight your tekstya mask layer and give it a drop shadow of H and V 0, Opacity 25, Blur 8.00.
Highlight your top layer. Open up the GG_Sunset. Copy and paste as a new layer onto your canvas. Position to your liking. Give it a drop shadow of H and V 0, Opacity 15, Blur 8.00.
Add your copyright info, watermark and your text. Save as PNG of JPG.
* * * *
If you are animating, resize your image by 90%, bicubic, all layers checked. Add your copyright info, watermark, and your text. Delete your white background layer, and merge your layers together. Copy your image. Open up Animation Shop. Paste as a new animation in AS.
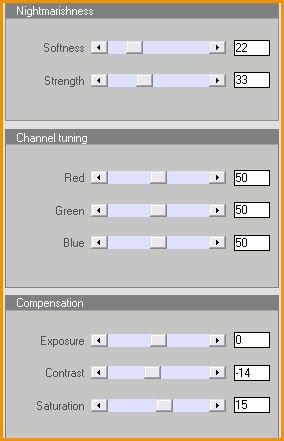
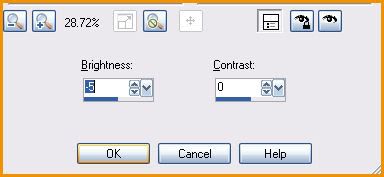
Back to Paint Shop Pro. We are going to start darkening our image, so it looks as if it is becoming night out. Go to adjust > Brightness/Contrast. Apply with the following settings:
Copy your tag. Paste after frame 1 in Animation Shop.
Back in PSP, adjust brightness/contrast, same settings. Copy. Paste after frame 2 in Animation Shop.
Back in Paint Shop Pro. Adjust Brightness/Contrast again, same settings. Copy. Paste after frame 3 in AS.
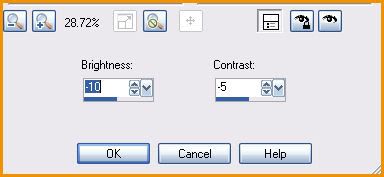
Back to PSP. Adjust Brightness/Contrast with the following settings:
Copy. Paste after frame 4 in AS.
Back to PSP. Adjust Brightness/Contrast, same settings you just used. Copy. Paster after frame 5 in Animation Shop.
Repeat the above steps, using the above settings for brightness/contrast, until you have a total of 13 frames.
In Animation Shop, select all frames of your animation (CTRL+A). Copy.
Open up the Sunset and Mask MNG file. Select all frames (CTRL + A) Go to edit > paste into selected frame. Position your tag over the sunset mask animation.
Now to add some stars to the night! Select frame 13 of your animation. Paste as a new animation. Duplicate frame 1 so you have 2 frames. Select all frames (CTRL+A). Open up the twink animation MNG file. Select all frames (CTRL+A) Copy the twink animation frames. Highlight your darkened 2 frame animation. Go to edit > paste into selected frame. Paste the twink star to your liking. Paste as many twinks as you want, wherever you want.
When you are done, select all frames. Copy. Highlightyour 13 frame animation. Select frame 13. Go to edit > paste AFTER current frame.
Highlight frame 15. Paste the twink 2 frame animation after current frame. Repeat this after frames 17, 19, 21 and 23. You should now have a total of 25 frames.
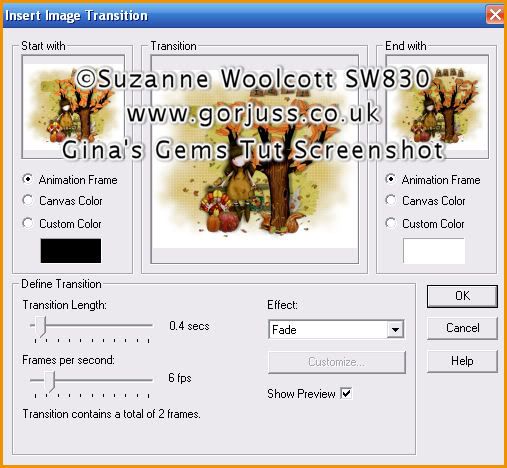
Highlight and select frame 13. Go to edit > insert image transition and apply with the following settings:
You will now have 27 frames.
Highlight and select frame 1. Copy. Highlight and select frame 27. Go to edit > paste after current frame. Highlight and select frame 27 again. Go to edit > insert image transition. Apply with the same settings you just used. You will now have a total of 30 frames.
Select all frames (CTRL+A) Go to Animation > Frame Properties. Change your frame properties to 25.
Highlight and select frame 13. Go to Animation > Frame Properties. Change the frame properties to 150.
Optimize and save as gif.
I hope you enjoyed this tutorial! If you have any questions, just give me a shout!
Subscribe to:
Post Comments (Atom)
0 comments:
Post a Comment