Monday, May 2, 2011
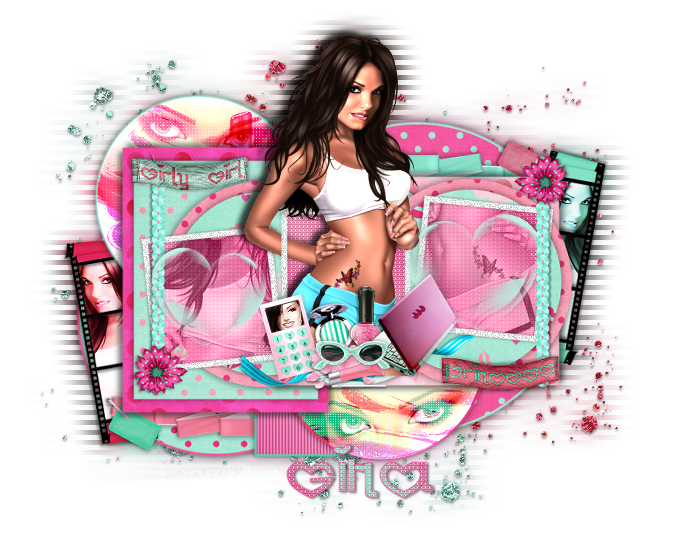
 Flirty Girly Princess
 This tutorial was written by me on 31 May 2010. Any similarities to other tutorials is purely coincidental.
Supplies Needed:
1 tube and 1 image/close up of choice. I am using the awesome artwork of Keith Garvey. I purchased this tube when he was still with MPT. If you would like to purchase his work now, you can with PSP Emporium.
Scrapkit. I am using Flirty Girly Princess made by me. It is available for purchase here, here, here, here or here.
Template 193 made by me. You can find it here.
Font of choice. I used Hearts (pay font).
Plug ins:
Eyecandy 4000 - Gradient Glow
Unplugged Tools - Interlace
Xero Filters - Bad Dream, Radiance and Soft Mood
DSB Flux - Linear Transmission
Visman Filters - Transmission (do a google search for more info on this freeware filter)
Penta Filters - Dot and Cross (this is part of the garbage collection)
~*~*~*~*~*~*~*~*~*~*~*~*~*~*~*~*~*~*~*~*~*~*~*~*~*~*~*~*~*~*~*~*~*~*
OK! Let's get started! Open up my template. Hold down shift + d to duplicate. Close the original. Delete the copyright info, and the strip 1 and 2 layers.
Highlight the Circle 1 layer. Go to selections > select all. Selections > float. Selections > defloat. Open up a paper from the kit. (I used Paper 3) Resize by 70%, smartsize. Copy and paste as a new layer onto your canvas. Position to your liking within the selection. Go to selections > invert. Hit delete on your keyboard. Deselect. (CTRL+D) Apply Eyecandy 4000 Gradient Glow, color # abead7, with the following settings:

Repeat the Gradient Glow one more time. Give the layer a drop shadow of H and V 0, Opacity 65, Blur 15.00. Delete the black Circle 1 template layer.
Highlight the Circle 2 layer. Select, float and defloat. Open up a paper from the kit. (I used Paper 1 from the Add On folder) Resize by 70%, smartsize. Copy and paste as a new layer onto your canvas. Position to your liking within the selection. Selections > invert. Hit delete and deselect. Apply Gradient Glow, color #f5579a, same settings as before. Repeat the Gradient Glow. Give the layer a drop shadow of H and V 0, Opacity 65, Blur 15.00. Delete the black Circle 2 template layer.
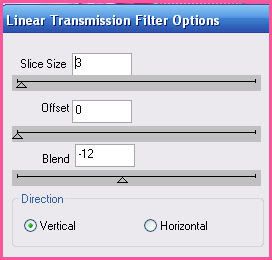
Highlight the Vertical Rectangle layer. Select, float and defloat. Chande your foreground color to #f5579a. Change your background color to #faa8c9. Click on your foreground color and make a gradient - Style - Linear, Angle 45, Repeats 1, Invert - UNCHECKED. Add a new raster layer to your working image. Floodfill the new layer with your gradient. DON'T DESELECT YET!! Apply DSB Flux - Linear Transmission with the following settings:
Deselect. Apply Gradient Glow, color #abead7, same settings as before. Repeat the gradient glow. Give the layer a drop shadow of H and V 0, Opacity 55, Blur 11.00. Delete the pink Vertical Rectangle Template layer.
Highlight the Circle 3 layer. Select, float and defloat. Add a new raster layer to your working image. Floodfill the new layer with your pink gradient. Don't deselect yet.
Open up the Lipstick with Smear photo from the kit. Resize by 50%, bicubic. Copy and paste as a new layer onto your canvas. Position to your liking within the selection. Go to selections > invert. Hit delete on your keyboard. Don't deselect yet!
Open up your image/close up. Resize, if necessary, bicubic. Copy and paste as a new layer onto your canvas. Position to your liking within the selection. Hit delete. Deselect.
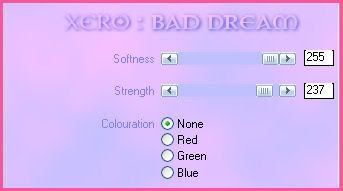
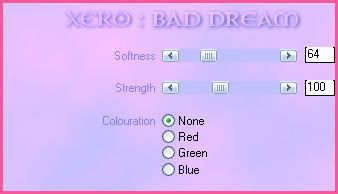
Highlight your close up/image layer. Apply Xero Filters - Bad Dream with the following settings:
Go to adjust > sharpness > unsharp mask. Apply with Radius - 5, Strength- 25, Clipping 2. Change the blend mode of the image/close up to Overlay.
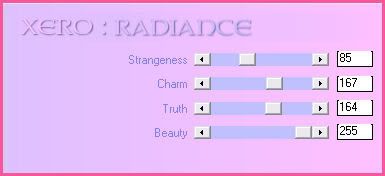
Highlight the Lipstic with Smear photo layer. Apply Xero Filters - Radiance with the following settings:
Change the blend mode of the lipstick layer to Multiply.
Highlight the Gradient Circle. Apply Penta Filters - Dot and Cross with the following settings:
.
Now apply Gradient Glow, color #abead7, with the following settings:
Repeat the gradient glow. Give the layer a drop shadow of H and V 0, Opacity 50, Blur 12.00. Delete the blue green Circle 3 template layer.
Highlight the Circle 4 layer. Select, float and defloat. Change your foreground color to #55d7b0, and your background color to #abead7. Click on your foreground color and make a gradient, Style - Linear, Angle 45, Repeats 1, Invert - UNCHECKED. Add a new raster layer to your working image. Floodfill the new layer with your gradient. Don't deselect yet!
Open up the Lipstick with Smear photo again. Resize by 70%, bicubic. Copy and paste as a new layer onto your canvas. Position to your liking with the selection. Selections > invert. Hit delete on your keyboard. Don't deselect yet!!
Open up your image/close up again. Resize, if necessary, bicubic. Mirror it. Copy and paste as a new layer onto your canvas. Position to your liking within the selection. Hit delete on your keyboard. Deselect. Apply Xero - Bad Dream to your image/close up with the following settings:
Change the blend mode to Overlay.
Highlight the Lipstick Smear and apply Xero - Radiance with the following settings:
Change the blend mode to Multiply.
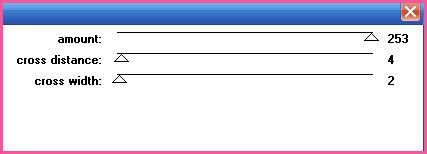
Highlight the Gradient Circle and apply Penta Filters - Dot and Cross with the following settings:
Apply Gradient Glow, color # F5579A, with the following settings:
Repeat the Gradient Glow. Give the layer a drop shadow of H and V 0, Opacity 50, Blur 12.00. Delete the pink Circle 4 template layer.
Highlight the Rectangle 1 layer. Select, float and defloat. Open up a paper from the kit. (I used Paper 29) Resize by 70%, smartsize. Copy and paste as a new layer onto your canvas. Position to your liking within the selection. Selections > invert. Hit delete and deselect. Give the layer a drop shadow of H 5, V -5, Opacity 50, Blur 10.00. Now give it a drop shadow of H -5, V 5, Opacity 50, Blur 10.00. Delete the blue green Rectangle 1 template layer.
Highlight the Rectangle 1 layer. Select, float and defloat. Open up a paper from the kit. (I used Paper 1) Resize by 70%, smartsize. Copy and paste as a new layer onto your canvas. Position to your liking within the selection. Go to selections > invert. Hit delete on your keyboard and deselect. Give the layer a drop shadow of H and V 0, Opacity 50, Blur 12.00. Delete the pink Rectangle 2 template layer.
Highlight the Rectangle 3 layer. Select, float and defloat. Open up a paper from the kit. (I used Paper 28) Resize by 70%, smartsize. Copy and paste as a new layer onto your canvas. Position to your liking within the selection. Selections > invert. Hit delete and deselect. Give it a drop shadow of H and V 0, Opacity 50, Blur 12.00. Delete the pink Rectangle 3 template layer.
Highlight the Circle 5 layer. Select, float and defloat. Open up a paper from the kit. (I used Paper 27) Resize by 70%, smartsize. Copy and paste as a new layer onto your canvas. Position to your liking within the selection. Selections > invert. Hit delete on your keyboard. Deselect. Give the layer a drop shadow of H and V 0, Opacity 50, Blur 10.00. Delete the gray circle 5 template layer.
Highlight the circle 6 layer. Select, float and defloat. Open up a paper from the kit. (I used Paper 4) Resize by 70%, smartsize. Copy and paste as a new layer onto your canvas. Position to your liking within the selection. Selections > invert. Hit delete and deselect. Give the layer a drop shadow of H and V 0, Opacity 50, Blur 10.00. Delete the torquoise circle 6 template layer.
Highlight the circle 7 layer. Select, float and defloat. Copy and paste the paper you just used (it should still be on your clipboard) Position to your liking within the selection. Selections > invert. Hit delete and deselect. Give it a drop shadow of H and V 0, Opacity 50, Blur 10.00. Delete the blue green circle 7 template layer.
Highlight the Circle 8 layer. Select, float and defloat. Open up a paper from the kit. (I used Paper 13) Resize, 70%, smartsize. Copy and paste as a new layer onto your canvas. Position to your liking within the selection. Selections > invert. Hit delete and deselect. Give it a drop shadow of H and V 0, Opacity 50, Blur 8.00. Delete the blue green circle 8template layer.
Highlight the Circle 9 layer. Select, float and defloat. Copy and paste the same you just used (it should still be on your clipboard) Position to your liking within the selection. Selections > invert. Hit delete and deselect. Give the layer a drop shadow of H and V 0, Opacity 50, Blur 8.00. Delete the blue green circle 9 template layer.
Highlight the frame fill 1 layer. Select, float and defloat. Changeyour foreground color to #f5579a. Change your background color to #faa2c5. Click on your foreground color and make a gradient - Style - Linear, Angle 45, Repeats 1, Invert unchecked. Add a new raster layer to your working image. Floodfill the new layer with your gradient. Don't deselect yet.
Open up your main tube. Resize, as necessary, bicubic. Mirror it. Copy and paste as a new layer onto your canvas. Position it to your liking within the selection. Selections >invert. Hit delete and deselect. Change the blend mode of your tube to Luminance (legacy) and lower to the opacity to about 63. Give it a drop shadow of H -3, Opacity 50, Blur 6.00. Highlight your frame fill 1 gradient layer and apply Unplugged Tools - interlace with the following settings:
Now apply Penta Dot and Cross with the following settings:
Delete the pink frame fill 1 template layer.
Highlight the frame fill 2 layer. Select, float and defloat. Add a new raster layer to your working image. Floodfill the new layer with your gradient. Deselect. Apply Unplugged Tools - Interlace, same settings you just used. Apply Penta Dot and Cross, same settings you just used. Delete the pink frame fill 2 template layer.
Highlight the frame fill 3 layer. Select, float and defloat. Add a new raster layer. Floodfill the new layer with your gradient. Don't deselect, yet. Open up your main tube. Resize, as necessary, bicubic. Copy and paste as a new layer onto your canvas. Position to your liking within the selection. Selections > invert. Hit delete and deselect. Change the blend mode of the tube to Luminance (Legacy). Lower the opacity to about 63. Give it a drop shadow of H 3, V 0, opacity 50, Blur 6.00. Highlight the gradient frame fill 3 layer. Apply Unplugged Tools - interlace, same settings as before. Apply Penta Dot and Cross, same setting as before. Delete the pink frame fill 3 layer.
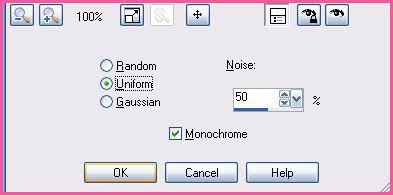
Highlight the frame fill 1 layer. Go to adjust > add/remove noise > add noise. Apply with the following settings:
Give it a drop shadow of H and V 0, Opacity 60, Blur 5.00.
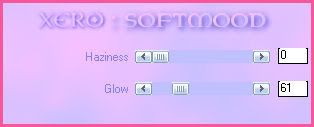
Highlight the frame 2 layer. Apply noise, same settings. Open up your main tube. Resize as necessary, bicubic. Copy and paste as a new layer onto your canvas. Position the tube to your liking. Apply Xero Soft Mood with the following settings:
Duplicate the tube. Drag the bottom tube layer below your frame 2 layer. Hide your top tube layer. Highlight your frame 2 layer. Grab your magic wand tool, tolerance set at 0, feather set at 0.00. Click inside the empty space of the frame 2 layer so that there are marching ants all around it. Go to selections > modify > expand by 1.00. Go to selections > invert. Grab your eraser tool, size 35, opacity 100. Carefully erase the bottom part of the tube that is hanging out of the frame. Unhide and highlight your top tube and do the same. Deselect. Still on your top tube, carefully erase part of the top tube so it looks as if she is intertwined with the frame (see my tag for reference) Highlight your bottom tube and give it a drop shadow of H -6, V -2, Opacity 70, Blur 15.00. Highlight the frame 2 layer and give it a drop shadow of H and V 0, Opacity 60, Blur 5.00.
Highlight the frame 3 layer and apply noise, same settings as bfore. Give it a drop shadow of H and V 0, opacity 60, Blur 5.00.
Open up a cell phone from the kit. Resize by 30%, smartsize. Copy and paste as a new layer onto your canvas. Go to image > free rotate. Rotate left by 15.00 degrees, both boxes unchecked. Go to adjust > unsharp mask. Apply with radius - 20. strength 50, clipping 13. Give it a drop shadow of H and V 0, opacity 45, Blur 8.00. Position it over the bottom left corner of the middle frame.
Open up the laptop from the kit. Resize by 40%, smartsize. Copy and paste as a new layer onto your canvas. Go to image > mirror. Give it a drop shadow of H and V 45, Blur 8.00. Position it over the right bottom corner of the middle frame.
Open up the eyeshadow from the kit. Resize by 35%, smartsize. Copy and paste as a new layer onto your canvas. Go to image > free rotate. Rotate left by 10.00 degrees, both boxes unchecked. Apply Unsharp Mask, same settings as before. Give it a drop shadow of H -2, Opacity 40, Blur 6.00. Position it next to the cell phone. Drag it below the cell phone layer.
Open up the nail polish from the kit. Resize by 40%, smartsize. Copy and paste as a new layer onto your canvas. Position it next to the laptop. Give it a drop shadow of H 2, V 0, opacity 40, Blur 6.00. Drag it below the laptop layer.
Highlight your top layer. Open up the lipgloss with flowers from the kit. Resize by 30%, smartsize. Copy and paste as a new layer onto your canvas. Give it a drop shadow of H and V 0, Opacity 35, Blur 8.00. Position it at the bottom of the eyeshadow and the nail polish.
Open up a sunglasses from the kit. (I used sunglasses 1) Reszie by 30%, smartsize. Copy and paste as a new layer onto your canvas. Give it a drop shadow of H and V 0, opacity 40, Blur 8.00. Position it right above the lipgloss and flowers.
Open up a sequins from the kit. (I used Sequins 2) Resize by 55%, smartsize. Copy and paste as a new layer onto your canvas. Give it a drop shadow of H 2, V -1, Opacity 45, Blur 4.00. Position it to the right of frame 3. (see my tag for reference) Duplicate. Go to image > mirror. Then, image > flip. Position it to the left of frame 1.
Open up a pretty flower from the kit. (I used pretty flower 2) Resize by 25%, smartsize. Copy and paste as a new layer onto your canvas. Give it a drop shadow of H and V 1, Opacity 35, Blur 6.00. Position it at the bottom of the left sequins. Duplicate the flower. Mirror it. Position it at the top of the right sequins.
Open up a texture tag from the kit. Resize by 50%, bicubic. Copy and paste as a new layer onto your canvas. Give it a drop shadow of H and V 0, Opacity 50, Blur 8.00. Position it over the top end of the left sequins (see my tag for reference)
Open up another texture tag from the kit. Resize, 50%, bicubic. Copy and paste as a new layer onto your canvas. Give it a drop shadow of H and V 0, Opacity 50, Blur 8.00. Position it over the bottom end of the right sequins.
Highlight your top layer. Open up a bubble heart from the kit. Resize by 40%, smartsize. Copy and paste as a new layer onto your canvas. Give it a drop shadow of H 3, V -1, Opacity 35, Blur 8.00. Position it over the right frame fill. Duplicate the bubble heart. Resize the duplicated bubble heart by 85%, bicubic. Mirror it. Position it over the left frame fill.
Open up a folded ribbon from the kit. Resize by 40%, smartsize. Copy and paste as a new layer onto your canvas. Give it a drop shadow H-3, V 2, Opacity 40, Blur 7.00. Position it towards the bottom of the bottom left circle. Drag it to right above your circle 2 layer. (see my tag for reference)
Open up another folded ribbon of choice. Resize, 40%, smartsize. Copy and paste as a new layer onto your canvas. Give it a drop shadow of H 3, V 2, Opacity 40, Blur 7.00. Go to image > mirror. Then, image > flip. Position it towards the top of the right top circle. Drag it to right above your circle 1 layer (see my tag for reference)
Open up negative frame 1 from the kit. Resize by 50%, smartsize. Copy and paste as a new layer onto your canvas. Go to image > free rotate. Rotate right by 80.00 degrees, both boxes unchecked. Position it to the right of the circle 2 layer. Drag it to right above the circle 2 layer. (see my tag for reference) Grab your magic wand tool, tolerance set to 100, feather set to 0.00. Click inside the 3 empty spaces of the negative frame. Go to selections > modify > expand by 2.00. Open up a paper from the kit. (I used Paper 32) Resize by 70%, smartsize. Copy and paste as a new layer onto your canvas. Position to your liking within the selection. Selections > invert. Hit delete on your keyboard. Don't deselect yet.
Open up your main tube. Resize as necessary, bicubic. Mirror the tube. Copy and paste as a new layer onto your canvas. Position it to your liking within the selection. Hit delete and deselect. Apply Xero - Bad Dream with the following settings:
Change the blend mode of the tube to Hard Light. Highlight your negative frame layer and drag it above your Hard Light tube layer. Give it a drop shadow of H -2, V 0, Opacity 45, Blur 3.00.
Open up Negative Frame 2 from the kit. Resize, 50%, smartsize. Copy and paste as a new layer onto your canvas. Go to image > free rotate. Rotate left by 80.00 degrees, both boxes unchecked. Position to the left of the circle 1 layer. Drag it to right above your circle 1 layer. Grab your magic wand tools, same settings as before. Click inside the 3 empty spaces of the frame. Go to selections > modify > expand by 2.00. Open up a paper from the kit. (I used Paper 30) Resize by 70%, smartsize. Copy and paste as a new layer onto your canvas. Position to your liking within the selection. Selections > Invert. Hit delete. Don't deselect yet.
Open up your main tube again. Resize, as necessary, bicubic. Copy and paste as a new layer onto your canvas. Position to your liking within the selection. Hit delete and deselect. Apply Xero Bad Dream, same settings as before. Change the blend mode to Hard Light.
Highlight your negative frame layer and drag it above the tube layer. Give it a drop shadow of H 2, V 0, Opacity 45, Blur 3.00.
Highlight your white background layer. Open up Glitter Splat 5 from the kit. Copy and paste as a new layer onto your canvas. Give it a drop shadow of H 0, V 2, Opacity 35, Blur 3.00. Position as in my tag above.
Open up Glitter Splat 6 from the kit. Resize by 90%, smartsize. Copy and paste as a new layer onto your canvas. Go to adjust > sharpen. Give it a drop shadow of H 0, Opacity 35, Blur 3.00. Position as in my tag above.
Add any other embellishments of your choosing.
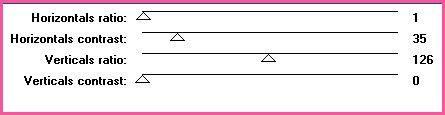
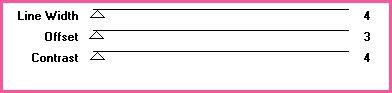
Hide your white background layer. Merge your visible layers together. Duplicate the merged layer. On your bottom merged layer, go to adjust > blur > gaussian blur. Apply with a radius of 10. Now apply Visman Filters - Transmission with the following settings;
Crop and resize to your liking.
Add your copyright info, watermark, and your text. Save as JPG or PNG.
I hope you enjoyed this tutorial! If you have any questions, just give me a shout.
Subscribe to:
Post Comments (Atom)
0 comments:
Post a Comment