Tuesday, May 3, 2011
 Toxic Candy
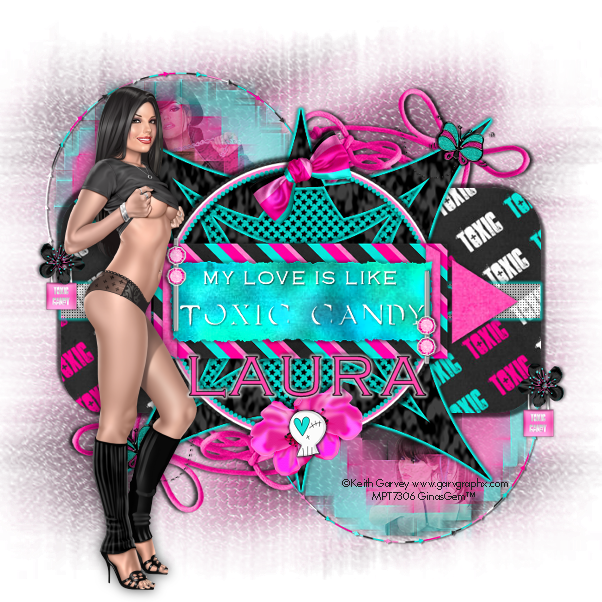
This tutorial was written by me on 21 May 2009. Any similarities to other tutorials is purely coincidental.
Supplies Needed:
3 tubes of choice. I am using the sexy artwork of Keith Garvey. I bought this tube when he was still with MPT. You can now purchase his artwork at PSP Tubes Emporium.
Scrapkit. I am using the awesome it Toxic Candyland by Cinnamon Scraps. You can grab this awesome freebie here. Thank you, Laura!!
Template 162 made by me. You can find it here.
EBD Mask 55 by Rachel of Enchanted by Darkness. Check out her site for awesome tuts and resources!
Font of choice. I used Copperplate Gothic Light which you can download here.
Plugins:
Tramages - Mo' Jellyfish. Do a search on google for more info. :-)
Mehdi Filters - Blots 2 and Weaver
Eyecandy 4000 - Gradient Glow
Eyecandy 5 Textures - Texture Noise
Supplies HERE
*~*~*~*~*~*~*~*~*~*~*~*~*~*~*~*~*~*~*~*~*~*~*~*~*~*~*~*~*~*~*~*~*~*~*~*~*~*
Ok! Let's get started! Open up my template. Duplicate by holding down shift + d. Close the original. Delete the credit info layer.
Highlight the arrowed circles layer. Go to selections > select all. Selections > float. Selections > defloat. Open up a paper from the kit. Resize by 80%, smartsize. Copy and paste the paper as a new layer onto your canvas. Go to selections > invert. Hit delete on your keyboard. Deselect (CTRL+D) Give the layer a drop shadow of H 2, V 0, Opacity 60, Blur 2.00. Delete the black arrowed circles layer.
Highlight the rounded rectangle layer. Select, float and defloat. Open up a paper from the kit. Resize by 85%, smartsize. Copy and paste as a new layer onto your canvas. Selections > invert. Hit delete. Deselect. Give the layer a drop shadow of H and V 5, Opacity 65, Blur 7.00. Now give it a drop shadow of H and V -5, Opacity 65, Blur 7.00. Delete the gray rounded rectangle layer.
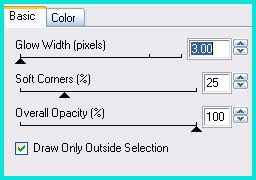
Highlight the white stripe layer. Apply Eyecandy 4000 - gradient glow (with a bright color of choice) using the following settings:
Give it a drop shadow of H and V 0, Opacity 65, Blur 5.00.
Highlight the shape fabric fill layer. You can leave it as is, or colorize it, or add a paper. (I added a paper)
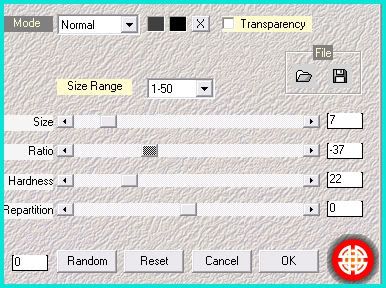
Highlight the shape layer. Select, float and defloat. Open up a paper from the kit. (a solid colored paper would work best) Resize by 80%, smartsize. Copy and paste onto your canvas. Selections > invert. Hit delete and deselect. Change your background color to a color one shade lighter than your paper and your foreground color to a color a shade darker to your paper. Apply Mehdi Blots 2 with the following settings:
Now, apply Gradient Glow, same settings as earlier. Repeat the gradient glow one more time. Give it a drop shadow of H and V 0, Opacity 85, Blur 10.00. Delete the black shape layer.
Highlight the rectangle layer. Select, float and defloat. Open up a paper from the kit. Resize by 80%, smartsize. Copy and paste onto your canvas. Selections > invert. Hit delete on your keyboard and deselect. Give the layer a drop shadow of H and V 3, Opacity 65, Blur 5.00. Now give it a drop shadow of H and V -3, Opacity 65, Blur 5.00. Delete the gray rectangle layer.
Highlight the triangles layer. Select, float and defloat. Open up a paper from the kit. Resize by 80%, smartsize. Copy and paste onto your canvas. Selections > invert. Hit delete and deselect. Give the layer a drop shadow of H and V 0, Opacity 65, Blur 7.00. Delete the gray triangles layer.
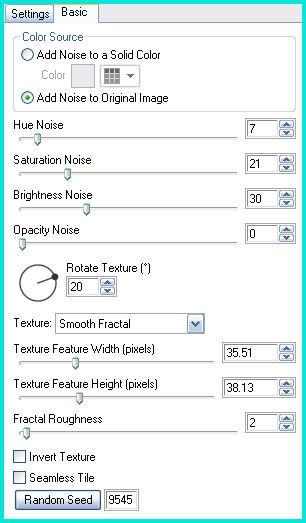
Highlight the burnt rectangle layer. Select, float and defloat. Open up a paper from the kit. Resize by 80%, smartsize. Copy and paste onto your canvas. Selections > invert. Hit delete and deselect. Apply Eyecandy 5 Textures - Texture Noise with the following settings:
Give the layer a drop shadow of H and V 2, Oapcity 65, Blur 5.00. Now give it a drop shadow of H and V -2, Oapcity 65, Blur 5.00. Delete the white burnt rectangle layer.
Highlight the word art layer. Select, float and defloat. Add a new raster layer. Floodfill the new layer with a color choice. Deselect. Give the layer a drop shadow of H and V 1, Opacity 65, Blur 2.00. Delete the black word art layer.
Open up flower 14 from the kit. Copy and paste onto your canvas. Position it in the center of the top left arrowed circle. Apply Mehdi - Weaver with the following settings:

Give the layer a drop shadow of H -3, V 0, Opacity 45, Blur 3.00. Lower the opacity to 65. Duplicate. Go to image > mirror. Then, image > flip. Position the duplicated flower in the bottom right arrow circle.
Highlight your top left weaved flower. Grab your magic wand tool, tolerance set to 100, feather set at 15. Click inside of the weaver flower so that there are marching ants all around it. Open up your first tube of choice. Copy and paste onto your canvas. Position it to your liking within the selection. Hit delete 3x. Deselect. Change the blend mode of the tube to Soft Light. Give it a drop shadow of H -4, V -1, Opacity 65, Blur 6.00.
Highlight the bottom right weaved flower and repeat the above steps using a different tube.
Open up string1 from the kit. Resize by 70%, smartsize. Copy and paste onto your canvas. Give it a drop shadow H -3, V 2, Opacity 65, Blur 4.00. Position it behind the top right point of your shape. Duplicate. Go to image > mirror. Then, image > flip. The duplicated string should be positioned behind yor bottom left layer. (see my tag for reference)
Highlight your shape layer. Open up frame 4 from the kit. Resize by 60%, smartsize. Copy and paste as a new layer onto your canvas. It should be centered behind your shape layer. Give it a drop shadow of H and V 0, Opacity 85, Blur 8.00.
Highlight your top layer. Open up a bow 5 from the kit. Resize by 40%, smartsize. Copy and paste onto your canvas. Give it a drop shadow of H 2, V 0, Opacity 55, Blur 4.00. Position at the top of the circle frame.
Open up flower 2 from the kit. Resize by 30%, smartsize. Copy and paste onto your canvas. Give it a drop shadow of H 3, V 0, Opacity 50, Blur 4.00. Duplicate. Go to image > mirror. Position the flowers at the bottom of the circle frame.
Open up an acrylic skull from the kit. Resize by 20%, smartsize. Copy and paste onto your canvas. Give it a drop shadow of H and V 0. Opacity 60, Blur 6.00. Position in the center of the 2 flowers.
Open up a keylock from the kit. Resize by 20%, smartsize. Copy and paste onto your canvas. Give it a drop shadow of H and V 0, Opacity 55, Blur 5.00. Duplicate. Position them to your liking on the rounded rectangle.
Open up flower 3 from the kit. Resize by 25%, smartsize. Copy and paste onto your canvas. Give it a drop shadow of H and V 0, Opacity 50, Blur 4.00. Duplicate. Go to image > mirror. Position them to your liking on the rounded rectangle.
Open up butterfly 12 from the kit. Resize by 30%, smartsize. Copy and paste onto your canvas. Give it a drop shadow of H 2, V 0, Oapcity 60, Blur 3.00. Duplicate. Go to image > mirror. Position them over the strings. (see my tag for reference)
Open up a deco staple from the kit. Resize by 50%, smartsize. Copy and paste onto your canvas. Go to image > free rotate. Rotate left by 90.00 degrees, both boxes unchecked. Give it a drop shadow of H 2, V 0, Opacity 55, Blur 5.00. Duplicate. Go to image > mirror. Then, image > flip. Position them to your liking on the burnt rectangle.
Add any other embellishments of your choosing.
Highlight your white background. Open up a paper from the kit. Don't resize. Copy and paste as a new layer onto your canvas. Apply EBD Mask 55 with the following settings:
Source Luminance
Fit to Canvas
Hide all Mask
Delete the mask, answer yes and merge the group. Duplicate. Merge the 2 mask layers together. Apply Tramages - Mo' Jellyfish with the following settings:
Give the layer a drop shadow of H and V 2, Opacity 45, Blur 4.00.
Highlight your top layer. Open up your main tube. Resize, if necessary, bicubic. Copy and paste onto your canvas. Position to your liking. Give your tube a drop shadow of H and V 0, Opacity 75, Blur 13.00.
Crop and resize to your liking.
Add your copyright info, watermark and your text.
Save as JPG or PNG.
I hop you enjoyed this tutorial! If you have any questions, just give me a shout.
Subscribe to:
Post Comments (Atom)
0 comments:
Post a Comment