Tuesday, May 3, 2011
 Rock Chic Gal
This tutorial was written by me on 18 May 2009. Any similarities to other tutorials is purely coincidental.
Supplies Needed:
3 tubes of choice. I am using the awesome artwork of Ismael Rac. I purchased this tube when he was still with MPT. You can now purchase his artwork at his store here.
Scrapkit. I used Rock Chic by Creative Intuitionz. If you wish to purchase this amazing kit, you can here. Thank you, Melissa!!
Template 161 made by me which can be found here.
Mask 56 by Vix. CHeck out her site for awesome tuts and resources!!
Font of choice. I used Pastor of Muppets which can be downloaded here.
Plugins:
Tramages - Tow the Line Do a search on google for more details. :-)
Medhi Filters - Fur 2
L & K Filters - Mayra
Eyecandy Impact - Gradient Glow
Eyecandy 5 Nature - Corona
Cybia Screenworks - Pin Hole
Animation Shop (opt)
Supplies HERE
*~*~*~*~*~*~*~*~*~*~*~*~*~*~*~*~*~*~*~*~*~*~*~*~*~*~*~*~*~*~*~*~*~*~*~*~*~*~
Ok! Let's get started! Open up my template. Duplicate by holding shift + d. Close the original. Delete the credit info layer.
Highlight the circle 1 layer. Go to selections > select all. Selections > float. Selections > defloat. Add a new raster layer. Open up a paper from the kit. Resize by 70%, smartsize. Highlight the new layer. Go to > Paste into Selection. Deselect. Apply Corona using a color of choice with the following settings:
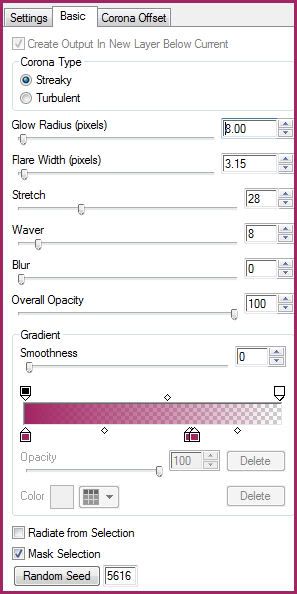
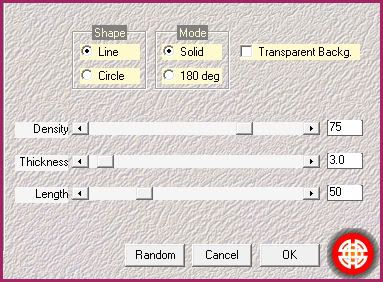
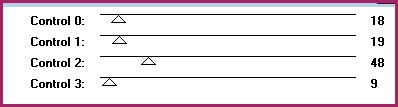
Now apply Medhi Fur 2 with the following settings:
Now apply Corona, same settings as before. Give the layer a drop shadow of H -4, V 3, Opacity 70, Blur 5.00. Delete the gray circle 1 layer.
Highlight the circle 2 layer. Repeat all the same steps you did with the circle 1 layer. Delete the black circle 2 layer.
Highlight the stars fill layer. Grab your magic wand tool, tolerance set at 30, feather set at 0.00. Click on one of the gray stars fill. Open up a paper from the kit. Resize by 45%, smartsize. Copy and paste as a new layer onto your canvas. Position to your liking within the selection. Selections > invert. Hit delete on your keyboard. Don't deselect yet.
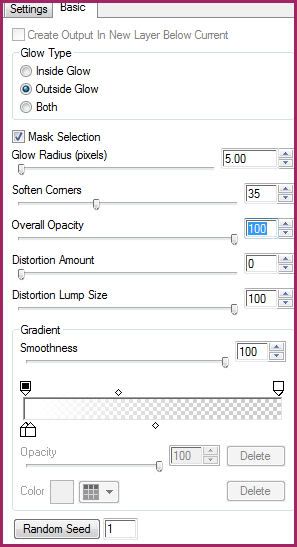
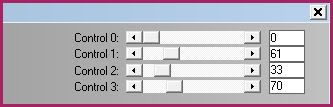
Open up your first tube of choice. Resize as necessary, bicubic. Copy and paste onto your canvas. Position to your liking within the selection. Hit delete and deselect. Apply Gradient Glow to your tube, color white, with the following settings:
Change the blend mode of the tube to Luminance (Legacy). Give your tube a drop shadow of H and V 0, Opacity 55, Blur 5.00.
Repeat the same steps with the other star, but mirror your tube. Delete the gray stars fill layer.
Highlight the stars frames layer. Select, float and defloat. Add a new raster layer. Floodfill the new layer with a color of choice. Deselect. Apply Screenworks - Pin Hole Give the layer a drop shadow of H and V 0, Opacity 75, Blur 7.00. Delete the gray stars frames layer.
Highlight the rectangles circles layer. Select, float and defloat. Open up a paper from the kit. Don't resize. Copy and paste as a new layer onto your canvas. Selections > invert. Hit delete on your keyboard. Deselect. Give the layer a drop shadow of H and V 0, Opacity 75, Blur 6.00. Delete the dark gray rectangles circles layer.
Highlight the X Mask layer. Select, float and defloat. Add a new raster layer. Floodfill the new layer with a light color from your tube. Deselect. Apply Tramages Tow the Line with the following settings:
Now apply Screenworks - Pinhole. Give the layer a drop shadow of H 3, V -2, Opacity 65, Blur 5.00. Now give it a drop shadow of H -4, V 3, Opacity 60, Blur 5.00. Delete the gray X Mask layer.
Highlight the X Black fill layer. Select, float and defloat. Open up a paper from the kit. Resise by 65%, smartsize. Copy and paste onto your canvas. Position to your liking within the selection. Hit delete. Don't deselect.
Open up your 2nd tube of choice. (preferably a close up) Copy and paste onto your canvas. Position to your liking within the X. Duplicate the tube. Hide teh top tube layer and drag it above your X white fill layer. HIghlight your bottom, unhidden tube layer and hit delete. Change the blend mode of the layer to Multiply. Give it a drop shadow of H and V 0, Opacity 65, Blur 3.00. Delete the X black fill layer.
Highlight the X white fill layer. Select, float and defloat. Open up a paper from the kit. Resize by 65%, smartsize. Copy and paste onto your canvas. Selections > invert. Hit delete. Don't deselect yet.
Unhide your tube layer. Highlight it and hit delete. Deselect. Change the blend mode of Hard Light. GIve the tube a drop shadow of H and V 0, Opacity 65, Blur 3.00. Delete the X white fill layer.
Highlight the X layer. Select, float and defloat. Add a new raster layer. Choose a bright color from your tube, or use the same color you used for your star frames layer. Floodfill the new layer with your chosen color. Deselect. Apply Screenworks - Pin Hole. Give the layer a drop shadow of H 3and V -2, Opacity 75, Blur 6.00. Now give it a drop shadow of H -2, V -3, Opacity 65, Blur 3.00. Delete the gray X layer.
Open up element 33 (ribbon) from the kit. Resize by 35%, smartsize. Copy and paste onto your canvas. Give it a drop shadow of H 2, V -2, Opacxiry 55, Blur 4.00. Duplicate. Go to image > mirror. Then, image > flip. Position the ribbons to your liking on the X, or see my tag for reference.
Open up element 78 (wax seal) from the kit. Resize by 15%, smartsize. Copy and paste onto your canvas. Give it a drop shadow of H and V 0, Oapcity 65, Blur 4.00. Position to your liking on the X layer.
Open up element 21 (boot button) from the kit. Resize by 15%, smartsize. Copy and paste onto your canvas. Give it a drop shadow of H and V 0, Opacity 65, Blur 4.00. Position to your liking on the X layer.
Open up element 18 (Rock wordart) from the kit. Resize by 35%, smartsize. Copy and paste onto your canvas. GIve it a drop shadow of H 2, V 0, Opacity 65, Blur 3.00. Position at the bottom of the bottom circle.
Open up element 5 (guitar) from the kit. Resize by 85%, smartsize.Copy and paste onto your canvas. Give it a drop shadow of H 2, V 0, Opacity 65, Blur 3.00. Position it towards the top of the tag and drag it beneath the rectangles circles layer.
Open up element 51 (crystal music note) from the kit. Resize by 35%, smartsize. Copy and paste onto your canvas. Give it a drop shadow of H and V 0, Opacity 60, Blur 5.00. Go to image > flip. Position the music note behind the top star. Duplicate the music note. Go to image > mirror. Position it behind the bottom star.
Open up element 10 (wings) from the kit. Resize by 45%, smartsize. Copy and paste onto your canvas. Give it a drop shadow of H -2, V -1, Opacity 60, Blur 3.00. Position it behind the top circle.
Open up element 25 (stars) from the kit. Copy and paste onto your canvas. Give it a drop shadow of H and V 0, Oapcity 70, Blur 8.00. Position towards the left top of the tag. Drag it below all of the template layers to right above your white background. Duplicate. Go to image > mirror. Then, image > flip. Position them as in my tag above.
Add any other embellishments of your choosing.
Highlight your white background. Add a new raster layer. Go to selections > select all. Open up a paper from the kit. Copy. HIghlight your new layer. Go to > paste into selection. Deselect. Apply VIx Mask 56 with the following settings:
Source Luminance
Fit to Canvas
Hide all Mask
Delete the mask, answer yes and merge the group. Duplicate the mask. Go to image > mirror. Then image > flip. Position the 2 mask layers as in my tag above. Merge the 2 mask layers together. Apply L and K - Mayra with the following settings:
Give the mask a drop shadow of H 3, V 0, Opacity 45, Blur 3.00.
Crop and resize to your liking.
Add your copyright info, watermark and your text. If you are not animating, save as JPG or PNG.
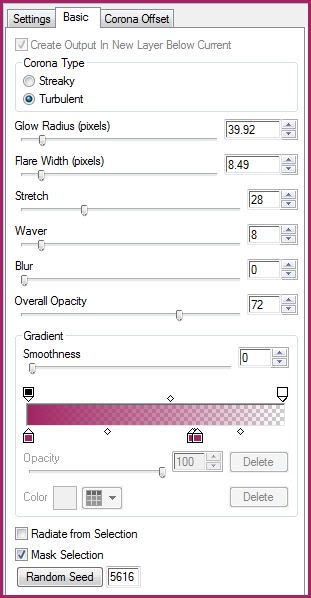
If you are animating, highlight your merged mask layer. Apply Eyecandy 5 Nature - Corona with the following settings:
Copy merged. Open up Animation Shop. Paste as a new animation in AS.
Back to Paint Shop Pro. Go to edit > undo corona. Apply Corona, again, same settings, except this time hit the random seed button. Copy merged. Paste after your current frame in AS.
Repeat the above steps 3 more times for a total of 5 frames.
In AS, select all frames (CTRL+A). Change the frame properties to 16.
Optimize and save as gif.
I hope you enjoyed this tutorial! If you have any questions, just give me a shout.
Subscribe to:
Post Comments (Atom)
0 comments:
Post a Comment