Wednesday, May 4, 2011
 Total Bettie

This tutorial was written by me on 21 September 2008. Any similarities to other tutorials is purely coincidental.
Supplies Needed
2 tubes of choice. Preferably one of them a close up. I am using the gorgeous artwork of Olivia. I got this tube when CILM was still open. You can find her CDO now.
Scrapkit. I'm using the awesome scrapkit Distinctively Auri by Scraps by Jessica. This scrap is worth buying just for the memory board alone! lol You can purchase this awesome scrapkit here Thank you Jessica!
Sinedots made by me
Word Art made by me
Font of choice. I used Gwendolyn (pay font)
Filters Needed:
EyeCandy 4000 HSB Noise (for animation)
Let's begin! Open up a new transparent image 720x 600. Floodfill with white. Open up the Memory Dashboard separate layers from the scrapkit. Highlight the bottom layer (the solid purple layer) Copy and paste as a new layer onto your canvas. Open up your close up tube. Resize (bicubic) if necessary. Paste as new layer onto your canvas. Position to you liking within the purple dashboard layer. (keep the memory dashboard open . . . we will be using it again in a bit) Give your tube a drop shadow of H and V 0, Opacity 75%, Blur 12.00.
Highlight the purple dashboard layer. Go to Selections > Select all. Selections > Float. Defloat. Highlight your tube layer. Go to Selections > Invert. Hit delete on your keyboard. Deselect (CTRL+D)
Open up the heart frame. Resize by 55%, smartsize. Grab your magic wand tool, tolerance 30, feather 0.00. Click inside the empty space of the frame. Go to Selections > Modify > expand by 8.00. Open up your your other tube of choice. Resize if necessary (bicubic) Paste as a new layer onto your canvas and position to your liking within the heart frame. Go to Selections > Invert. Hit delete on your keyboard. Deselect (CTRL+D) Give your tube a drop shadow of H and V 0, Opacity 70, blur 10.00. Give your heart frame layer a drop shadow of H and V 0, Opacity 60, Blur 10.00.
Back to the memory dashboard. Copy the right ribbons layer. Paste as a new layer onto your canvas. Now, I colorized the ribbons to match my tube, but this is totally optional. Lower the opacity of the right ribbons to about 50%. Give the right ribbons a drop shadow of H and V 0, Opacity 50, Blur 10.00.
Back to the memory dashboard. Highlight the left ribbons layer and copy. Paste onto your canvas. I also colorized these ribbons, a bit darker color from my tube. Again, this is optional. Lower the opacity to 50%. Give it a drop shadow of H and V 0, Opacity 50, Blur 10.00
Back to the memory dashboard. Copy the top merged layer (black dots) and paste as a new layer onto your canvas. Highlight your heart frame layer. Drag it to the top of your palette. (leave the tube layer below the ribbons)
Hide your white background and merge your visible layers. Give the tag layer a drop shadow of H and V 0, Opacity 45, Blur 20.00.
Open up ribbon3. Resize by 20%. Paste as a new layer onto your canvas. Give it a drop shadow of H and V 0, Opacity 50, Blur 4.00. Duplicate the ribbon 3 times, so you have a total of 4 and position them along the bottom edge of your tag. Open up a flower of choice. Resize as necessary and position in the middle of the ribbons. Give it the same drop shadow you gave your ribbons.
Open up the doorlock. Resize by 60%. Paste onto your canvas. Give it a drop shadow of H and V 0, Opacity 50, Blur 4.00. Duplicate the lock layer 2 more times so you have a total of 3. Position them along the vertical side of your tag. (see my tag for reference) Open up a gem of choice. Resize by 20%. Duplicate the gem 5 times so you have a total of 6, and position them so they look as if the are holding the doorlocks in place. (see my tag for reference)
Open up a bow of choice. Resize by about 35%. Position in the right upper corner of your tag. Give it the same drop shadow you gave your doorlock.
Add any other embellishments of your choosing. When you are done, hide your white backgrond and merge your visible layers.
Highlight your white background layer. Open up Sinedots2, and paste as new layer onto your canvas. Give it a drop shadow of H and V 0, Opacity 50, Blur 5.00.
Highlight your white background layer again. Open the glittersplat from your scapkit. Resize by 95% and paste onto your canvas. Give it a drop shadow of H -1, V 0, Opacity 50, Blur 2.00.
Hide your white background, and merge your visible layers. Duplicate the merged layer. On the top layer, resize your merged layer by 95%, Bicubic. Go to Adjust > Sharpness > Unsharp Mask. Apply with Radius 5.00, Strength 10, Clipping 1.
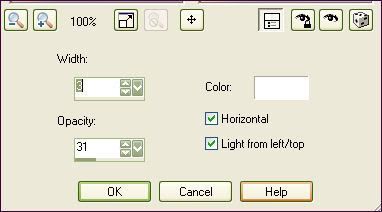
On the bottom layer go to Adjust > Blur > Gaussian Blur. Radius 10. Go to Effects > Texture Effects > Blinds. Apply with the following settings:
Now Apply the filter Xero Bad Dream with the following settings:
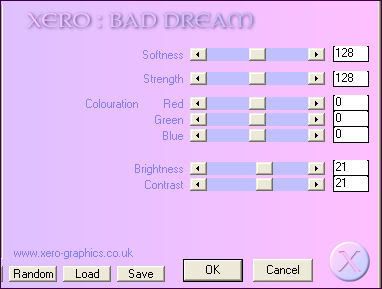
Lower the opacity of this layer to 70%.
Open up the Total Bettie Wordart. Decorate or colorize to your liking. Add your copyright info, watermark and any other text. Crop and resize to your liking. If you are not animating, merge your layers and save as PNG or JPG. If you are animating, let's continue!
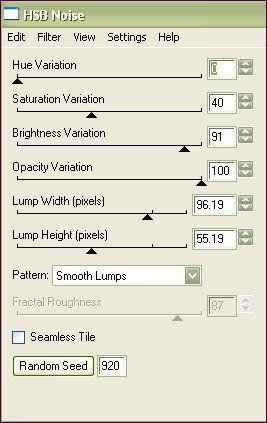
Highlight your blurred layer. Apply the filter EyeCandy HSB Noise with the following settings:
Copy merged. Open up Animation Shop. Paste as a new animation in AS. Back to PSP. Go to Edit > Undo HSB Noise. Redo HSB Noise but this time click the Random Seed button. Copy merged and paste after Frame 1 in AS. Repeat this step 2 more times for a total of 4 frames. Select all of the frames (CTRL+A) Change the frame properties to 20.
Optimize and save as GIF. I hope you emjoyed this tutorial. If you have any questions, give me a shout or send me an email.
Subscribe to:
Post Comments (Atom)
0 comments:
Post a Comment