Wednesday, May 4, 2011
 Autumn's Gift

This tutorial was written by me on 19 September 2008. Any similiarities to other tutorials is purely coincidental.
Supplies Needed:
Tube of choice. I'm using the artwork of Steve Baier. If you wish to use his beautiful work, you must purchase a license with UYA
Scrapkit. I'm using the elegant scrapkit Autumn's Gift by Baby Cakes Scraps. You can purchase this beautiful kit at her blog or at her store
Gold pattern (supplied) Put in your patterns folder
Font of choice. I used Mea Culpa (Pay Font)
Filters Needed:
Visman Natural Sparkles (opt)
Ok! Let's begin! Open up a new transparent image 650 x 650. Floodfill with white. Open up a wreathe of choice. Paste as a new layer onto your canvas. Grab your freehand selection tool - Selection Type: point to point, feather set a 0.00. Draw a circle around the empty space of the wreathe :
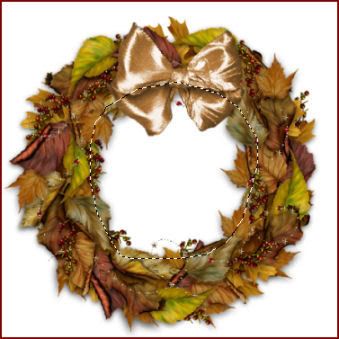
Open up a paper of choice. Copy and paste as a new layer onto your canvas. Position the paper so that the part you want showing is in the middle of the selected circle. Go to Selections > Invert. Hit delete on your keyboard. Deselect. (CTRL+D) Drag your paper layer beneath your wreathe.
Open up your tube. Resize if necessary (bicubic) Position your tube to your liking within the wreathe. Duplicate the tube layer and drag the duplicated tube layer below your wreathe layer but above your paper layer. Highlight the top tube layer. Grab your eraser tool size set at about 20, opacity 80. Erase the parts of the tube that don't hanging out of the wreathe. Give your bottom tube layer a drop shadow of H and V 0, Opacity 85%, Blur 15.00. Hide your white background, and merge your visible layers.
Open up a blossom of choice. Resize to about 25% smartsize. Paste as a new layer onto your canvas. Apply filter Mura Meister Copies with the following settings:
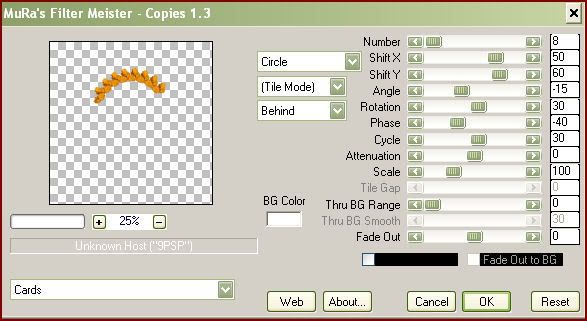
Give the flowers a drop shadow of H and V 0, Opacity 60%, blur 7.00. Drag the flowers below the wreathe layer and position so that the tops of the flower are peeking out from below the wreathe. Duplicate the flowers. Go to Image > Mirror. Then, Image > Flip. Position opposite of the first flower curve.
Open up another blossom. Resize by about 25%, smartsize. Paste onto your canvas, and position to your liking on the wreathe. Give it a drop shadow of h and V 0, Opacity 50, Blur 5.00. Open up a bow of choice. Resize by 15% smartsize. Paste onto your canvas and position to your liking. Give it the same drop shadow you gave your blossom.
Open up a single grape pod. Resize by 25%, smartsize. Position to your liking on the wreathe. Give it the same drop shadow you gave your bow. Add any other embellishments of your choosing. (there are lots to choose from!) When you are done, hide your white background and merge your visible layers.
Open up the journal paper. Resize by 50%, smartsize. Position at the bottom of the wreathe and give it a drop shadow of H and V 0, Opacity 70%, Blur 8.00.
Open up the brooch. Resize by 10%. Give it a drop shadow of H and V 0, Opacity 50, blur 3.00. Duplicate the brooch and position them over the rivets of the journal paper. Add a couple of other embellishments to the journal paper if you like. (I added a patchwork flower and a leaf cluster.) Hide your white background and merge your visible layers.
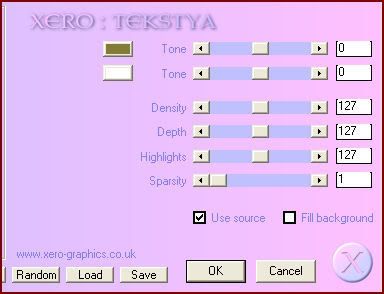
Find your gold pattern in your materials palette. Make it your background pattern. Go to Layers > New Raster Layer. Floodfill the new layer with the gold pattern. Apply the Vix mask. Delete the mask, answer yes and merge the group. On your mask layer apply the filter Xero Tekstya with the following settings:
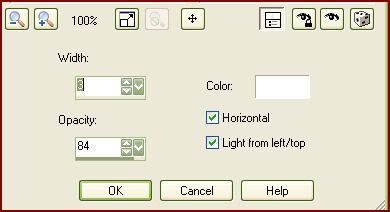
Duplicate the mask layer. On the original mask layer (bottom one) go to Adjust > Blur > Gaussian Blur. Apply with a Radius of 15.00. Go to Effects > Texture Effects > Blinds. Apply with the following settings:
Highlight your white background layer. Open up a sparkle of choice. Resize by 48%, smartsize. Paste as a new layer onto your canvas. Duplicate the sparkle. Go to Image > Mirror. Position them to your liking. (I left mine below the mask layers but that is completely up to you. :-))
Resize your wreathe layer by 95% bicubic. Go to Adjust > Sharpness > Unsharp Mask. Apply with Radius 5.00, Strength 10, Clipping 1.00.
Merge your layers together. Crop and resize to your liking. Add your copyright info, watermark and text. If you are not animating, save as PNG of JPG. If you are, let's continue!
Grab your freehand selection tool. Selection type: point to point, feather set at 0.00. Select around any areas that you want to add sparkles. Apply VM Sparkle with the following settings:
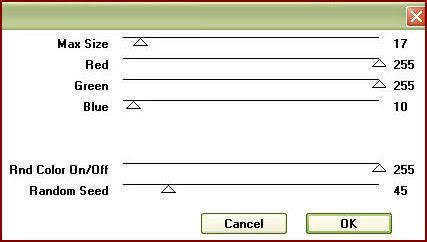
Deselect (CTRL+D). Copy. Open up animation shop. Paste as a new animation. Back to PSP. Go to Edit > Undo Select None. Select Undo one more time to undo the sparkles. Apply VM Sparkle again, but this time slide the random seed button to 48. Deselect. Copy and paste after the first frame in AS. Back to PSP. Undo twice. Apply VM Sparkle again, but change the random seed to 51. Copy and paste after the 2nd frame in Animation Shop. Optimize and save as GIF.
I hope you enjoyed this tutorial. If you have any questions, just leave me a shout or an email!
Subscribe to:
Post Comments (Atom)
0 comments:
Post a Comment