Monday, May 2, 2011
 Time after Time
This tutorial was written by me on 20 August 2009. Any similarities to other tutorials is purely coincidental.
Supplies Needed:
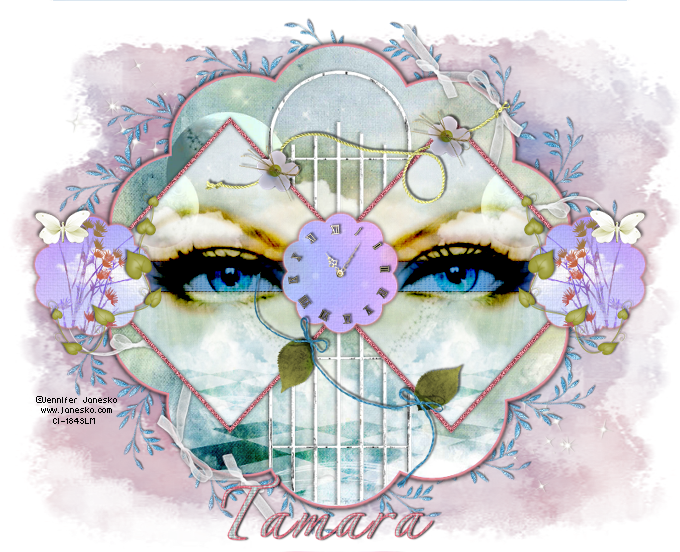
Close up of choice. I am using the exquisite artwork of Jennifer Janesko. I purchased this close up with CILM when they were still open. If you would like to purchase her artwork now, you can with CDO.
A Secret Place scrapkit by Just a Girl's Designs. If you would like to purchase this gorgeous kit, you can here. Thank you, Tamara!!
Becky Mask 22. Unfortunately, her site is now close. :(
Fabric Texture - Put it in your textures folder
Plugins:
DSB Flux - Bright Noise
Xero Filters - Radiance
Eyecandy 4000 - Gradient Glow
Supplies HERE
*~*~*~*~*~*~*~*~*~*~*~*~*~*~*~*~*~*~*~*~*~*~*~*~*~*~*~*~*~*~*~*~*~*~*~*~*~*~*~*~*~
Ok! Let's get started! Open up my template. Duplicate by holding down shift + d. Close the original. Delete the credit info layer and all of the heart layers.
Highlight the large scalloped circle layer. Go to selections > select all. Selections > float. Selections > defloat. Open up background 7 from the kit. Resize by 75%, smartsize. Copy. Add a new raster layer to your working image. Paste the paper into the selection. Don't deselect yet.
Open up the fence from the kit. Resize by 65%, smartsize. Copy and paste as a new layer onto your canvas. Position as in my tag above. Go to selections > invert. Hit delete on your keyboard. Deselect. Give the fence a drop shadow of H 2, V-1, Opacity 60, Blur 4.00.
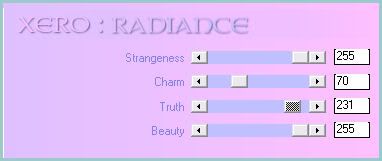
Highlight the paper layer. Apply Xero Radiance with the following settings:
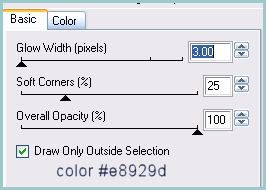
Now apply Eyecandy 4000 - Gradient Glow with the following settings:
Repeat the gradient glow. Give the layer a drop shadow of H and V 0, Opacity 80, Blur 8.00. Delete the pink large scalloped circle layer.
Highlight hte diamond fill 1 layer. Select, float and defloat. Open up background 7 from the kit again. Resize by 45%, smartsize. Copy. Add a new raster layer to your working image. Paste into selection. Deselect. Duplicate the paper diamond layer. Go to image > mirror. Delete both pink diamond fill layers.
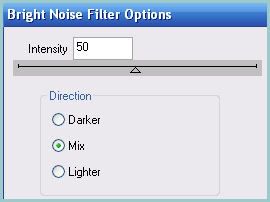
Highlight the diamond frame 1 layer. Select, float and defloat. Add a new raster layer. Floodfill with a color from your tag or tube. (I used color #d85470). Deselect. Apply DSB Flux - Bright Noise with the following settings:
Give the layer a drop shadow of H and V 0,Opacity 75, Blur 6.00. Duplicate. Go to image > mirror. Delete both template diamond frame layers.
Highlight the long rectangle layer. Select, float and defloat. Open up background 2 from the kit. Resize by 80%, smartsize. Copy and paste as a new layer onto your canvas. Selections > invert. Hit delete and deselect. Give the layer a drop shadow of H and V0, Opacity 70, Blur 6.00. Delete the gray long rectangle layer.
Highlight the left scalloped circle layer. Select, float and defloat. Open up background 6 from the kit. Resize by 35%, smartsize. Copy and paste as a new layer onto your canvas. Position the paper to your liking within the selection. Selections > invert. Hit delete on your keyboard. Don't deselect yet.
Open up Flowers from the kit. Resize by 40%, smartsize. Mirror them. Copy and paste as a new layer onto your canvas. Position them to your liking within the selection. Hit delete. Deselect. Give them a drop shadow of H 2, V 0, Opacity 55, Blur 2.00. Change the blend mode to Exclusion.
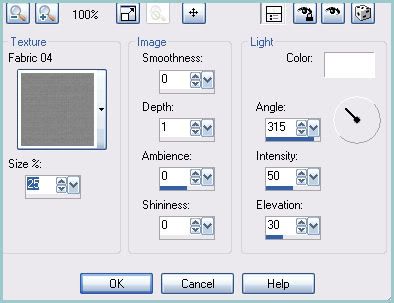
Hghlight the paper left scalloped circle. Go to effects > texture effects > textures. Find the Time after Time Fabric Texture in the drop shadow menu and apply with the following settings:
Now, apply Gradient Glow, one time, same settings and color as before. Give the layer a drop shadow of H and V 0, Opacity 70, Blur 5.00. Duplicate the paper scalloped circle. Go to image > mirror. Duplicate the Flowers. Go to image > mirror. Delete the gray left scalloped circle layer and the gray right scalloped circle layer.
Highlight the middle scalloped circle layer. Select, float and defloat. Open up background 1 from the kit. Resize by 50%, smartsize. Copy and paste as a new layer onto your canvas. Go to selections > invert. Hit delete and deselect. Apply Textures, same settings as before. Apply Gradient glow one time, same setings as before. Give the layer a drop shadow of H and V 0, Opacity 70, Blur 5.00.
Highlight your large scalloped circle layer. Open up ribbon 3 from the kit. Resize by 65%, smartsize. Copy and paste as a new layer onto your canvas. Give it a drop shadow of H and V 0, Opacity 60, Blur 4.00. Position towards the bottom of the left side of the large scalloped circle. (see my tag for reference) Duplicate. Go to image > mirror. Then, image > flip.
Highight your top layer. Open up the string deco from the kit. Resize by 48%, smartsize. Copy and paste as a new layer onto your canvas. Give it a drop shadow of H 2, V -2, Opacity 55, Blur 3.00. Position to your liking.
Open up the leaves deco from the kit. Resize by 45%, smartsize. Copy and paste as a new layer onto your canvas. Give it a drop shadow of H and V -2, Opacity 55, Blur 3.00. Position to your liking.
Open up the vine from the kit. Resize by 30%, smartsize. Copy and paste as a new layer onto your canvas. Give it a drop shadow of H 2, V -2, Opacity 55, Blur 3.00. Position to your liking on the right scalloped circle. Duplicate. Go to image > mirror.
Open up a butterfly from the kit. Resize by 20%, smartsize. Copy and paste as a new layer onto your canvas. Give it a drop shadow of H 2, V -1, Opacity 50, Blur 3.00. Position to your liking on the right scalloped circle. Duplicate. Go to image > mirror.
Highlight your white background layer. Open up Foliage 3 from the kit. Resize by 40%, smartsize. Copy and paste as a new layer onto your canvas. Go to adjust > add/remove noise > add noise. Apply noise with guassian and monochrome checked, value set at 25. Now apply Mura Meister Copies with the following settings:
Give the layer a drop shadow of H -2, V 0, Opacity 70, Blur 3.00.
Open up the clock from the kit. Resize by 30%, smartsize. Copy and paste as a new layer onto your canvas. Give it a drop shadow of H 1, V -1, Opacity 60, Blur 2.00. Position it in the center of the middle scalloped circle.
Highlight your top diamond frame layer. Open up your close up. Resize as necessary, bicubic. Copy and paste as a new layer onto your canvas. Give it a drop shadow of H 2, V -2, Opaciyt 60, Blur 3.00. Duplicate your close up layer. Highlight the bottom one, and change the blend mode to Burn. Highlight the top one and change the blend mode to Multiply. Lower the opacity to about 20.
Add any other embellishments of your choosing.
Highlight your white background layer. Open up a paper from the kit. Copy and paste as a new layer onto your canvas. Apply Becky Mask 022 with the following settings;
Source Luminance
Fit to Canvas
Hide all Mask.
Delete the mask from your layer palette. Answer yes to the pop up box and merge the group. Grab your pick tool, and pull the sides of the mask to make it a bit wider. Give it a drop shadow of H 2, V 0, Opaciyt 30, Blur 3.00.
Crop and resize to your liking.
Add your copyright info, watermark and your text.
Save as JPG or PNG.
I hoep you enjoyed this tutorial! If you have any questions, just give me a shout.
Subscribe to:
Post Comments (Atom)
0 comments:
Post a Comment