Monday, May 2, 2011
 Au' Naturale
This tutorial was written by me on 13 November 2009. Any similarities to other tutorials is purely coincidental.
Supplies Needed:
Tube of choice. I am using the exquisite artwork of Zindy Nielsen. If you would like to use her artwork, you must purchase a license at her site here.
All Naturual scrap kit by Candy's Treats. If you would like to purchase this gorgeous kit, visit her blog here for details. Thank you, Diane!!
Template 188 made by me. You can find it here.
Mask 295 by Vix. Thank you!
Butterfly tubes of choice. The ones I used are by Zindy Nielsen.
White flare tube
Plugins:
Eyecandy 5 Impact - Gradient Glow
Xero Filters - Bad Dream XL and Tekstya
Animation Shop (opt)
Supplies HERE
*~*~*~*~*~*~*~*~*~*~*~*~*~*~*~*~*~*~*~*~*~*~*~*~*~*~*~*~*~*~*~*~*~*~*~*
Ok! Let's get started! Open up my template. Duplicate by holding shift + d. Close the original. Delete the credit info layer.
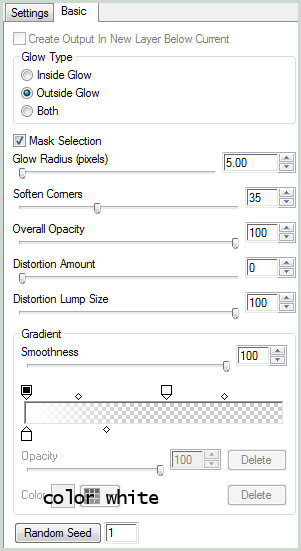
Highlight the square 1 layer. Go to selections > select all. Selections > float. Selections > defloat. Open up a paper from the kit. Resize the paper by 45%, smartsize. Copy and paste as a new layer onto your canvas. Position the paper to your liking within the selection. Go to selections > invert. Hit delete on your keyboard. Deselect. (CTRL+D). Apply Gradient Glow with the following settings:
Repeat the gradient glow one more time. Give the layer a drop shadow of H and V 0, Opacity 60, Blur 20.00. Duplicate the layer. Go to image > mirror. Then, image > flip. Delete the black square 1 and 2 layers.
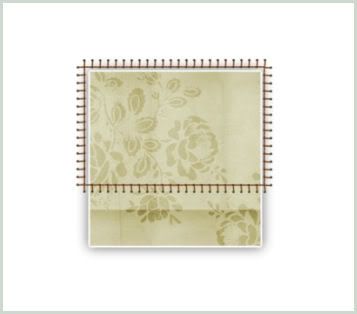
Open up String Frame 2 from the kit. Resize by 50%, smartsize. Copy and paste as a new layer onto your canvas. Position it on top of the top square paper layer like this:
Give the string frame a drop shadow of H and V -1, Opacity 55, Blur 3.00. Duplicate the string frame layer. Go to image > mirror. Then, image > flip.
Highlight the middle rectangle layer. Select, float and defloat. Open up a paper from the kit. Resize by 75%, smartsize. Copy and paste as a new layer onto your canvas. Selections > invert. Hit delete and deselect. Give the layer a drop shadow of H and V 0, Opacity 55, Blur 5.00. Delete the gray middle rectangle layer.
Highlight the star line layer and give it a drop shadow of H 1, V 0, Opacity 65, Blur 2.00.
Highlight the angled rectangle 1 layer. Select, float and defloat. Open up a paper from the kit. Resize by 65%, smartsize. Copy and paste as a new layer onto your canvas. Duplicate the paper layer 2 times for a total of 3 paper layers. Hide the top 2 paper layers. Drag the 2 hidden paper layers above the angled rectangle 3 layer. Highlight the bottom paper layer. Go to selections > invert. Hit delete on your keyboard. Deselect. Apply Gradient Glow, same settings as before. GIve the layer a drop shadow of H and V 0, Opacity 60, Blur 6.00. Delete the blue angled rectangle 1 layer.
Highlight the angled rectangle 2 layer. Select, float and defloat. Select, float and defloat. Unhide and highlight one of the hidden paper layers. Hit delete and deselect. Apply Gradient Glow, same settings. Give the layer a drop shadow of H and V 0, Opacity 60, Blur 6.00. Delete the blue angled rectangle 2 layer.
Highlight the angled rectangle 3 layer. Select, float and defloat. Selections > invert. Unhide and highlight the last hidden paper layer. Hit delete. Deselect. Apply Gradient Glow, same settings. Give the layer a drop shadow of H and V 0, Opacity 60, Blur 6.00. Delete the angled rectangle 3 layer.
Highlight the top thin rectangle layer. Select, float and defloat. Open up a paper from the kit. Resize by 65%, smartsize. Copy and paste as a new layer onto your canvas. Selections > invert. Hit delete and deselect. Give the layer a drop shadow of H and V 0, Opacity 55, Blur 4.00. Delete the blue top thin rectangle layer.
Highlight the bottom thin rectangle layer. Select, float and defloat. Open up a paper from the kit. Resize by 65%, smartsize. Copy and paste as a new layer onto your canvas. Selections > invert. Hit delete and deselect. Give the layer a drop shadow of H and V 0, Opacity 55, Blur 4.00. Delete the blue bottom thin rectangle layer.
Highlight the left circle fill layer. Select, float and defloat. Open up a paper from the kit. Resize by 40%, smartsize. Copy and paste as a new layer onto your canvas. Position the paper to your liking within the selection. Selections > invert Hit delete and deselect. Duplicate the circle paper layer. Go to image > mirror. Delete the gray circle 1 and 2 layers.
Highlight the square fill layer. Select, float and defloat. Open up a paper from the kit. Resize by 40%, smartsize. Copy and paste as a new layer onto your canvas. Selections > invert. Hit delete. Don't deselect yet.
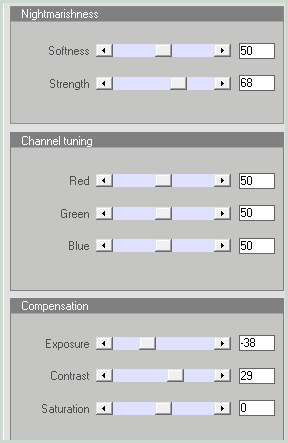
Open up your main tube. Resize as necessary, bicubic. Copy and paste as new layer onto your canvas. Position to your liking within the selection. Hit delete on your keyboard. Deselect. Apply Bad Dream XL to the tube layer with the following settings:
Now, go to adjust > sharpness > unsharp mask. Apply with a radius of 5, strength 20, clipping 1. Give your tube a drop shadow of H 4, V -2, Opacity 50, Blur 10.00. Now, give it a drop shadow of H -2, V 0, Opacity 30, Blur 6.00. Delete the gray square fill layer.
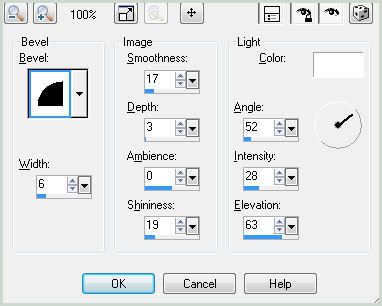
Highlight the left circle frame layer. Select, float and defloat. Open up a paper from the kit. Resize 40%, smartsize. Copy and paste as a new layer onto your canvas. Position to your liking within the selection. Selections > invert. Hit delete on your keyboard. Deselect. Now go to Effects > 3D Effects > Inner Bevel. Apply with the following settings:
Give the layer a drop shadow of H and V 0, Opacity 50, Blur 4.00. Duplicate the circle frame. Go to image > mirror. Delete the circle frame 1 and 2 layers.
Highlight the square frame layer. Select, float and defloat. Open up a paper from the kit. Resize by 40%, smartsize. Copy and paste as a new layer onto your canvas. Go to selections > invert. Hit delete and deselect. Apply an inner bevel, same settings, to the layer. Give it a drop shadow of H and V 0, Opacity 50, Blur 6.00. Delete the gray square frame layer.
Open up the ribbon pleated 2 from the kit. Resize by 25%, smartsize. Copy and paste as a new layer onto your canvas. Position it at the top of the sqaure frame layer. Give it a drop shadow of H -2, V -1, Opacity 50, Blur 5.00.
Open up the ribstitch 5 from the kit. Resize by 23%, smartsize. Copy and paste as a new layer onto your canvas. Give it a drop shadow o H 2, V 1, Opacity 50, Blur 4.00. Position it at the right end of the ribbon pleat. Duplicate the rib stitch. Go to image > mirror. Position it at the left end o the ribbon pleat.
Open up the ribbon mess from the kit. Resize by 23%, smartsize. Copy and paste as a new layer onto your canvas. Go to image > mirror. Give it a drop shadow of H 2, V-2, Opacity 45, Blur 4.00. Position it at the top of the right circle frame. Duplicate the ribbon mess. Go to image > mirror. Them, image > flip.
Open up your butterfly tubes. Resize them as necessary, smartsize. Copy and paste them as new layers onto your canvas. Apply Bad Dream XL to the butterflies, if you wish. If you do apply the filter, don't forget to apply an unsharp mask. Give them drop shadows of choice, and position them to your liking.
Open up the small flower cluster from the kit. Resize by 40%, smartsize. Copy and paste as a new layer onto your canvas. Positon it at the bottom of the right bottom square. (see my tag for reference) Give it a drop shadow of H 2, V 2, Opacity 45, Blur 5.00. Drag the flower cluster to right above your square 2 layer. Duplicate the flower cluster. Go to image > mirror. Then, image > flip.
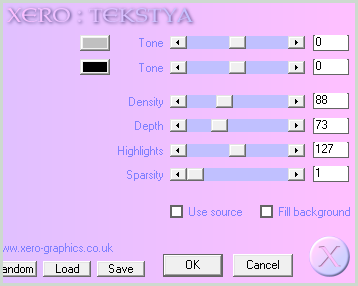
Highlight your white background layer. Open up Smudge 1 from the kit. Resize by 65%, smartsize. (I colorized it, but that is optional) Copy and paste as a new layer onto your canvas. Position it towards the top right of your canvas. (see my tag for reference) Now apply Xero Filters - Tekstya with the following settings:
Now go to adjust > sharpen. Give it a drop shadow of H 5, V 0, Opacity 60, Blur 2.00. Duplicate the smudge. Go to image > mirror. Then, image > flip.
Open up the Paper Scrap from the kit. Resize by 85%, smartsize. Copy and paste as a new layer onto your canvas. Go to image > free rotate. Rotate right by 30.00. Go to adjust > sharpness > unsharp mask. Apply with a radius of 5, strength 35, clipping 2. Give it a drop shadow of H and V 0, Opacity 65, Blur 8.00. Position it as in my tag above.
Open up the beads from the kit. Resize by 60%, smartsize. Apply unsharp mask, same settings as before. Copy and paste as a new layer onto your canvas. Give them a drop shadow of H 3, V -1, Opacity 60, Blur 3.00. Duplicate the beads. Go to image > mirror. Then, image > flip. Position the beads as in my tag above.
Highlight the top smudge layer. Open up a paper from the kit. Copy and paste as a new layer onto your canvas. Apply Vix Mask 295 with the following settings:
Source Luminance
Fit to Canvas
Hide all Mask
Delete the mask layer from your layer palette. Answer yes to the pop up box and merge the group. Resize the mask by 90%, smartsize. Give the mask a drop shadow of H 2, Opacity 55, Blur 3.00.
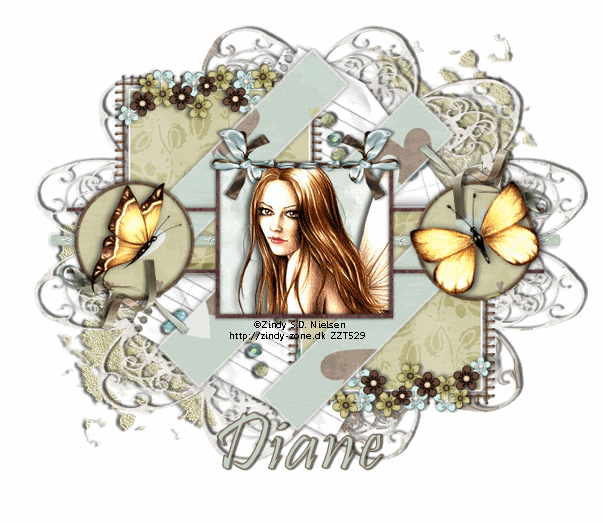
Crop and resize to your liking.
Add your copyright info, watermark and your text. If you are not animating, save as JPG or PNG.
If you are animating, take the white flare tube and put it in your Picture Tube folder. Find your picture tube tool. In the drop down menu, find the white flare tube, scale 30, step 200, placement mode - random, selection mode - random.
Highlight your top layer. Add a new raster layer. Now carefully place a sparkle in the middle of every blue flower of the flower clusters. Copy merged. Open up Animation Shop. Paste as a new animation in AS.
Back to Paint Shop Pro. Delete the white flare layer. Add another new raster layer. Carefully place a sparkle in the center of every brown flower of the flower clusters. Copy merged. Paster after frame 1 in Animation Shop.
In PSP, delete the sparkle layer. Add another new raster layer. Carefully place a sparkle in the center of every tan flower in the flower clusters. Copy merged. Paste after frame 2 in Animation Shop.
In AS, select all frames. Change your frame properties to 13.
Optimize and save as gif.
I hope you enjoyed this tutorial! If you have any questions, just give me a shout.
Subscribe to:
Post Comments (Atom)
0 comments:
Post a Comment