Monday, May 2, 2011
 Thru My Window
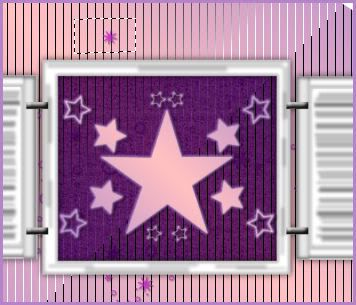
This tutorial was written by me on 1 August 2009. Any similarities to other tutorials is purely coincedental.
Supplies Needed:
Tube of choice. I am using the awesome artwork of Ismael Rac. You must purchase the appropriate license to use his artwork. I purchase this tube from MPT when he was still with them. If would like to purchase his artwork now, you can at his store here.
Midnight Whispers scrapkit by Scraps with Attitude. If you would like to purchase this beautiful kit, you can here. Thank you, Missy!!
Star brushes of choice or use the files in my supplies
Font of choice. I used Large Nine which can be downloaded here.
Plugins:
Tramages - Tow the Line Do a google search for more details on this filter
Mura Meister - Copies
Eyecandy 4000 - Gradient Glow
Xero Filters - Fritillary
Animation Shop (opt)
Supplies HERE
*~*~*~*~*~*~*~*~*~*~*~*~*~*~*~*~*~*~*~*~*~*~*~*~*~*~*~*~*~*~*~*~*~*~*~*~
Ok! Let's get started! Open up a new transparent image 800 x 650. Floodfill with white.
Open up a window from the kit. Resize by 65%, smartsize. Copy and paste as a new layer onto your canvas. Grab your magic wand tool, tolerance set to 50, feather set to 0.00. Click inside the emtpy space of the frame so that there are marching ants all around it. Go to selections > modify > expand by 5.00. Open up paper 12 from the kit. Resize by 50%, smartsize. Copy and paste as a new layer onto your canvas. Selections > invert. Hit delete on your keyboard. Deselect. Drag the paper layer beneath your window layer. Highlight your window layer and give it a drop shadow of H and V 0, Opacity 70, Blur 8.00.
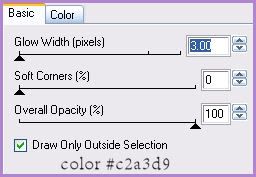
Highlight your paper layer. Open up the stars from the kit. Copy and paste as a new layer onto your canvas. Go to selections > select all. Selections > float. Selections > defloat. Add a new raster layer to your working image. Go to your materials palette. Change the foreground color to #af86ce and the background color to #ffc1c1. Click on your background color and make a gradient with Style - Linear, Angle 45, Repeats 1, Invert NOT checked. Floodfill your new layer with the gradient. Deselect. Apply Eyecandy - Gradient Glow with the following settings:
Give the layer a drop shadow of H and V 1, Opacity 50, Blur 2.00. Delete the black stars layer.
Open up curtain 2 from the kit. Resize by 40%, smartsize. Copy and paste as a new layer onto your canvas. Give it a drop shadow of H -2, V 2, Opacity 25, Blur 3.00. Position the curtain as in my tag above.
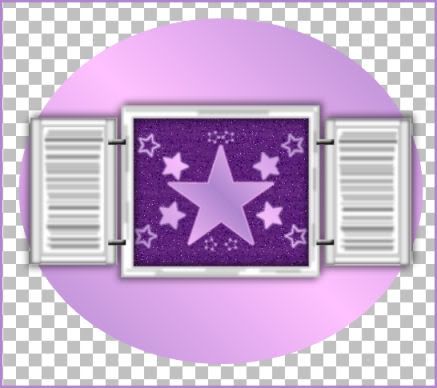
Highlight your white background. Go to your materials palette and make your foreground null. Grab your preset shape tool, ellipse, oval. Draw out a longish oval like this:
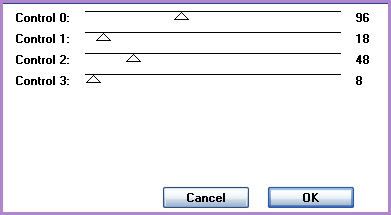
Go to objects > align > center in canvas. Convert the oval vector layer to a raster layer. Apply Tramages - Tow the Line with the following settings:
Still on the oval, select, float and defloat. Go to selections > modify > expand by 15. Add a new raster layer to your working image. Drag the new layer beneath your oval layer. Open up paper 2 from the kit. Resize by 65%, smartsize. Go to your materials palette and click on the pattern tab. Find paper 2 in your drop down menu. Make it your background pattern, Angle 45, Size 25. Floodfill your new layer with the paper pattern. Deselect. Apply Gradient Glow, same settings as before, but change the color to #ffc1c1. Give the layer a drop shadow of H and V 0, Opacity 85, Blur 12.00. Highlight the gradient oval and give it a drop shadow of H and V 0, Opacity 80, Blur 7.00. Highlight the window paper layer and change the blend mode to Multiply.
Highlight the gradient oval. Open up flower group 1 from the kit. Resize by 50%, smartsize. Go to image > free rotate. Rotate left by 90.00 degrees, both boxes unchecked. Give the flowers a drop shadow of H -3, V -2, Opacity 60, Blur 4.00. Position them at the top of your window. (see my tag for reference).
Open up the curly ribbon from the kit. Resize by 40%, smartsize. Copy and paste as a new layer onto your canvas. Go to image > mirror. Give the ribbon a drop shadow of H -2, V -1, Opacity 60, Blur 4.00. Position it at the left top of the paper oval. Drag the ribbon layer to right above your paper oval (see my tag for reference)
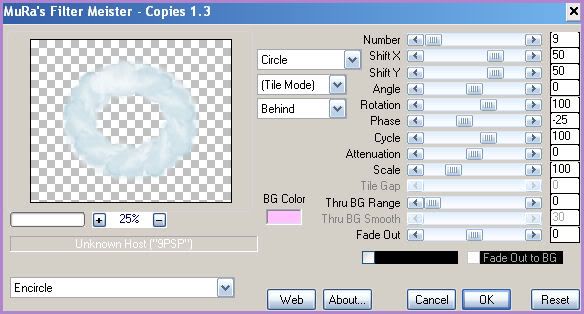
Highlight your paper oval layer. Open up a cloud from the kit. Resize by 40%, smartsize. Copy and paste as a new layer onto your canvas. Apply Mura Meister Copies with the following setings:
Highlight the gradient oval. Open up the Star Sprinkles file from your supplies. Copy and paste as a new layer onto your canvas. Select, float and defloat. Add a new raster layer to your working image. Go to your materials palette. Change your foreground color to #b122b2 and your background color to #e816f7. Click on your foreground color and make a gradient, Style - Linear, Angle 45, Repeats 1, Invert NOT checked. Floodfill your new layer with the gradient. Deselect. Give the layer a drop shadow of H and V 1, Opacity 60, Blur 2.00. Delete the gray sprinkle stars layer. Grab your freehand selection tool, type point to point, feather set to 0.00. Carefully select around the little spikey star at the top of the window like this:
Copy. Now hit delete on your keyboard. Paste as a new layer onto your canvas. Right click the layer on your layer palette. Arrange > send to top. Hide the little star for now. We will come back to it later.
Highlight your sprinkle star layer. Duplicate. Go to image > mirror. Image > flip. Arrange the sprinkle star layers to your liking on the gradient oval. (see my tag for reference).
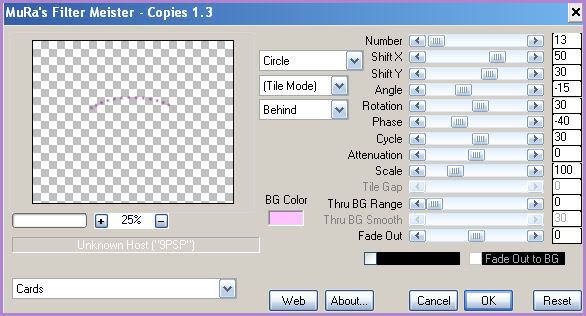
Highlight the little star layer at the top of your layer palette. Unhide. Apply Mura Meister Copies with the following settings:
Move the star line above your ovals in the center. Duplicate. Go to image > flip. (see my tag for reference)
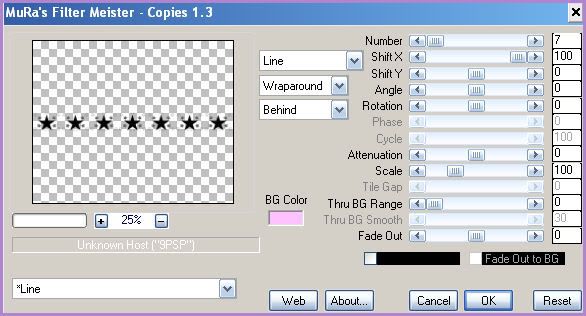
Open up the stars file again from your supplies. Resize by 50%, smartsize. Copy. Highlight your white background layer. Paste the stars as a new layer onto your canvas. Select, float and defloat. Add a new raster layer. Floodfill the new layer with your gradient. Deselect. Apply Mura Meister Copies with the following settings:
Resize the layer by 90%, smartsize. Delete the black stars layer.
Open up the shooting star file from your supplies. Copy and paste as a new layer onto your canvas. Select, float and defloat. Add a new raster layer. Go to your materials palette. Change your foreground color to #d2b9e3 and your background color to #f0d1f5. Click on your background color and make a gradient, Style - Linear, Angle 45, Repeats 4, Invert ticked. Floodfill your new layer with your gradient. Deselect. Delete the gray shooting star layer. Move the shooting star to the left top of the larger oval. (see my tag for reference. Duplicate the shooting star. Go to image > mirror. Duplicate the mirrored shooting star. Go to image > flip. Duplicate the flipped shooting star. Go to image > mirror. Merge all 4 shooting star layers together.
Add any other embellishments of your choosing.
Crop and resize to your liking.
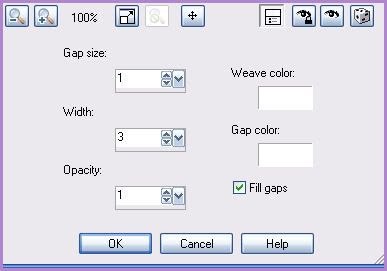
Highlight the dark pink stars line. Go to effects > texture effects > weave. Apply with the following settings:
Give the layer a drop shadow of H -2, V 0, Opacity 60, Blur 3.00.
Highlight the shooting stars layer and apply weave, same settings. Give the layer a drop shadow of H 2, V 0, Opacity 60, Blur 3.00.
Open up your tube. Resize as necessary, bicubic. Copy and paste as a new layer onto your canvas. Give your tube a drop shadow of H -4, V -3, Opacity 30, Blur 8.00. Now give it a drop shadow of H 3, V 4, Opacity 30, Blur 8.00. Arrange the tube to your liking.
Hide your white background layer. Merge your visible layers together. Duplicate the merged layer. On the bottom layer, go to adjust > blur > gaussian blur. Apply with a radius of 11.00.
Add your copyright info, watermark, and your text. If you are not animating, apply xero fritillary (with the settings below) and save as JPG or PNG.
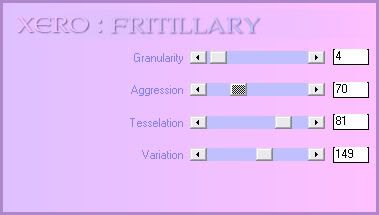
If you are animating, highlight the guassian blurred layer. Apply Xero Filters - Fritillary, with the following settings:
Copy merged. Open up Animation Shop. Paste as a new animation in AS.
Back to Paint Shop Pro. Go to edit > undo fritillary. Apply Fritillary again, but change Variation to 151. Copy merged. Paste after frame 1 in AS.
Back to PSP, edit > undo. Apply Fritillary again, changing the Variation to 153. Copy merged. Paste after frame 2 in AS.
In Animation Shop, select all frames (CTRL+A). Change the frame properties to 12.
Optimize and save as gif.
I hope you enjoyed this tutorial! If you have any questions, just give me a shout.
Subscribe to:
Post Comments (Atom)
0 comments:
Post a Comment