Monday, May 2, 2011
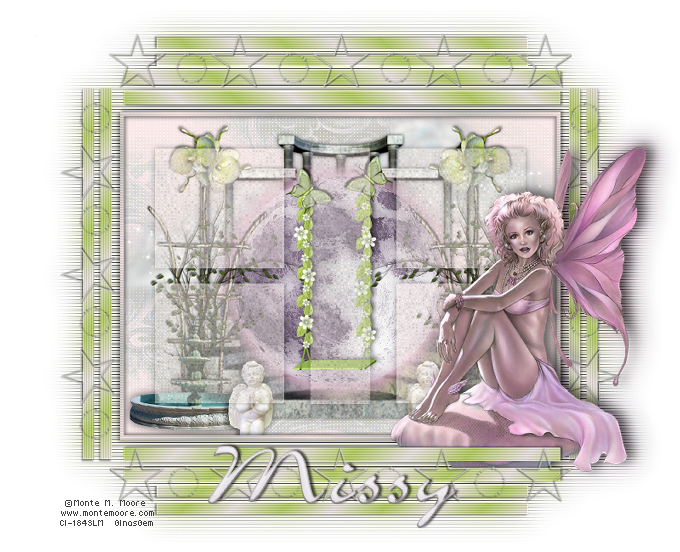
 Luna Paradise
This tutorial was written by me on 30 July 2009. Any similarities to other tutorials is purely coincidental.
Supplies Needed:
Tube of choice. I am using the beautiful artwork of Monte M. Moore. I purchased this tube with CILM when they were still open. If you would like to purchase his work now, you can with CDO.
Angels on the Moon scrapkit by Scraps with Attitude. If you would like to purchase this gorgeous kit, you can here. Thank you, Missy!!
Template 181 made by me, which you can find here.
Font of choice. I used Airfoil Script which you can download here.
Plugins:
Xero Filters - Improver, Porcelain XL & Fritillary
VDL - Unplugged Effects - Tools - Interlace
Eyecandy 5 Impact - Corona
Penta Filters - Color Dot
*~*~*~*~*~*~*~*~*~*~*~*~*~*~*~*~*~*~*~*~*~*~*~*~*~*~*~*~*~*~*~*~*
Ok! Let's get started! Open up my template. You will notice the white background is hidded. . . keep it this way so you can see the star line layers. Duplicate the template byholding down shift + d. Close the original. Delete the credit info layer.
Hide all of the template layers for now, so we can see what we are doing. Open up the moon from the kit. Resize by 45%, smartsize. Copy and paste as a new layer onto your canvas. Go to Adjust > Brightness/Contrast > Brightness/Contrast. Apply with brightness and contrast set to 50. Now go to Adjust > Hue/Saturation/Lightness >Hue/Saturation/Lightness. Apply with the following settings:
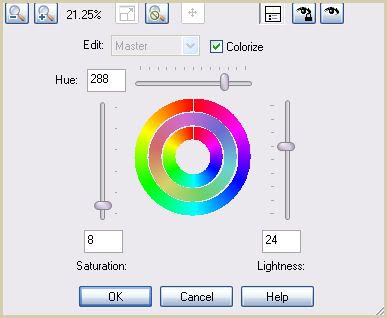
You can play around with the Hue slider if you'd prefer a different color. Now apply Xero Filters - Porcelain XL with the following settings:
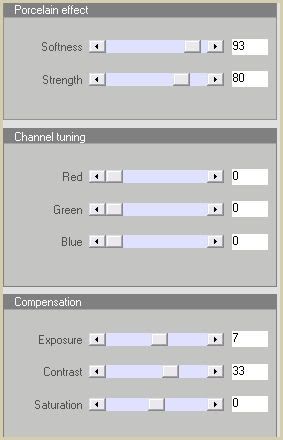
We're still not done with the moon! lol. Now apply Eyecandy 5 Impact - Corona with the following settings:
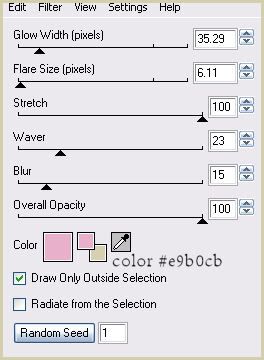
Give the moon a drop shadow of H and V 0, Opacity 65, Blur 7.00.
Open up one of the swings from the kit. Resize by 43%, smartsize. Copy and paste as a new layer onto your canvas. Position in the center of the moon so that the top of the swing sits at the top of the moon. Give the swing a drop shadow of H 4, V -2, Opacity 55, Blur 5.00.
Open up a butterfly that matches the swing. Resize by 10%, smartsize. Copy and paste as a new layer onto your canvas. Give the butterfly a drop shadow of H -3, V 2, Opacity 50, Blur 4.00. Duplicate the butterfly. Go to image > mirror. Positoin the butterflies at the tops of the swing.
Change your foreground color to null, and your background color to black. Grab your preset shape tool, rectangle. Draw out a rectangle about an inch larger than the moon. Go to objects > align > center in canvas. Drag it beneath your moon layer and convert it to a raster layer. You should have something like this:

Still on the black rectangle, go to selections > select all. Selections > float. Selections > defloat. Open up the Fairytale Palace from the kit. Resize by 65%, smartsize. Add a new raster layer. Copy the palace and paste into selection. Deselect. Give the Palace a drop shadow of H and V 0, Opacity 75, Blur 7.00. Delete the black rectangle.
Open up the trellis with greenery. Resize by 45%, smartsize. Copy and paste and paste as a new layer onto your canvas. Give it a drop shadow of H -2, V -2, Opacity 65, Blur 4.00. Position the trellis on the right column of the palace. Drag the trellis layer above the moon layer. Duplicate the trellis. Go to image > mirror. Position the trellis in front of the left column of the palace. See my tag for reference.
Open up the water fountain from the kit. Resize by 25%, smartsize. Copy and paste as a new layer onto your canvas. Give it a drop shadow of H and V 0, Opacity 65, Blur 8.00. Position the fountain in front of the right trellis. (see my tag for reference) Duplicate the fountain. Go to image > mirror. Position the duplicated fountain in front of the left trellis.
Open up Angel 1 from the kit. Resize by 15%, smartsize. Copy and paste as a new layer onto your canvas. Give it a drop shadow of H 3, V -2, Opacity 55, Blur 5.00. Position the angel to the left of the right water fountain. Duplicate the Angel. Go to image > mirror. Position it to the right of the left water fountain. (See my tag for reference)
Open up Flower 1 from the kit. Resize by 15%, smartsize. Copy and paste as a new layer onto your canvas. Give the flower a drop shadow of H 3, V 2, Opacity 60, Blur 6.00. Position the flower at the top right corner of the palace. Duplicate the flower. Go to image > mirror. Position the duplicated flower at the top left corner of the palace. (see my tag for reference)
Open up the cloud from the kit. Resize by 65%, smartsize. Copy and paste as a new layer onto your canvas. Give it a drop shadow of H and V 0, Opacity 45, Blur 6.00. Drag it beneath your palace layer and position to your liking. Duplicate the cloud. Go to image > mirror. Position the mirrored cloud to your liking.
Add any other embellishments of your choosing to the "paradise". Merge your visible layers together. This should be all of the scrapkit elements - moon, swing, clouds, flowers, fountains, palace, butterflies, and angels. Drag it to the top of your layer palette.
Unhide the square template layer. Select, float and defloat. Open up paper 2 from the kit. Resize by 65%, smartsize. Now go to Adjust > One Step Photo Fix:

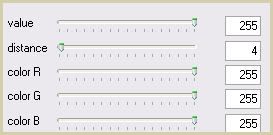
Copy the paper. Highlight your working image. Add a new raster layer. Paste into selection. Don't deselect. Go to selections > modify > expand by 3.00. Add a new raster layer to your working image. Go to your materials palette. Make your foreground color #cfcec8, and your background color # f9e9e7. Click on your foreground color and make a gradient, Style - Linear, Angle 45, Repeats 7. Floodfill your new layer with the gradient. Go to selections > modify > contract by 5.00. Hit delete on your keyboard. Deselect. Apply Unplugged Tools - Intrelace with the following settings:
Give the layer a drop shadow of H 3, V -3, Opacity 65, Blur 7.00.
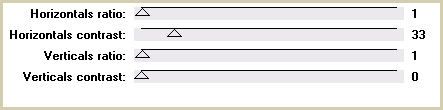
Highlight the paper layer and apply Penta Filters - Color Dot with the following settings:
Delete the black square template layer.
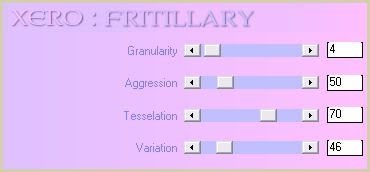
Unhide and highlight the 4 squares layer. Select, float and defloat. Add a new raster layer. Go to your materials palette and click on the gradient. Change the repeats to 1. Floodfill the new layer with the gradient. Deselect. Apply Xero Filters - Fritillary with the following settings;
Lower the opacity of the layer to about 50, and drag it above your merged moon layer. Give the layer a drop shadow of H and V 0, Oapcity 65, Blur 10.00. Delete the white 4 squares layer.
Highlight the middle rectangle layer. Select, float and defloat. Add a new raster layer. Go to your materials palette, and click on the gradient. Leave everything the same, but tick the invert box. Floodfill the new layer with the gradient. Deselect. Apply Xero - Fritillary, same settings. Lower the opacity of the layer to about 50. Drag the layer above your merged moon layer. Give the layer a drop shadow of H and V 0, Oapcity 65, Blur 10.00. Delete the white middle rectangle layer.
Highlight the double rectangle 1 layer. Select, float and defloat. Add a new raster layer. Go to your materials palette. Change your foreground color to # efe8e7 and your background color to #bed473. Click on your foreground color and make a gradient, Style - Linear, Angle 45, Repeats 7. Floodfill the new layer with the gradient. Deselect. Apply Unplugged Tools - Interlace, same settings as before.
Repeat the same steps as above with the rest of the double rectangle layers. Delete all the gray double rectangle layers. Duplicate one of the smaller double rectangle layers. Go to image > free rotate. Rotate left by 90.00 degrees, both boxes unchecked. Position under the star line 3 layer. (see my tag for reference) Give it a drop shadow of H -3, V 0, Opacity 60, Blur 3.00. Duplicate. Go to image > mirror.
Give all of the horizontal double rectangles a drop shadow of H and V 2, Opacity 60, Blur 4.00.
Highlight the star line 1 layer. Select, float and defloat. Add a new raster layer. Floodfill your new layer with your foreground color (the light pink) Give it a drop shadow of H and V 2, Opacity 55, Blur 2.00.
Repeat the above steps with the rest of the starline layers. Delete all 4 white star line layers.
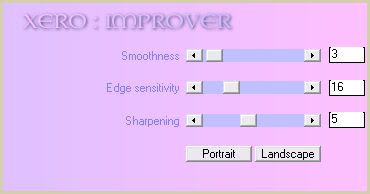
Open up your tube. Resize, as necessary, bicubic. Copy and paste as a new layer onto your canvas. If you like, you can apply Xero - Improver with the following settings:
Give your tube a drop shadow of H 4, V -3, Opacity 70, Blur 16.00. Arrange the tube to your liking.
Add any other embellishments of your choosing.
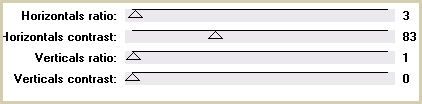
Hide your white background and merge your visible layers together. Resize your merged layer by 90%, bicubic. Duplicate. On your bottom layer, go to adjust > blur > gaussian blur. Apply with a radius of 15.00. Apply Unplugged Tools - Interlace with the following settings:
Crop and resize to your liking.
Add your copyright info, watermark and your text.
Save as JPG or PNG.
I hope you enjoyed this tutorial! If you have any questions, just give me a shout.
Subscribe to:
Post Comments (Atom)
0 comments:
Post a Comment