Monday, May 2, 2011
 Picture Perfect
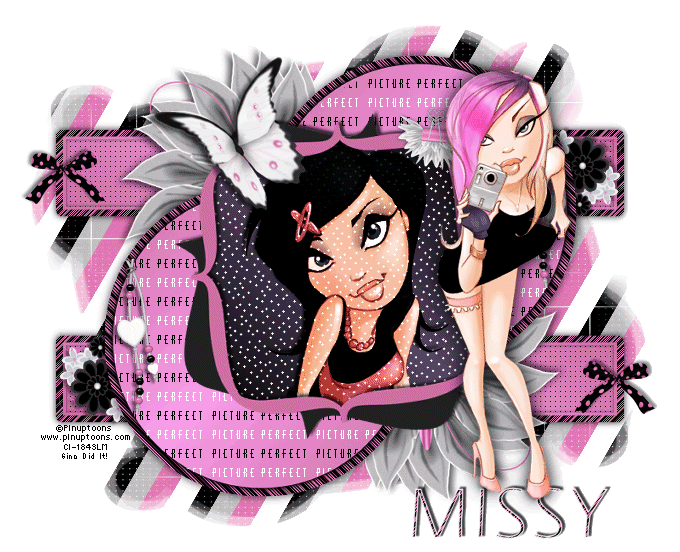
This tutorial was written by me on 24 July 2009. Any similarities to other tutorials is purely coincidental.
Supplies Needed:
2 tubes of choice. I am using the fantastic artwork of Rion Vernon, creator of Pinuptoons. I purchased this tube when CILM was still open, but you can get his work at CDO now.
Scrapkit. I am using Pink Chicklette by Scraps with Attitude. If you would like to purchase this kit, you can here. Thank you, Missy!!
WSL Mask 99 by Chelle of Wee Scots Lass Creations. You can download it from her blog here. Thank you!
2 fonts of choice. I used Cute Bitmap (pixel font) which you can download here and Eras Light ITC (pay font)
Plugins:
Eyecandy 4000 - Gradient Glow
Mura Filters - Tone and Copies
Animation Shop (opt)
No other supplies needed
*~*~*~*~*~*~*~*~*~*~*~*~*~*~*~*~*~*~*~*~*~*~*~*~*~*~*~*~*~*~*~*~*~*~*
Open up a new transparent image, 800 (w) x 650 (h). Floodfill with white.
Open up frame 1(bracket frame) from the kit. Resize by 60%, smartsize. Copy and paste as a new layer onto your canvas. On your materials palette, change your foreground color to #342b3d and your background color to #000000. Click on your foreground color and make a gradient with the following settings:
Style - Linear Angle - 45 Repeats - 1 Invert - ticked
Highlight the frame layer on your working image. Grab your magic wand tool, tolerance set to 100, feather set to 0.00. Click inside the empty space of the frame so that there are marching ants all around it. Go to selections > modify > expand by 5.00. Add a new raster layer. Floodfill your new layer to your working image. Let the selection stand.
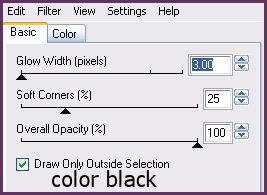
Apply Mura Meister Filters - Tone with the following settings:

Make sure that the first has a check mark and NOT a square!!!
Open up your first tube of choice. Resize as necessary, bicubic. Copy and paste as a new layer onto your canvas. Position your tube to your liking within the frame. Go to selections > invert. Hit delete on your keyboard. Deselect. Give your tube a drop shadow of H -3, V-2, Opacity 65, Blur 5.00. Change the blend mode of your tube to Hard Light.
Highlight your frame layer and give it a drop shadow of H -4, V -3, Opacity 80, Blur 7.00. Drag your frame to the top of your layer palette.
On your materials palette, change your foreground color to #cd6fa4, and your background color to #f89dea. Click on your background color and make a gradient with the following settings:
Style - Linear Angle - 45 Repeats - 1 Invert - UNCHECKED
The lighter color should be in the center. :-) Make your foreground color null.
Grab your preset shape tool, ellipse, circle. Draw out a circle that is roughly the same size as your frame. (see my tag for reference) On your layer palette, convert to Raster layer. Select, float and defloat your circle. Go to selections > modify > expand by 10.00. Add a new raster layer. Open up paper 5 from the kit. Resize by 50%, smartsize. On your materials palette, click pattern. Find the paper on the drop down menu. Make it your background pattern. Change the Angle to 30, and the size to 50. Floodfill the new layer with the pattern. Deselect. Drag the patterned paper beneath all of the layers so it is right above yoru white background layer. Position it towards the bottom left of the tag. Give it a drop shadow of H and V 0, Opacity 85, Blur 20.00. Highlight the gradient circle and position it on top of the patterned circle. It should be centered so that a bit of the patterned circle shows through. (see my tag for reference). Duplicate both circles. Go to image > mirror. Then, image > flip.
Open up flower 3 from the kit. Copy and paste as a new layer onto your canvas. Give it a drop shadow of H -4. V -4, Opacity 70, Blur 8.00. Position the flower beneath the circles, to the top left of the frame. (see my tag for reference) Duplicate. Go to image > mirror. Then, image > flip.
On your materials palette, make your foreground color #cd6fa4, and your background color #f89dea. Make a gradient, same as before. Make your foreground null. Grab your preset shape tool - rectangle. Draw out a long, thin rectangle. (see my tag for reference). Convert to a raster layer. Select, float and defloat. Go to selections > modify > contract by 3.00. Go to effects > texture effects > weave. Apply with the following settings:
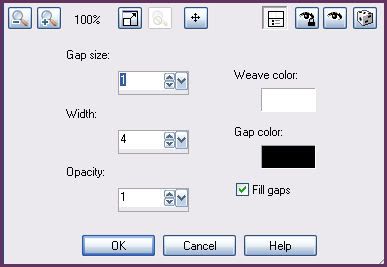
Let the selection stand. Go to selections > modify > expand by 7.00. Add a new raster layer. On your materials palette, click on pattern, and find paper 5 in the drop down menu. The settings should be the same as before, Angle 30, Size 50. Floodfill the new layer with the pattern. Give the new pattern rectangle a drop shadow of H and V 0, Opacity 75, Blur 12.00. Drag the patterned rectangle beneath all of the other layers to right above your white background. Position it towards the top of the tag. (see my tag for reference) Drag the weave, gradient rectangle right above the patterned rectangle as in my tag above. Highlight the weaved gradient rectangle. Select, float and defloat. Go to selections > modify > contract by 3.00. Selections > invert. Apply a drop shadow of H and V 0, Opacity 60, Blur 5.00. Deselect. Duplicate both rectangles. Go to image > flip, for both rectangles.
Open up Flower Bunch 2 from the kit. Resize by 25%, smartsize. Copy and paste as a new layer onto your canvas. Give it a drop shadow of H 3, V -2, opacity 65, Blur 4.00. Position it at right corner of the top rectangle. Duplicate. Mirror. Position at the left corner of the bottom rectangle.
Open up bow 1 from the kit. Resize by 25%, smartsize. Copy and paste as a new layer onto your canvas. Give it a drop shadow of H -2, V -1, Opacity 60, Blur 4.00. Duplicate the bow. Position the bows to your liking on the rectangles.
Highlight your top layer. Open up butterfly 5 from the kit. Resize by 50%, smartsize. Copy and paste as a new layer onto your canvas. Go to image > mirror. Give the butterfly a drop shadow of H -4, V -2, Opacity 65, Blur 6.00. Position to your liking on the frame.
Open up a flower binder from the kit. Resize by 40%, smartsize. Copy and paste as a new layer onto your canvas. Give it a drop shadow of H and V 0, Opacity 60, Blur 6.00. Position to your liking on the frame.
Open up the heart string from the kit. Resize by 30%, smartsize. Copy and paste as a new layer onto your canvas. Give it a drop shadow of H -2, V -1, Opacity 60, Blur 3.00. Duplicate. Mirror. Position the to your liking on the circles.
Add any other embellishments of your choosing.
Highlight your white background. Open up a paper from the kit. Copy and paste as a new layer onto your canvas. Apply WSL Mask 99 with the following settings:
Source Luminance
Fit to Canvas
Hide all Mask
Delete the mask from your layer palette, answer yes to the pop up box and merge the group.
Open up your main tube. Resize as necessary, bicubic. Copy and paste as a new layer onto your canvas. Give it a drop shadow of H and V 0, Opacity 75, Blur 20.00. Arrange the tube to your liking.
Crop and resize to your liking.
Now to add our text. Hide all of the layers above your gradient circles, so we can see what we are doing. Highlight one of your gradient circle layers. Change your background color to white. Grab your text tool. I used these settings: size 11, Anti - alias off, Stroke Width - 0.00, Creat as Vector, Kerning 100. Type out "PICTURE PERFECT" (all caps). Go to objects > align > center in canvas. Convert your text to a raster layer. Apply Mura Meister Copies with the following settings;

Highlight one of your gradient circle layers. Select, float and defloat. Move the words to your liking within the selection. Selections > invert. Hit delete and deselect. Duplicate the words. Position the duplicated word layer on top of your other gradient circle. Apply Gradient Glow to both circles, with the following settings:
Give both circles a drop shadow of H and V 0, Opacity 75, Blur 10.00.
Add the rest of your text, copyright info, and your watermark. If you are not animating, unhide all of the layers and save as JPG or PNG.
If you are animating, highlight one of your Picture Perfect layers. Grab your freehand selection tool, type point to point, feather set to 0.00. Carefully select around every other line of the words. Promote selection to layer. Highlight the original word layer and hit delete. Do the same with the other word layer.
Unhide all of your other layers. Highlight your promoted selection layer. Go to image > negative image. The words should have changed from white to black. Highlight your promoted selection 1 layer. Go to image > negative image. Copy merged. Open up Animation Shop. Paste as a new animation in AS.
Back to Paint Shop Pro. Go to edit > undo negative image. Undo > layer selection. Edit > undo negative image. All of the words should now be white again. Highlight your first original word layer. Go to image > negative image. Highlight your other original word layer. Image > negative image. Copy merged. Paste after frame 1 in AS.
In Animation Shop, select all frames (CTRL+A). Change the frame properties to 20.
Optimize and save as gif.
I hope you enjoyed this tutorial! If you have any questions, just give me a shout.
Subscribe to:
Post Comments (Atom)
0 comments:
Post a Comment