Monday, May 2, 2011
 Here Comes Trouble
This tutorial was written by me on 20 July 2009. Any similarities to other tutorials is purely coincidental.
Supplies Needed:
Tube of choice. I am using the sexy artwork of Keith Garvey. If you would like to use his artwork, you must purchase a license at MPT.
Scrapkit or scrap peices of choice. I used the awesome kit, Black and White Collection - Red by Rieneke Designs. If you would like to purchase this kit, you can here. Thank you, Rieneke!!
Template 180 made by me. You can find it here.
WSL Mask 84 by Chelle of Wee Scots Lass Creations. Check out her blog for awesome goodies!!
Font of choice. I used Bank Gothic Medium. (pay font)
Plugins:
L & K Filters - Trouble and Trix
Lokas Software - 3D Shadow
Eyecandy 4000 - Gradient Glow
Animation Shop (opt)
Supplies HERE
*~*~*~*~*~*~*~*~*~*~*~*~*~*~*~*~*~*~*~*~*~*~*~*~*~*~*~*~*~*~*~*~*~*~*~*~*~*~
Ok! Let's get started! Open up my template. Duplicate by holding down shift + d. Close the original. Delete the credit info layer.
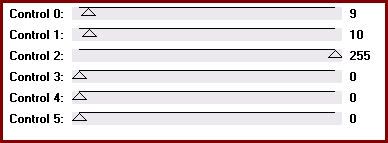
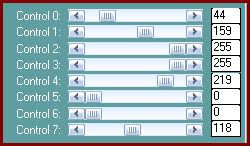
Highlight the rectangle 1 layer. Go to selections > select all. Selections > float. Selections > defloat. Apply L & K Filters - Trouble with the following settings:
Don't deselect yet. Open up your tube. Resize, as necessary, bicubic. Mirror your tube. Copy and paste as a new layer onto your canvas. Position to your liking within the selection. Go to selections > invert. Hit delete on your keyboard. Deselect. (CTRL+D). Give the tube a drop shadow of H 3, V -1, Opacity 65, Blur 5.00. Change the blend mode of the tube to Screen. Highlight the rectangle and go to image > negative image. Give the layer a drop shadow of H and V 0, Opacity 80, Blur 12.00.
Highlight the rectangle 2 layer. Select, float and defloat. Apply L & K - Trouble, same settings. Open up your tube again. Resize, as necessary, bicubic. Copy and paste as a new layer onto your canvas. Selections > invert. Hit delete and deselect. Give the tube a drop shadow of H -3, V -1, Opacity 65, Blur 5.00. Change the blend mode to Screen. Highlight the rectangle and go to image > negative image. Give it a drop shadow of H and V 0, Opacity 80, Blur 12.00.
On your materials palette, change your foreground to color #000000 and your background color to #202020. Change your background color to Gradient with the following settings:
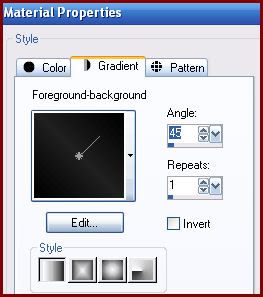
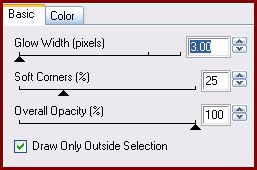
Style is Linear. Highlight the rectangle 3 layer. Select, float and defloat. Add a new raster layer. Floodfill the new layer with the gradient. Deselect. Apply Eyecandy - Gradient Glow, Color #700806, with the following settings:
Now give the layer a drop shadow of H and V 0, Opacity 65, Blur 7.00. Delete the gray rectangle 3 layer.
Highlight the center rectangle 1 layer. Select, float and defloat. Apply L & K - Trouble, same settings as before. Deselect. Apply Gradient Glow, color white, same settings as before. Give it a drop shadow of H and V 0, Opacity 60, Blur 5.00.
Highlight the center rectangle 2 layer. Select, float and defloat. Apply Trouble, same settings as before. Deselect. Apply Gradient Glow, same settings. Give the layer a drop shadow of H and V 0, Opacity 60, Blur 5.00.
On your materials palette, change your foreground color to #c0c0c0, and your background color to #ffffff (white). Make a gradient, same settings as before. (style - linear, angle 45, repeats 1). Highlight your frames fill layer. Select, float and defloat. Add a new raster layer. Floodfill the new layer with your gradient. Deselect. Delete the gray frames fill layer.
Grab your magic wand tool, tolerance set to 100, feather set to 0.00. Click on the first square so that there are marching ants all around it. Open up your tube again. Resize, if necessary, bicubic. Copy and paste as a new layer onto your canvas. Position the part of the tube you want showing within the selection. Go to selections > invert. Hit delete. Deselect. Give the tube a drop shadow of H -2, V -1, Opacity 60, Blur 5.00. Change the blend mode to Luminance (Legacy).
Repeat the above steps with the remaing 3 squares.
Highlight the frames layer. Apply Gradient Glow, color #700806. Give the frames a drop shadow of H 2, V 1, Opacity 70, Blur 5.00.
Change your foreground and background color to black. Highlight the thin rectangle 1 layer. Apply L & K Filters - Trix with the following settings:
Give it a drop shadow of H and V 1, Opacity 60, Blur 2.00. Repeat these same steps with the thin rectangle 2, 3, and 4 layers.
Open up a clip 1 from the kit. Resize by 30%, smartsize. Copy and paste as a new layer onto your canvas. Go to image > free rotate. Rotate right by 90.00 degree, both boxes unchecked. Give it a drop shadow of H 2, V -2, Opacity 60, Blur 5.00. Duplicate. Go to image > mirror. Position the clips at the end of the frames. (see my tag for reference)
Open up the star string from the kit. Resize by 25%, smartsize. Copy and paste as a new layer onto your canvas. Give it a drop shadow of H 2, V -1, Opacity 60, Blur 4.00. Duplicate. Go to image > mirror. Position one star string at the top left corner of the top center rectangle, and the other at the bottom right corner of the bottom rectangle. (see my tag for reference)
Highlight your rectangle 3 layer. Open up the stitch tube from the kit. Resize by 47%, smartsize. Copy and paste as a new layer onto your canvas. Give it a drop shadow of H 2, V -1, oapcity 70, Blur 2.00. Center the stitches in the center of the rectangle 3 layer. (see my tag for reference)
Open up the heart 1,2 and 3 from the kit. Resize the red heart by 20%, smartsize. Copy and paste as a new layer onto your canvas. Give it a drop shadow of H and V 0, Opacity 65, Blur 5.00. Position it at the bottom right corner of the rectangle 2 layer. Duplicate the red heart. Mirror it and position it at the bottom left corner of the rectangle 1 layer.
Resize the black and white heart by 15%, smartsize. Copy and paste them as a new layers onto your canvas. Give them both a drop shadow of H and V 0, Oapcity 65, Blur 5.00. Position the black heart at the top right corner of the the rectangle 2 layer. Duplicate. Mirror the black heart. Position the duplicated black heart at the top left corner of the rectangle 1 layer. Duplicate the white heart. Mirror one of them. Position them between the red and black hearts.
Open up string 2 and 3 from the kit. Resize them by 25%, smartsize. Copy and paste as a new layer onto your canvas. Give them both a drop shadow of H and V 2, Opacity 65, Blur 2.00. Duplicate each string one time. On the duplicated strings, go to image > mirror. Then, image > flip. Position the strings to your liking or see my tag for reference.
Open up the red beads from the kit. Resize by 45%, smartsize. Copy and paste as a new layer onto your canvas. Go to image > free rotate. Rotate right by 90, both boxes unchecked. Give the beads a drop shadow of H 3, V -2, Opacity 65, Blur 4.00. Duplicate the beads. Go to image > mirror. Then, image > flip. Position the beads to your liking or see my tag for reference.
Add other embellishments if you like. There are plenty to choose from. :)
Highlight your white background layer. Open up paper 14 from the kit. Copy and paste as a new layer onto your canvas. Apply WSL Mask 84 with the following settings:
Source Luminance
Fit to Canvas
Hide all Mask
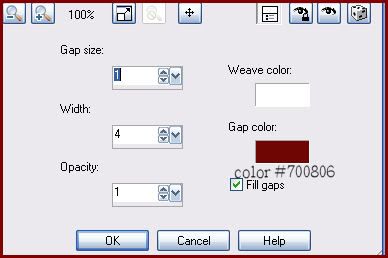
Delete the mask layer from your materials palette. Answer yes to the pop up box and merge the group. Go to effects > texture effects > weave. Apply with the following settings:
Open up your tube. Resize, if necessary, bicubic. Copy and paste your tube as a new layer onto your canvas. Position your tube to your liking. Apply Lokas 3D Shadow with the following settings:

Crop and resize to your liking.
Grab your front tool. Change your foreground color to white and your background color to black. Type out some text. ( I typed out "Her Comes Trouble") Your text should be it's own layer. Duplicate your text. On the bottom layer go to image > negative image. Give both text layers a drop shadow of H 2, V -1, Opacity 60, Blur 3.00. Drag both text layers above the center rectangle 2 layer. Position the original text in the center of the top center rectangle and the other in the center of the bottom center rectangle. Change both text layers blend mode to Overlay.
Add your copyright info, watermark and any other text of your choosing. If you are not animating, save as JPG or PNG.
If you are animating, copy merged your tag. Open up Animation Shop. Paste as a new animation in AS.
Back in Paint Shop Pro, highlight your thin rectangle 4 layer. Go to image > negative image. Copy merged and paste after frame 1 in AS.
In PSP, highlight your thin rectangle 3 layer. Go to image > negative image. Copy merged and paste after frame 2 in AS.
Back to PSP. Highlight your thin rectangle 2 layer, and go to image > negative image. Copy merged and paste after frame 3 in AS.
In Paint Shop Pro, highlight the thin rectangle 1 layer. Go to image > negative image. Copy merged and paste after frame 4 in AS.
In Animation Shop, highlight frame 4. Copy. Paste after frame 5.
Highlight frame 3. Copy. Paste after frame 6.
Highlight frame 2. Copy. Paste after frame 7.
You should now have a total of 8 frames. Select all frames (CTRL+A) Change the frame properties to 13.
Optimize and save as gif.
I hope you enjoyed this tutorial! If you have any questions, just give me a shout!
Subscribe to:
Post Comments (Atom)
0 comments:
Post a Comment