Thursday, May 5, 2011
 Sweet Snow Flowers
This tutorial was written by me on 13 November 2008. Any similarities to other tutorials is purely coincidental.
Things we need:
2 tubes of choice. I am using the elegant artwork of Jennifer Janesko. I got this tube when CILM was still open. You can find her CDO now.
Scrapkit Snow Town by Just a Girl's Designs. If you wish to purchase this awesomely versatile winter kit, you can here. Thank you Tamara!
Scalloped twinkle star frame made by me which you can download here
Mask by Chelle. Don't forget to check out her site for awesome resources and tuts!
Twinkle animation.
Font of choice. I used Ekaterina Velikaya (pay font)
Plugins
Eyecandy 5 Impact Gradient Glow
Animation Shop (opt)
Let's get started! Open up a new transparent image 650 x 650. Floodfill with white. Open up the scalloped frame. Copy and paste as a new layer onto your canvas. Go to selections > select all. Selections > float. Selections > defloat. Open up a paper of choice from the kit. Resize by 46%, smartsize. Copy and paste as a new layer onto your canvas. Go to selections > invert. Hit delete on your keyboard. Do NOT deselect.
Open up your first tube of choice. Resize bicubic, if necessary. Copy and paste as a new layer onto your canvas. Position to your liking within the frame. Hit delete. Deselect (CTRL+D) Give your tube a drop shadow of H and V 0, Opacity 60, Blur 10.00. Highlight the paper frame. Give it a drop shadow of H and V 0, Opacity 50, Blur 6.00. Delete the gray frame. Hide your white background and merge your visible layers.
Open up the icy heart frame from the kit. Resize by 27%, smartsize. Grab your magic wand tool, tolerance set at 20, feather set at 0.00. Click inside the empy space of the frame. Go to selections > modify > expand by 4.00. Open up a paper of choice. Resize by 35%, smartsize. Copy and paste as a new layer onto your canvas. Selections > invert. Hit delete. Do NOT deselect.
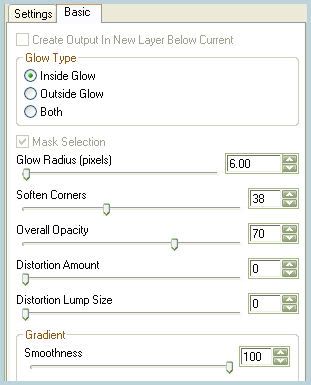
Open up your 2nd tube of choice. Resize, bicubic to fit your frame. Copy and paste as a new layer onto your canvas. Position to your liking within the selection. Hit delete. Deselect. Give the tube a drop shadow of H and V 0, Opacity 50, Blur 5.00. Drag the heart frame above your paper and tube layers. Apply gradient glow with a color of choice (I used color #bcd3db) to the frame with the following settings:
Hide your scalloped frame and your white background, and merge your visible layers.
Open up a bow of choice. Resize by 12%, smartsize. Copy and paste as a new layer onto your canvas. Give it a drop shadow of H and V 0, Opacity 40, Blur 4.00. Duplicate and mirror the bow. Position the bows to your liking.
Open up a patchwork of choice. Resize by 15%, smartsize. Copy and paste as a new layer onto your canvas. Give it the same drop shadow you gave your bow, and position it to your liking on the heart frame.
Open up the 2 blue snowflakes. Resize the first by 40%, smartsize. Copy and paste onto your canvas. Give it a drop shadow of H and V 0, Opacity 40, Blur 4.00. Position to your liking and drag it below your scalloped frame layer. (see my tag for reference)
Resize the second blue snowflake by 35%, smartsize. Give it the same drop shadow as your previous snowflake. Copy and paste onto your canvas and position to your liking. Make certain it is under your scalloped frame layer.
Open up the pink snowflake. Resize by 20%, smartsize. Copy and paste onto your canvas. Give it a drop shadow - H and V 0, Opacity 40, Blur 4.00. Duplicate the pink snowflake. Position to your liking behind the heart frame. (See my tag for reference)
Highlight your white background. Open up a tree of choice. Resize by 55%, smartsize. Copy and paste onto your canvas. I mirrored my tree, but this is not necessary. I also colorized it Hue - 138 Saturation 48, but again this is not necessary. Apply gradient glow, same settings as earlier. Position to your liking.
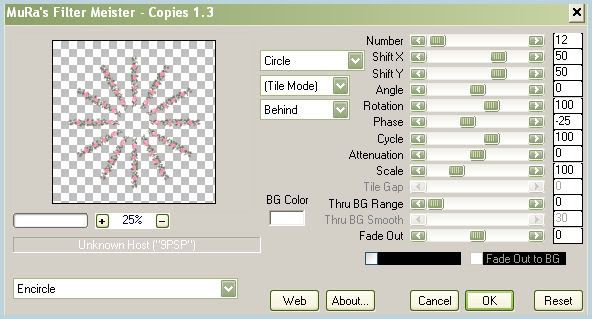
Highlight your white background. Open up the garland. Resize by 20%, smartsize. Copy and paste onto your canvas. Go to image > free rotate. Rotate right by 90.00, both boxes unchecked. Apply Mura Meister Copies with the following settings:
Resize the encircled garland by 90%, smartsize. Give it a drop shadow of H and V 0, Opacity 40, Blur 4.00. Position to your liking. (see my tag for reference)
Open up a paper of choice from the kit. Resize by 60%, smartsize. Highlight your white background. Copy your paper and paste onto your canvas.
Apply WSL_Mask 143 with the following settings:
Source Luminance
Fit to Layer
Hide all mask.
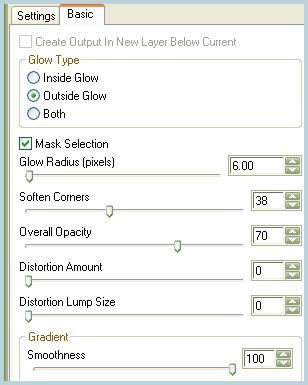
Delete the mask from your layer palette. Answer yes to the pop up box, and merge the group. Resize the mask by 90%, smartsize. Apply Eyecandy Gradient Glow with the following settings:
Hide your white background and merge your visible layers.
Crop and resize to your liking. Add your copyright info, watermark and text. If you are not animating, then save as JPG or PNG.
If you are animating, merge all of your layers together and copy. Open up animation shop. Paste as a new animation. Duplicate until you have a total of 16 frames.
Open up the twink animation. Select all frames (CTRL+A) Copy. Highlight your tag animation. Select all frames (CTRL+A) Go to edit > paste into selected frame. Repeat this step, position the twinks where you want them as many times as you like.
Optimize and save as gif.
I hope you enjoyed this tutorial. If you have any questions, just leave me a shout. :-)
Subscribe to:
Post Comments (Atom)
0 comments:
Post a Comment