Monday, May 2, 2011
 Summer Fun
This tutorial was written by me on 15 July 2009. Any similarities to other tutorials is purely coincidental.
Supplies Needed:
Tube of choice. I am using the awesome artwork of Jose Cano. I purchased this tube when he was still with MPT. If you would like to purchase his work now, you can at PSP Emporium.
Scrapkit. I am using the summery kit Beach Bum by Creationz by Jo. If you would like to purchase this kit, you can here. Thank you, Jo!
Mask 349 by Vix. Check out her site for awesome tuts and resources!!
Image of choice. I got mine from www.scx.hu.
Font of choice. I used Aspire which you can get here.
Plugins:
Xero Filters - Illustrator
Penta Filters - VTR2 & Dot and Cross
Supplies HERE
*~*~*~*~*~*~*~*~*~*~*~*~*~*~*~*~*~*~*~*~*~*~*~*~*~*~*~*~*~*~*~*~*~*~*~*~*~*~*~
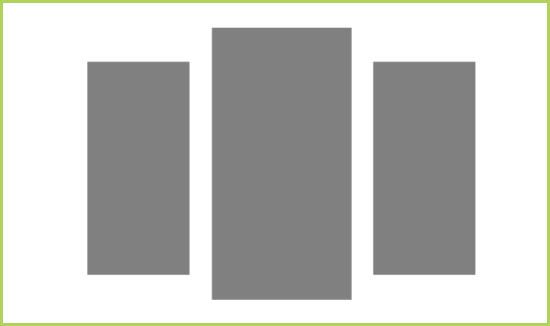
Open up a new transparent image 800 (w) x 650 (h). Floodfill with white. Make your background color dark gray, foreground null. Grab your present shape tool - rectangle. Draw out a longish rectangle. Go to objects > align > center in canvas. On your layer palette, convert to raster layer. Duplicate the rectangle. Resize by 80%, smartsize. Move it to the right of the middle rectangle. Duplicate the smaller rectangle. Go to image > mirror. You should have something similar to this:
Highlight the middle large rectangle. Go to selections > select all. Selections > float. Selections > defloat. Open up a paper from the kit. Resize by 65%, smartsize. Copy and paste as a new layer onto your canvas. Go to selections > invert. Hit delete on your keyboard. Deselect.
Highlight one of the smaller rectangles. Select, float and defloat. Open up another paper from the kit. Resize by 65%, smartsize. Copy and paste as a new layer onto your canvas. Position to your liking within the selection. Selections > invert. Hit delete and deselect. Duplicate the paper rectangle. Go to image > mirror. Merge the 3 gray rectangles together.
Highlight the merged gray rectangles layer. Select, float and defloat. Go to selections > modify > contract by 7.00. Open up your image of choice. Resize as necessary. Copy and paste as a new layer onto your canvas. Position to your liking within the selection. Selections > invert. Hit delete. Deselect. Delete the gray merged rectangles layer.
Highlight the middle large paper rectangle. Give it a drop shadow of H and V0, Opaciyt 70, Blur 15.00. Highlight the right smaller rectangle. Give it a drop shadow of H 4, V -3, Opaciyt 65, Blur 10.00. Highlight the left smaller rectangle. Give it a drop shadow of H -4, V 3, Opacity 65, Blur 10.00. The photo layer should be at the top of your layer palette.
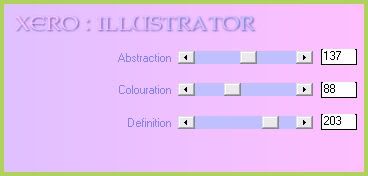
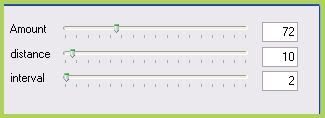
Duplicate the photo layer. Highlight the top photo layer. Select, float and defloat. Apply Xero Filters - Illustrator with the following settings:
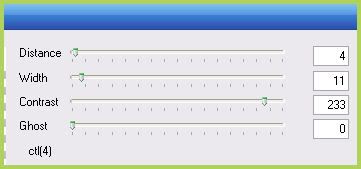
Change the blend mode of the layer to Multiply. Highlight the bottom photo layer and apply Penta Filters - VTR2 with the following settings:
Give the layer a drop shadow of H and V 0, Opacity 65, Blur 8.00.
Open up the rafia ring from the kit. Resize by 45%, smartsize. Copy and paste as a new layer onto your canvas. give it a drops hadow of H -2, V -1, opacity 60, Blur 5.00. Position it in between the middle rectangle and the left rectangle. (see my tag for reference) Duplicate. Go to image > mirror.
Open up the rafia bow from the kit. Resize by 35%, smartsize. Copy and paste as a new layer onto your canva. Give it a drop shadow of H and V 0, Oapcity 55, Blur 5.00. Position it at the top of the left rafia ring. Duplicate. Go to image > mirror.
Open put the pebbles from the kit. Resize by 20%, smartsize. Copy and paste as a new layer onto your canvas. Give thema drops hadow of H 0, V2, opacity 55, Blur 6.00. Position them so they look as if they are stacked on the right rafia ring. (see my tag for reference). Duplicate. Go to image > mirror.
Open up the shells from the kit. Resize by 30%, smartsize. Copy and paste as a new layer onto your canvas. Give them a drop shadow of H and V 0, Opacity 65, Blur 7.00. Position them at the top left corner of the left rectangle.
Open up the buckle bow from the kit. Resize by 10%, smartsize. Copy and paste as a new layer onto your canvas. Give it a drop shadow of H and V 0, Opacity 50, Blur 5.00. Position it so it looks as if it is holding the shells in place.
Open up the can clip from the kit. Resize by 35%, smartsize. Copy and paste as a new layer onto your canvas. Give it a drop shadow of H and V 0, Opacity 55, Blur 5.00. Position it at the bottom left corber of the left rectangle.
Open up Rope Flutter 2 from the kit. Resize by 30%, smartsize. Copy and paste as a new layer onto yoru canvas. Give it a drop shadow of H and V 0, Opacity 60, Blur 6.00. Position it at the bottom right corner of the right rectangle.
Open up the button from the kit. Resize by 45%, smartsize. Copy and paste as a new layer onto your canvas. Give it a drop shadow of H and V 0, Oapcity 50, Blur 5.00. Position on the top right corner of the right rectangle.
Open up the string from the kit. Resize by 35%, smartsize. Copy and paste as a new layer onto your canvas. Give it a drop shadow of H 3, V -2, Opacity 65, Blur 5.00. Go to image > flip. Position it at the bottom left corner of the left rectangle. (see my tag for reference) Drag the string layer beneath all of your other layers, right above your white background layer. Duplicate. Go to image > mirror. Then, image > flip.
Open up the sequin starfish. Copy and paste as a new layer onto your canvas. Give it a drops hadow of H-2, V -1, opaciyt 60, Blur 4.00. Position it so it is peeking out from beneath your shells. Duplicate. Position the duplicated starfish behind your rope flutter. (see my tag for reference)
Highlight your white background. Open up the stitched ribbon from the kit. Resize by 55%, smartsize. Copy and paste as a new layer onto your canvas. Give it a drop shadow of H and V 0, Oapcity 65, Blur 8.00.
Highlight your top layer. Open up your tube. Resize, as necessary, bicubic. Copy and paste as a new layer onto your canvas. Give it a drop shadow of H and V 0, oapcity 75, Blur 13.00. Arrange to your liking.
Add any other embellishments of your choosing.
Highlight your white background. Open up a paper from the kit. Copy and paste as a new layer onto your canvas. Apply Vix Mask 349 with the following settings;
Source Luminance
Fit to Canvas
Hide all Mask.
Delete the mask from your layer palette. Answer yes to the pop up box and merged the group. Resize the mask layer by 85%, smartsize. Duplicate. Go to image > mirror. Position the mask layers side by side. Merge the 2 mask layers together.
Apply Penta - Dot and Cross to the merged mask layer with the following settings:
Give the layer a drops hadow of H -2, V 1, Opacity 30, Blur 2.00. Now give it a drop shadow of H 2, V -1, Opacity 30, Blur 2.00.
Crop and resize to your liking.
Add your copyright info, watermark and your text. Save as JPG or PNG.
I hope you enjoyed this tutorial! If you have any questions, just give me a shout.
Subscribe to:
Post Comments (Atom)
0 comments:
Post a Comment