Monday, June 13, 2011
 Splendid Sun - Revamped
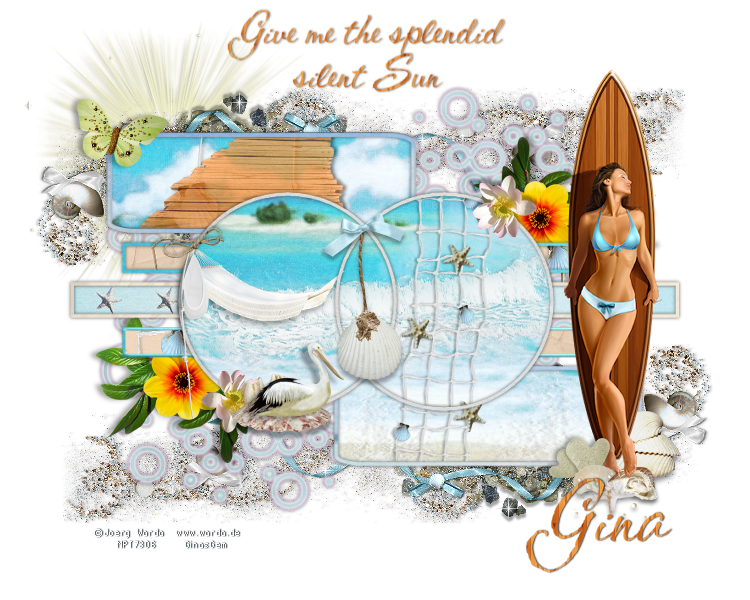

This original tutorial was written by me on 29 May 2009. The revamped version was written by me on 12 May 2011. Any similarities to other tutorials is purely coincidental.
Supplies Needed:
Tube of choice. I am using the awesome artwork of Joerg Warda. This tube was purchased when he was still with MPT. I don't know where his art would be available for purchase anywhere, so just another summer tube of choice.
Scrap Kit. I am using Ocean Blue Tagger's Size kit made by me. If you would like to purchase this kit you can here, here, here, here, here, or here. If you have another Ocean or Summer kit that you prefer to use, just use my tutorial as a guide.
Template 166 made by me. You can grab it here.
Mask 309 by Vix. Check out her site for awesome resources and tuts!
Font of choice. I used Cac Shishoni Brush which you can download here.
Supplies HERE
*~*~*~*~*~*~*~*~*~*~*~*~*~*~*~*~*~*~*~*~*~*~*~*~*~*~*~*~*~*~*~*~*~*~*~*~*~*~*~*~*~*
Ok! Let's get started! Open up my template. Duplicate by holding down shift + d. Close the original. Delete the credit info layer.
Highlight the lots of circles layer. Go to selections > select all. Selections > float. Selections > defloat. Open up a paper from the kit. (I used paper 11) Resize by 85%, smartsize. Copy and paste as a new layer onto your canvas. Go to selections > invert. Hit delete on your keyboard. Deselect. (CTTRL+D). Apply Eyecandy 5 Impact - Gradient Glow (using colors of your choice) with the following settings:

Now give the layer a drop shadow of H and V 0, Opacity 65, Blur 4.00. Delete the black lots of circles layer.
Highlight the rectangle fill 1 layer. Select, float and defloat. Open up a paper from the kit. (I used paper 15) Resize by 80%, smartsize. Copy and paste as a new layer onto your canvas. Selections > invert. Hit delete and deselect. Delete the black rectangle fill 1 layer.
Highlight the rectangle fill 3 layer. Select, float and defloat. Copy and paste the same paper you just used (it should still be on your clipboard). Selections > invert. Hit delete and deselect. Delete the black rectangle fill 3 layer.
Highlight the rectangle fill 2 layer. Select, float and defloat. Open up a paper from the kit. (I used paper 19) Resize by 80%, smartsize. Copy and paste onto your canvas. Selections > invert. Hit delete and deselect. Delete the black rectangle fill 2 layer.
With the rectangle frames, you can either leave as is, or add papers like I did. Either way, give the layer a drop shadow of H and V 0, Opacity 80, Blur 5.00.
Highlight the rounded rectangle fill 1 layer. Select, float and defloat. Open up a paper from the kit. Resize by 75%, smartsize. (I used paper 9) Copy and paste as a new layer onto your canvas. Duplicate the paper layer. Hide your top paper layer, and highlight your bottom one. Go to selections > invert. Position the paper to your liking within the selection. Hit delete. Don't deselect yet!!
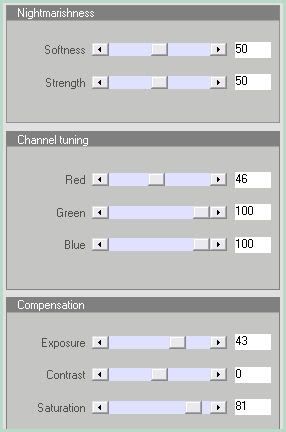
Open up the wooden bridge from the kit. Resize by 60%, bicubic. Copy and paste as a new layer onto your canvas. Position so that the end of the bridge reaches the top of the rounded rectangle. (see my tag for reference) Hit delete on your keyboard. Deselect. Apply Xero Filters - Bad Dream with the following settings:
Lower the opacity of the bridge layer to 75, and give it a drop shadow of H 3, V 0, Opacity 65, Blur 5.00. Delete the gray rounded rectangle fill 1 layer.
Highlight the rounded rectangle fill 2 layer. Select, float and defloat. Unhide your hidden paper layer and drag it above the rounded rectangle fill 2 layer. Position the paper to your liking within the selection. Go to selections > invert. Hit delete on your keyboard. Don't deselect yet!!
Open up water 2 from the kit. Resize by 30%, bicubic. Copy and paste as a new layer onto your canvas. Position the water on the right side of the rounded rectangle. Duplicate the water layer. Position the duplicated water on the left side of the rounded rectangle. Hit delete. Deselect. Give both water layers a drop shadow of H -1, V 0, Opacity 35, Blur 2.00. Delete the gray rounded rectangle fill 2 layer.
Highlight the rounded rectangle frame 1 layer. Leave as is or add a paper. Give the layer a drop shadow of H and V 0, Oapcity 75, Blur 5.00. Highlight the rounded rectangle frame 2 layer and repeat the same steps you did for the rounded rectangle frame 1 layer.
Highlight the intertwined circles fill layer. Select, float and defloat. Open up a paper from the kit. (I used paper 6 again) Resize by 75%, smartsize. Copy and paste onto your canvas. Selections > invert. Hit delete. Don't deselect yet.
Open up water 1 from the kit. Resize by 50%, bicubic. Copy and paste as a new layer onto your canvas. Position the water to your liking within the selection. Hit delete on your keyboard. Deselect. Give the water a drop shadow of H -1,V 0, Opacity 35, Blur 2.00. Delete the gray intertwined circles fill layer.
Open up the hammock from the kit. Resize by 18%, smartsize. Go to adjust > sharpness > unsharp mask. Apply with a Radius of 5, Strength 15, Clipping 2. Copy and paste the hammock as a new layer onto your canvas. Go to image > mirror. Position the hammock on the left side of the intertwined circles fill as in my tag above. Give the hammock a drop shadow of H 0, V 3, Opacity 35, Blur 8.00.Open up the Fishing Net Deco from the kit. Resize by 43%, smartsize. Apply unsharp mask, same settings as before. Copy and paste as a new layer onto your canvas. Position the fishing net deco on the right side of the intertwined circles fill layer. The top part of the net should touch the right top of the intertwined circles frame and the bottom should reach the bottom edge of the rounded rectangle 2 layer. Give the fishing net deco a drop shadow of H 2, V 0, Opacity 35, Blur 4.00. Grab your freehand selection tool, type point to point, feather set at 0.00. Carefully select around the top ends of the net that are hanging above the intertwined circles frame, and the bottom ends of the net that are hanging below the rounded rectangle 2 frame. Hit delete. Deselect. (see my tag for reference if you need more clarification)
Highlight the intertwined circles frame layer. Leave as is, or add a paper. Give the layer a drop shadow of H and V 0, Opacity 85, Blur 7.00.
Open up the sea shells deco from the kit. Resize by 30%, smartsize. Apply unsharp mask, same settings as before. Copy and paste as a new layer onto your canvas. Grab your freehand selection tool, same settings as before. Select around the right sea shell and rope, and around the left sea shell and rope. Hit delete. Deselect. You should only have the middle (and biggest one) left. Position the sea shell and rope in the center of the intertwined circles frame fill. Give it a drop shadow of H 0, V 3, Opacity 35, Blur 8.00.
Open up a bow from the kit. Resize by about 30%, smartsize. Apply unsharp mask, same settings. Copy and paste as a new layer onto your canvas. Position the bow at the top of the sea shell rope. Give the bow a drop shadow of H 0, V 2, Opacity 25, Blur 6.00.
Open up the Fishing Net from the kit. Resize by 25%, smartsize. Apply unsharp mask, same settings as before. Copy and paste as a new layer onto your canvas. Position the net on the left side of the intertwined circles frame. Give it a drop shadow of H 2, V 0, Opacity 30, Blur 5.00.
Open up the rope bow from the kit. Resize by 25%, smartsize. Apply unsharp maks, same settings. Position it at the top of the fishing net. Give it a drop shadow of H and V 0, Opacity 25, Blur 4.00.
Open up Flower 3 from the kit. Resize by 17%, smartsize. Apply unsharp mask, same settings. Copy and paste as a new layer onto your canvas. Position the flower at the bottom left of the left intertwined circle frame. Give it a drop shadow of H -3, V 2, Opacity 35, Blur 8.00. Duplicate the flower. Position the duplicated flower at the top right of the right intertwined circle frame.
Open up the calcified sea shell from the kit. Resize by 20%, smartsize. Apply unsharp mask, same settings you've been using. Copy and paste as a new layer onto your canvas. Position it at the bottom center of the left intertwined circle frame, right next to the bottom flower. (see my tag for reference) Give the calcified sea shell a drop shadow of H 0, V 4, Opacity 35, Blur 8.00.
Open up Pelican 1 from the kit. Resize by 15%, smartsize. Apply unsharp mask, same settings. Copy and paste as a new layer onto your canvas. Position it so it looks as if it is sitting on top of the calcified sea shell. (see my tag for reference) Give the pelican a drop shadow of H -3, V 0, Opacity 35, Blur 5.00.
Open up a butterfly from the kit. Resize by 30%, smartsize. Apply unsharp mask, Radius 5, Strength 25, Clipping 2. Copy and paste as a new layer onto your canvas. Go to image > mirror. Position the butterfly at the upper left corner of the top rounded rectangle frame. Give the butterfly a drop shadow of H 2, V 0, Opacity 35, Blur 4.00.
Open up Branch 2 from the kit. Resize by 35%, bicubic. Copy and paste as a new layer onto your canvas. Position the branch to the upper right of the right intertwined circle. Give the branch a drop shadow of H 3, V -3, Opacity 50, Blur 6.00. Drag the branch layer to right above your lots of circle layer. Duplicate the branch. Go to image > mirror. Then, image > flip.
Open up Flower 1 from the kit. Resize by 25%, smartsize. Apply unsharp mask, Radius 5, Strength 15, Clipping 2. Copy and paste as a new layer onto your canvas. Position the yellow flower to the right and slightly down from the pink flower. Give the yellow flower a drop shadow of H and V 0, Opacity 40, Blur 8.00. Duplicate the yellow flower. Go to image > mirror. Then, image > flip. The yellow flower layers should be right above your branch layers.
Open up Cluster 2 from the kit. Resize by 65%, bicubic. Copy and paste as a new layer onto your canvas. Mirror the cluster. Position the cluster so that the bow is peeking out from behind the top rounded rectangle. Give the cluster a drop shadow of H and V -1, Opacity 30, Blur 3.00. Duplicate the cluster. Go to image > mirror. Then, image > flip. Both cluster layers should be right above your white background layer.
Open up the pebbles from the kit. Resize by 40%, bicubic. Copy and paste as a new layer onto your canvas. Position the pebbles so that some of them are peeking out from under the bottom cluster. Give the pebbles a drop shadow of H 0, V 2, Opacity 30, Blur 3.00. Duplicate the pebbles. Go to image > mirror. Then, image > flip. Both pebble layers should be below your cluster layers.
Open up the sun from the kit. Resize by 45%, bicubic. Copy and paste as new layer onto your canvas. Give it a drop shadow of H 1, V 0, Opacity 40, Blur 2.00. Go to adjust > brightness/contrast > brightness/contrast. Apply with the following settings:
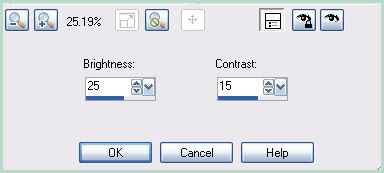
Position the sun so that the top of it is peeking out from behind the top rounded rectangle. The sun layer should be below the pebbles layers.
Open up your tube from the kit. Resize as necessary bicubic. Copy and paste as a new layer onto your canvas. Position the tube to your liking. Give it a drop shadow of H and V 0, Opacity 65, Blur 20.00.
Open up stacked sea shells 2 from the kit. Resize by 20%, smartsize. Apply unsharp mask, Radius 5, Strength 15, Clipping 2. Copy and paste as a new layer onto your canvas. Mirror them. Position them to your liking behind your tube's feet. Give the shells a drop shadow of H 0, V 3, Opacity 30, Blur 5.00.
Open up stacked sea shells 1 from the kit. Resize by 10%, smartsize. Copy and paste as a new layer onto your canvas. Position them at the bottom of your tube's feet. Give them a drop shadow of H and V 0, Opacity 30, Blur 7.00.
Open up the Heart Rocks from the kit. Resize by 15%, smartsize. Copy and paste as a new layer onto your canvas. Position them to the left of your tube's feet, so that they are slightly in front of them. Give the rocks a drop shadow of H and V 0, Opacity 30, Blur 5.00.
Open up the oyster shell with pearl. Resize by 10%, smartsize. Copy and paste as a new layer onto your canvas. Position them on top of the tube's feet. Give it a drop shadow of H and V 0, Opacity 30, Blur 5.00.
Open up the star fish deco. Resize by 15%, smartsize. Copy and paste as a new layer onto your canvas. Position them in front of and slightly down from the oyster shell. Give it a drop shadow of H and V 0, Opacity 30, Blur 5.00.
Add any other embellishments of your choosing.
Hide your white background. Merge your visible layers together. Resize by 90%, bicubic.
Highlight your white background. Open up a paper from the kit. (I used paper 11) Resize by 95%, smartsize. Copy and paste onto your canvas as a new layer onto your canvas. Apply Vix Mask 309 with the following settings:
Source Luminance
Fit to Canvas
Hide all Mask
Delete the mask from your layer palette, answer yes to the pop up box and merge the group. Resize the mask layer by 98%, smartsize. Duplicate the mask layer 2 times. Merge the 3 mask layers together. Give it a drop shadow of H and V 0, Opacity 30, Blur 5.00.
Crop and resize to your liking.
Add your copyright info, watermark and your text.
Delete your white background layer and save as PNG.
I hope you enjoyed this tutorial! If you have any questions, just give me a shout.
Subscribe to:
Post Comments (Atom)
1 comments:
Found your tut blog today and I will definitely be back. Wow! You have some lovely tutorials. I've linked you from my blog, too. :)
Post a Comment