Thursday, May 5, 2011
 Snowflake Season
This tutorial was written by me on 21 October 2008. Any similarities to other tutorials is purely coincidental.
Supplies Needed:
Tube of choice. I am using the work of Rion Vernon. I got this tube when CILM was still open. You can find him at CDO now.
Scrapkit. I am using the beautiful kit Winterland by Soxsational Scraps. If you wish to purchase this kit you can here
Template #56 by Dezigns by Ali
Falling Snow Animation
Font of choice. I am using Kirsten (pay font)
Plug Ins
EyeCandy Gradient Glow
Filters Unlimited 2.0 paper textures
Ok! Let's begin! Open up Ali's Template. Delete the credits and hold down Shift +D to duplicate. Close the original. Go to Image > Canvas Size. Change the canvas size to 700 x 700 pixels. (we will crop and resize later) Add a new raster layer. Send it to the bottom and floodfill with white.
Highlight the bottom circle 2 layer. Go to Selections > Select all. Selections > Float. Defloat. Open up a paper of choice from the scrapkit. Copy and paste as a new layer onto your canvas. Go to Selections > Invert. Hit delete on your keyboard. Deselect (CTRL+D) Give the circle a drop shadow of H and V 0, Opacity 65, Blur 10.00. Delete the gray bottom circle 2 layer.
Highlight the bottom circle 1 layer. Select, float and defloat. Open up a contrasting paper of choice. Copy and paste onto your canvas. Selections > Invert. Hit delete on your keyboard. Deselect and give this circle the same drop shadow as you did with the previous circle. Delete the gray bottom circle 1 layer.
Highlight the middle circles layer. Grab your magic wand tool, tolerance set at 30, feather at 0.00. Click inside the far left circle. Open up a paper of choice. Copy and paste onto your canvas. Selections > Invert. Hit delete on your keyboard.. Deselect. Repeat this same step with the rest of the circles, alternating a between a dark paper and a lighter colored paper. Delete the black middle circles layer.
Highlight the circle frames layer. Select, float, and defloat. Add a new raster layer. Floodfill the selection with a color of your choosing ( I used white). Deselect. Apply Filters Unlimited 2.0, Paper Textures > Canvas (fine) with the default settings. Give the layer a drop shadow of H and V 0, Opacity 60, Blur 5.00. Delete the gray circle frames layer.
Hide your white background and merge your visible layers.
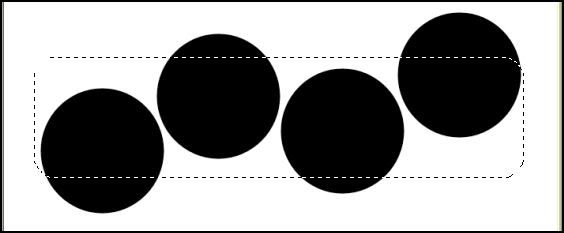
Highlight your white background. Grab your selection tool, Type Rounded Rectangle, feather set at 0.00. Draw out a rectangle that is as long as your middle circles like this: (yours should be 'papered' already)
Add a new raster layer. Floodfill with the same color you used for the circle frames. Go to Selections > Modify > Contract by 7.00. Hit delete on your keyboard. Deselect. You should now have a thin rounded rectangle frame. Apply Filters Unlimited 2.0, same settings as earlier.
Grab your magic wand tool. Click inside the empty part of the rounded rectangle frame. Go to Selections > Modify > Expand by 2.00. Open up a paper of choice and paste onto your canvas. Position to your liking within the selection. Selections > Invert. Hit delete on your keyboard. Deselect. I colorized my paper, but this is optional. Drag your paper beneath the frame. Give your frame a drop shadow of H and V 0, Opacity 60, Blur 5.00. Hide your white background and your circles, and merge the rounded rectangle frame and paper together. Unhide all layers and drag the rectangle beneath the circles. Duplicate the rounded rectangle and position to your liking.
Open up the beads. Resize by 85%, smartsize. Paste onto your canvas and position to your liking. Give the beads a drop shadow of H and V 0, Opacity 50, Blur 4.00
Open up the ice skates from the kit. Resize by 50%, smartsize. Paste onto your canvas. Position to your liking, and give them the same drop shadow you gave the beads.
Open up a staple ribbon of choice. Resize by 25%, smartsize. Paste onto your canvas and position to your liking. Give it the same drop shadow you gave your skates.
Open up a flower of choice. Resize by 20%, smartsize. Paste onto your canvas and position to your liking. Give it the same drop shadow you gave the ribbon staple.
Add any other embellishments of your choosing. When you are done, hide your white background and merge your visible layers. Crop and resize to your liking.
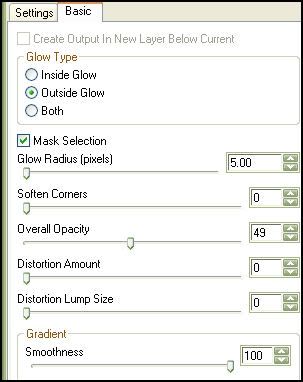
Highlight the circles and rectangles layer. Apply Gradient Glow (with a color of choice) with the following settings:
Open up your tube. Resize if necessary (bicubic) Paste onto your canvas, and position to your liking. Give your tube a drop shadow of H and V 0, Opacity 65, Blur 10.00.
Open up wordart of choice. Resize to your liking (smartsize) and paste onto your canvas. Position to your liking. Give it a drop shadow of H 1, V 0, Opacity 62, Blur 2.00.
Add your copyright info, watermark and text. (make sure these are on seperate layers so they are not blurred by the snow :-))
Hide your tube layer, wordart layer, and text layers. Merge the rectangle circles and white background together. Copy.
Open up Animation Shop. Paste as a new animation. Duplicate the frames until you have a total of 10 frames. Select all frames (CTRL+A)
Open up the Falling Snow animation. Select all frames (CTRL+A) Copy.
Open up your tag animation. Go to Edit > Paste into Selected frame. Position the snow to your liking.
Back in Paint Shop Pro. Hide your circle/rectangle, white background merged layer. Merge your visible layers. Copy.
Paste as a new animation in AS. Duplicate until you have 10 frames. Select all frames (CTRL+A) Copy.
Open up the tag and snow animation. Select all frames (CTRL+A) Go to Edit > Paste into selected frame. Position to your liking.
Optimize and save as gif.
I hope you enjoyed this tutorial. If you have any questions, just give me a shout!
Subscribe to:
Post Comments (Atom)
0 comments:
Post a Comment