Thursday, May 5, 2011
 Snow Falls
This tutorial was written by me on 27 November 2008. Any similarities to other tutorials is purely coincidental.
3 Tubes of choice. I am using the adorable artwork of Suzanne Woolcott. If you wish to use her artwork, you must purchase a license here
Scrapkit Sally Snow and the Snow Princess by Alane. If you wish to purchase this kit, you can here. Thank you, Alane!
Template 54 made by me which you can get here
Floating Snow Animation
Font of choice. I used Jolis Script which you can download here
Plugins:
Animation Shop (opt)
***********************************************************************************************************
Let's get started! Open up my template and duplicate by holding down shift + d. Close the original. Delete the credit info layer.
Highlight the long rectangle layer. Go to selections > select all. Selections > float. Selections > defloat. Open up a paper of choice from the kit. Resize by 15%, smartsize. Copy and paste as a new layer onto your canvas. Go to selections > invert. Hit delete on your keyboard. Deselect (CTRL+D) Give the layer a drop shadow of H and V 0, Opacity 60, Blur 10.00. Delete the black rectangle layer.
Highlight the icicles 1 layer. Give it a drop shadow of H and V 0, Opacity 25, Blur 3.00. Highlight the icicles 2 layer and give it the same drop shadow.
Highlight the big square 1 layer. Select, float and defloat. Open up a paper of choice from the kit. Resize by 15%, smartsize. Copy and paste onto your canvas. Selections > invert. Hit delete. Don't deselect yet!
Open up your first tube of choice. Resize as necessary bicubic. Copy and paste onto your canvas. Position to your liking. Hit delete. Deselect. Change the blend mode of the tube to Luminance (legacy) Give your tube a drop shadow of H and V 0, Opacity 50, Blur 6.00.
Highlight the paper big square and give it a drop shadow of H and V 0, Opacity 60, Blur 8.00. Delete the gray square layer.
Highlight the big square 2 layer and repeat the same steps as you did with big square 1, but mirror your tube.
Highlight the small square 1 layer. Select, float and defloat. Open up a paper of choice from the kit. Resize by 15%, smartsize. Copy and paste as a new layer onto your canvas. Selections > invert. Hit delete. Don't deselect yet!
Open up your second tube of choice. Resize as necessary, bicubic. Copy and paste onto your canvas. Position to your liking within the selections and hit delete. Deselect. Change the blend mode of the tube to Luminance (legacy). Give your tube a drop shadow of H and V 0, Opacity 50, Blur 6.00.
Highlight the small square paper layer and give it a drop shadow of H and V 0, Opacity 50, Blur 6.00. Delete the gray small square layer.
Highlight the small square 2 layer and repeat the same steps as you did with small square 1, but mirror your tube.
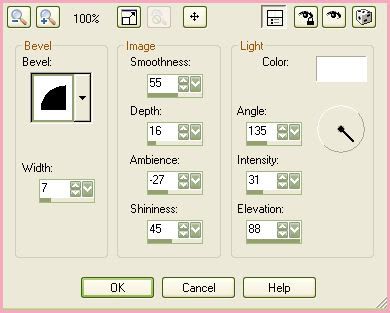
Highlight the snowflake wreathe layer. Select, float and defloat. Open up a light colored paper of choice. Resize by 15%, smartsize. Copy and paste onto your canvas. Selections > invert. Hit delete and deselect. Go to effects > 3D Effects > Inner Bevel and apply with the following settings:
Give the snowflake wreathe a drop shadow of H and V 0, Opacity 45, Blur 5.00. Delete the gray snowflake wreathe template layer.
Highlight the circle layer. Select, float and defloat. Open up a paper of choice from the kit. Resize, 15%, smartsize. Copy and paste onto your canvas. Selections > invert. Hit delete. Do not deselect!
Open up your main tube. Resize as necessary, bicubic. Copy and paste onto your canvas. Position to your liking within the selection. Hit delete and deselect. Give your tube a drop shadow of H and V 0, Opacity 55, Blur 10.00. Delete the gray circle layer.
Highlight the circle strip layer. Select, float and defloat. Open up a paper that contrasts with the last one you used. Copy and paste as a new layer onto your canvas. Selections > invert. Hit delete and deselect. Give it a drop shadow of H and V 0, Opacity 60, Blur 5.00. Delete the gray strip layer. Drag the paper strip under your tube layer.
Highlight the snowflakes layer and apply noise - Random and Monochrome checked, value set at 10. Give them a drop shadow of H 1, V 0, Opacity 40, Blur 2.00. Drag your snowflake layer below your tube layer.
Highlight your circle frame layer. Select, float and defloat. Open up a paper of choice from the kit. Resize by 15%, smartsize. Copy and paste onto your canvas. Selections > invert. Hit delete. Deselect. Give it a drop shadow of H and V 0, Opacity 60, Blur 5.00. Delete the black circle frame.
Open up a bauble of choice. Resize by 3%, smartsize. Copy and paste onto your canvas. Give it a drop shadow of H and V 0, Opacity 50, Blur 4.00. Duplicate the bauble and mirror it. Position them to your liking.
Open up a bow of choice. Resize by 5%, smartsize. Copy and paste onto your canvas. Give it the same drop shadow you gave your bow. Duplicate the bow and mirror it. Position them to your liking.
Open up the wand. Resize by 10%, smartsize. Copy and paste onto your canvas. Give it a drop shadow of H and V 0, Opacity 50, Blur 5.00. Duplicate the wand. Mirror the wand. Position them to your liking.
Open up the mittens. Resize by 4%, smartsize. Copy and paste onto your canvas. Give them a drop shadow of H and V 0, Opacity 50, Blur 5.00. Duplicate the mittens and mirror. Position them to your liking.
Open up a sally snow of choice. Resize by 9%, smartsize. Copy and paste onto your canvas. Give her a drop shadow of H and V 0, Opacity 50, Blur 5.00. Position her to your liking.
Open up a snowglobe of choice. Resize by 10%, smartsize. Copy and paste onto your canvas. Give it a drop shadow of H and V 0, Opacity 50, Blur 5.00. Position to your liking.
Highlight your white background. Open up an xmas tree of choice. Resize by 11%, smartsize. Copy and paste onto your canvas. Apply Mura Meister Copies with the following settings:
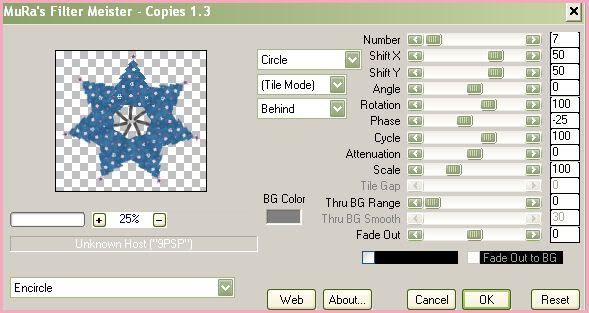
Give it a drop shadow of H and V 0, Opacity 50, Blur 8.00.
Open up a snowflake of choice. Resize by 15%, smartsize. Copy and paste onto your canvas. Give it a drop shadow of H 1, V 0, Opacity 40, Blur 2.00. Duplicate the snowflake and position them to your liking.
Add any other embellishments of your choosing.
Crop and resize to your liking.
Add your copyright info, watermark and text. If you are not animating, save as JPG or PNG.
If you are animating, merge all of your layers together. Copy. Open up animation shop and paste as a new animation.
Duplicate until you have a total of 19 frames. Select all frames (CTRL+A) Open up the floating snow animation. Select all frames (CTRL+A) Copy. Highlight your tag animation. Go to edit > paste into selected frame. Position to your liking and left click your mouse. Repeat this step as many times as you like.
Optimize and save as gif.
I hope you enjoyed this tutorial. If you have any questions, just give me a shout!
Subscribe to:
Post Comments (Atom)
0 comments:
Post a Comment