Thursday, May 5, 2011
 Brrrr
Brrrr

This tutorial was written by me on 27 November 2008. Any similarities to other tutorials is purely coincidental.
Supplies Needed:
Tube of choice. I am using the amazing artwork of Jessica Dougherty. I got this tube when CILM was still open. You can find her at CDO now.
Scrapkit. I used the wintery goodness kit Brrr by Sarah of Pimp My Tags. If you wish to purchase this kit, you can here.
Template 55 made by me which you can download off of my blog here.
Font of choice. I used Alex Brush (pay font)
Plugins:
Xenofex 2 - Constellation
Xero Filters - Sparkles
Animation Shop (optional)
No other supplies needed
*******************************************************************************************************
Let's get started! Open up my template. Duplicate by holding down shift + d. Close the original. Delete the credit info and the circle layer.
Highlight the 4 snowflake frames fill layer. Go to selections > select all. Selections > float. Selections > defloat. Open up a paper of choice from the kit and resize by 78%, smartsize. Copy and paste as a new layer onto your canvas. Go to selections > invert. Hit delete on your keyboard. Deselect (CTRL+D) Delete the gray snowflake frames fill.
Highlight the 4 snowflake frames. Select, float and defloat. Open up a paper of choice from the kit. Resize by 78%, smartsize. Copy and paste onto your canvas. Selections > invert. Hit delete and deselect. Give the layer a drop shadow of H and V 0, Opacity 45, Blur 5.00. Delete the black snowflake frames template layer.
Highlight the big rectangles layer. Select, float and defloat. Open up a paper from the kit. Resize, 78%, smartsize. Hit delete on your keyboard. Deselect. Give the layer a drop shadow of H and V 0, Opacity 50, Blur 10.00. Delete the gray big rectangles layer.
Highlight the medium rectangles layer. Select, float and defloat. Open up a paper of choice from the kit. Resize by 78%, smartsize. Copy and paste as a new layer onto your canvas. Selections > invert. Hit delete and deselect. Give the layer a drop shadow of H and V 0, Opacity 50, Blur 8.00. Delete the dark gray medium rectangles.
Highlight the small rectangle layer. Select, float and defloat. Open up a paper from the kit. Resize by 78%, smartsize. Copy and paste onto your canvas. Selections > invert. Hit delete. Deselect. Give the layer a drop shadow of H and V 0, Opacity 60, Blur 6.00. Delete the white rectangle.
Highlight the snowflake wreathe layer. Select, float and defloat. Open up a paper of choice from the kit. Resize by 78%, smartsize. Copy and paste onto your canvas. Selections > invert. Hit delete and deselect. Apply Xenofex Constellation with the following settings:
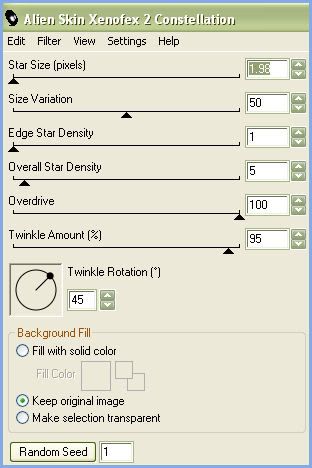
Give the layer a drop shadow of H and V 0, Opacity 60, Blur 10.00. Delete the gray snowflake wreathe.
Open up a snowflake felt frame from the kit. Resize by 85%, smartsize. Copy and paste as a new layer onto your canvas. Grab your magic wand tool, tolerance set at 40, feather at 0.00. Click inside the empty space in the middle of the frame. (don't forget the little space under the bow) You may have to click a couple of times close the bow. :-) Go to selections > modify > expand by 5.00. Open up a paper of choice. Resize by 78%, smartsize. Copy and paste onto your canvas. Selections > invert. Hit delete. Don't deselect yet!
Open your tube. Resize, bicubic if necessary. Mirror your tube. Copy and paste as a new layer onto your canvas. Position to your liking within the selection. Hit delete and deselect. Change the blend mode of your tube to Hard Light. Give your tube a drop shadow of H and V 0, Opacity 50, Blur 10.00.
Highlight the felt frame paper fill layer. Apply Constellation, same settings as before.
Highlight your felt frame. Drag it above your paper and tube layers. Give it a drop shadow of H and V 0, Opacity 50, Blur 8.00.
Open up the snowflake deco element from the kit. Resize by 45%, smartsize. Go to adjust > sharpness > unsharp mask. Apply with:
Radius 5
Strength 25
Clipping 1
Copy and paste onto your canvas. Give it a drop shadow of H 1, V 0, Opacity 40, Blur 3.00. Duplicate the snowflake deco and mirror the duplicated layer. Position them at the ends of the big rectangles. Drag both snowflake deco layers below your medium rectangles. (see my tag for reference)
Highlight your top layer. Open up a bow of choice from the kit. Resize by 30%, smartsize. Copy and paste onto your canvas. Give it a drop shadow of H and V 0, Opacity 50, Blur 5.00. Duplicate the bow and mirror it. Position them to your liking on the snowflake decos.
Open up a button deco of choice. Resize by 15%, smartsize. Copy and paste onto your canvas. Give it a drop shadow of H and V 0, Opacity 50, Blur 3.00. Duplicate the button and mirror it. Position to your liking.
Highlight your white background. Open up a snowflake of choice. Resize by 50%, smartsize. Copy and paste onto your canvas. Go to image > free rotate. Rotate left by 45.00, both boxes unchecked. Go to adjust > sharpen. Apply constellation, same settings as before. Give it a drop shadow of H 1, V 0, Opacity 50, Blur 3.00. Duplicate the snowflake and mirror the duplicated layer. Position them behing the top 2 small snowflake frames. (see my tag for reference)
Highlight your white background. Open up the folded ribbons. Don't resize. Copy and paste onto your canvas. Apply Constellation, same settings as before. Give it a drop shadow of H and V 0, Opacity 50, Blur 8.00. Position in the middle of the medium rectangles (see my tag for reference)
Highlight your white background. Open up the snow sparkle cluster. Don't resize. Copy and paste onto your canvas. Apply unsharp mask, same settings as before. Give it a drop shadow of H 1, V 0, Opacity 25, Blur 3.00. Position to your liking.
Open up the snow spray. Resize by 85%, smartsize. Apply unsharp mask, same settings as earlier. Copy and paste onto your canvas. Give it the same drop shadow you gave your sparkle cluster. Duplicate the snow spray. Go to image > mirror. Then, image > flip. Position on at the top of your tag, and the other at the bottom. (see my tag for reference)
Add any other embellishments of your choosing.
Open up your main tube. Resize, bicubic as necessary. Copy and paste onto your canvas. Give it a drop shadow of H and V 0, Opacity 50, Blur 10.00. Position to your liking.
Crop and resize to your liking.
Add your copyright info, watermark and text. If you are not animating, save as JPG or PNG.
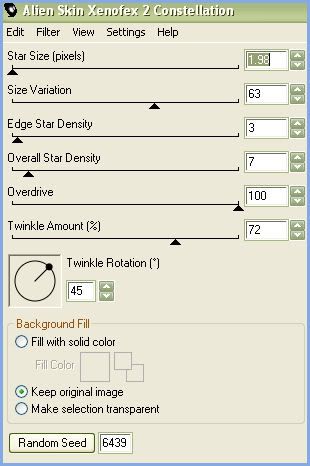
If you are animating, highlight your tube layer. Grab your freehand selections tool, type point to point, feather set at 1.00. Carefully select around the parts of the tube, you would like to have sparkle.
Apply Xenofex Constellation with the following settings:
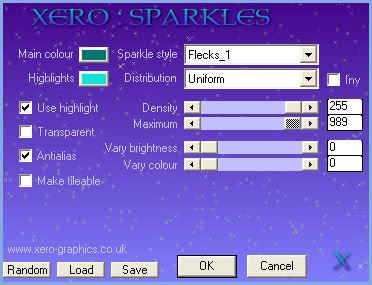
Now apply Xero sparkles (with colors of choice) with the following settings:
Deselect. Copy merged. Open up Animation Shop. Paste as a new animation in AS.
Back to Paint Shop Pro. Go to edit > undo select none. Edit > undo sparkles. Edit > undo constellation. Apply constellation again, but this time, hit the random seed button. Apply Xero Sparkles again but change the maximum to 991. Deselect. Copy merged. Paste after frame 1 in AS.
Back to PSP. Go to edit > undo select none. Edit > undo sparkles. Edit > undo constellation. Apply constellation again, hitting the random seed button once. Apply Xero Sparkles again, changing the maximum to 993. Deselect. Copy merged. Paste after frame 2 in Animation Shop.
Optimize and save as gif.
I hope you enjoyed this tutorial! If you have any questions, just give me a shout. :-)
Subscribe to:
Post Comments (Atom)
0 comments:
Post a Comment