Thursday, May 5, 2011
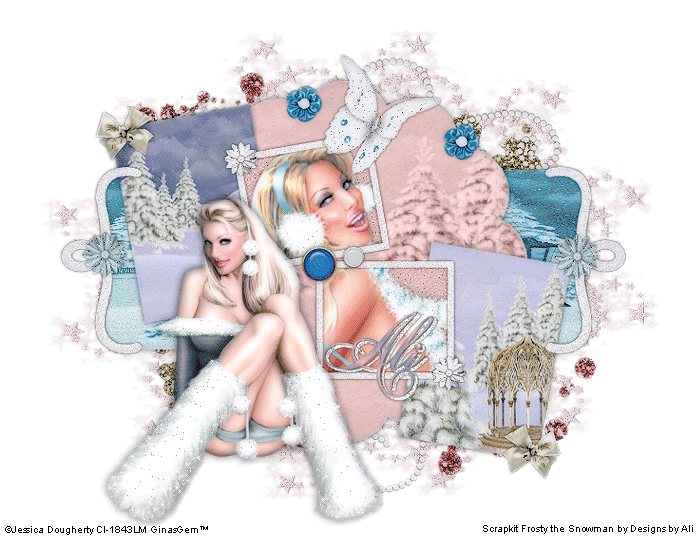
 Snow Bunny
This tutorial was written by me on 3 November 2008. Any similarites to other tutorials is purely coincidental.
Supplies Needed:
1 or 2 tubes of choice. I am using the beautiful artwork of Jessica Dougherty. I got these tubes when CILM was still open. You can find her CDO now.
Scrapkit Frosty the Snowman by Designs by Ali. This scrap kit has the most beautiful papers!! If you wish to purchase this amazing kit you can here. Thank you Ali!
Template 21 made by me. You can download it at my blog here
Mask by Vix. Don't forget to check out her other great masks and tuts!!
Font of choice. I used Helinda Rook (pay font)
Plugins
Xero Sparkles and Porcelain
Xeonofex 2 Constellation
Animation Shop
Let's get started! Open up the template and delete the credits. Highlight the large long rectangle layer. Go to selections > select all. Selections > float. Selections > defloat. Open up a paper from the kit. Resize by 68%, smartsize. Copy and paste as new layer onto your canvas. Position to your liking. Go to selections > invert. Hit delete on your kyeboard. Deselect.(CTRL+D) Give the layer a drop shadow of H and V 0, Opacity 60, Blur 10.00. Delete the black rectangle.
Highlight the scalloped circle layer. Select, float and defloat. Add a new raster layer. Open up a paper of choice from the kit. Resize by 60%, smartsize. Go to Paste into Selection. Deselect. Give the layer a drop shadow of H and V 0, Opacity 60, Blur 7.00. Delete the gray scalloped circle.
Highlight the left unframed rectangle. Select, float and defloat. Add a new raster layer. Open up a paper of choice. Resize by 40%, smartsize. Paste the paper into the selection. Deselect. Give the layer a drop shadow of H and V 0, Opacity 50, Blur 5.00 Repeat the same thing with the right rectangle, using a different paper. Delete both gray rectangles.
Highlight the 2 rectangles fill. Select, float and defloat. Open up a paper of choice. Copy and paste onto your canvas. Selections > invert. Hit delete. Do NOT deselect.
Open up your tube. Resize bicubic, if necessary. Copy and paste onto your canvas. Position to your liking within the selection. Hit delete. Deselect (CTRL+D) Give the tube a drop shadow of H and V 0, Opacity 50, Blur 5.00.
Highlight the 2 rectangles frames. You can either leave it white and add some bright noise of paste a paper of choice. :-) Give the frames a drop shadow of H and V 0, Opacity 60, Blur 4.00.
Highlight the bracket 1 layer. Select, float and defloat. Add a new raster layer. Floodfill with white. Deselect. Add some noise, random, monochrome checked, noise value 10. Give the white bracket a drop shadow of H and V 0, Opacity 50, Blur 3.00. Repeat the same steps with the other bracket. Delete both gray brackets.
Open up a butterfly of choice. Resize by 25%, smartsize. Copy and paste as a new layer onto your canvas. Add some noise (same as before) and give it a drop shadow of H and V 0, Opacity 50, Blur 5.00. Position to your liking.
Open up a brad of choice. Resize by 8%, smartsize. Copy and paste onto your canvas. Give it the same drop shadow you gave your butterfly. Position to your liking.
Open up a satin flower of choice. Resize by 7%, smartsize. Copy and paste onto your canvas. Give it a drop shadow of H and V 0, Opacity 50, Blur 4.00. Duplicate. Position them to your liking.
Open up a flower of choice. Resize by 8%, smartsize. Copy and paste onto your canvas. Add some noise (same settings as before) Give it the same drop shadow you gave your satin flower. Duplicate. Position them to your liking.
Open up a bow of choice. Resize by 10%, smartsize. Copy and paste onto your canvas. Give it the same drop shadow you gave your flower. Duplicate. Go to image > mirror. Position the bows to your liking.
Add any other embellishments that you like. :-)
Highlight your white background. Open up a couple of glitter splats of choice. Resize by 25%, smartsize. Go to adjust > sharpen. Copy and paste them onto your canvas. Give them a drop shadow of H and V 0, Opacity 60, Blur 3.00. Position them to your liking.
Open up a bling swirl of choice. Resize by 30%, smartsize. Sharpen. Copy and paste onto your canvas. Give it a drop shadow of H 1, V 0, Opacity 40, Blur 1.00. Duplicate. Position them to your liking.
Highlight your white background. Add a new raster layer. Choose a light color from your tube or tag. Floodfill the new layer with the color. Apply Vix's mask:
Source Luminance
Fit to Canvas
Hide all mask
Delete the mask from your layer palette. Answer yes and merge the group. Add noise to the mask, same settings as before but change the noise value to 50. Give the mask the same drop shadow you gave your bling swirl.
Highlight your top layer. Open up your main tube. Resize bicubic if necessary. Copy and paste onto your canvas. Give the tube a drop shadow of H and V 0, Opacity 60, Blur 12.00. Arrange the tube to your liking.
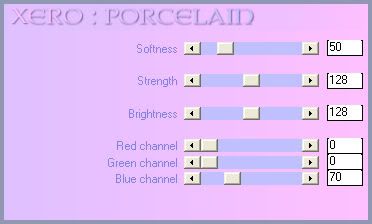
Hide your white background. Merge your visible layers. On your merged layer apply Xero Porcelain with the following settings:
Go to adjust > sharpness > unsharp mask. Apply with the following settings:
Radius 5 Strength 20 Clipping 1
Merge all layers together. Crop and resize to your liking.
Add your copyright info, watermark, and your text. If you are not animating, you are done. :-)
If you are animating, grab your freehand selection tool, type : point to point, feather 1. Carefully select around the areas that you would like to sparkle. Apply Xero Sparkles (with a color of choice, I used color #9097b3) with the following settings:

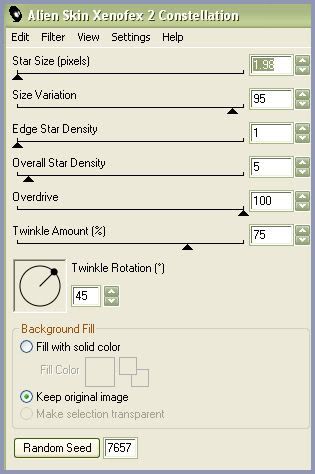
Now apply Xeonofex 2 Constellation with the following settings:
Deselect. Copy. Open up animation shop and paste as a new animation. Back to PSP. Go to Edit > Undo 3x. Apply xero sparkles again but this time change maximum to 999. Apply Constellation, but this time hit the random seed button. Deselect. Copy. Paste after your current frame in AS.
Back to PSP. Go to Edit > Undo 3x. Apply xero sparkles, but change maximum to 1000. Apply Constellation, but hit the random seed button. Deselect. Copy. Paste after frame 2 in AS.
Select all frames (CTRL+A) Change the frame properties to 13.
Optimize and save as gif.
I hope you enjoyed this tut! If you have any questions, just leave me a shout! :-)
Subscribe to:
Post Comments (Atom)
0 comments:
Post a Comment