Wednesday, May 4, 2011
 Shamrock Frenzy
This tutorial was written by me on 12 March 2009. Any similarities to other tutorials is purely coincidental.
Supplies Needed:
Tube of choice. I am using the sexy artwork of Keith Garvey. I bought this tube when he was still with MPT. You can find his work at PSP Tubes Emporium now.
Scrapkit. I am using the lucky scrapkit Wearin the Green by Just a Girl's Designs. If you wish to purchase this kit, you can here. Thank you, Tamara!!
Template 137 made by me which you can download here.
Brush or mask of choice. I used my airbrush tool with a paper from the kit.
Font of choice. I used Lesser Concern which you can download here.
Plugins:
Xenofex 2 - Constellation
Animation Shop (opt)
No other supplies needed
*~*~*~*~*~*~*~*~*~*~*~*~*~*~*~*~*~*~*~*~*~*~*~*~*~*~*~*~*~*~*~*~*~*~*~*~*~*~*~*~*~*~*~*~*~
Ok! Let's get started! Open up my template. Duplicate by holding down shift + d. Close the original. Delete the credit info layer.
Highlight the rounded rectangles layer. Go to selections > select all. Selections > float. Selections > defloat. Open up a paper from the kit. Don't resize. Copy and paste onto your canvas. Go to selections > invert. Hit delete on your keyboard. Deselect (CTRL+D). Give the layer a drop shadow of H and V 0, Opacity 75, Blur 5.00. Delete the gray 2 rounded rectangles.
Highlight the 5 leaf clover. Select, float and defloat. Open up a paper from the kit. Resize by 86%, smartsize. Copy and paste onto your canvas. Selections > invert. Hit delete and deselect. Give the layer a drop shadow of H and V 0, Opacity 75, Blur 8.00. Delete the black 5 leaf clover layer.
Highlight the shamrocks layer. Select, float and defloat. Open up a paper from the kit. Resize by 86%, smartsize. Copy and paste onto your canvas. Selections > invert. Hit delete and deselect. Give the layer a drop shadow of H and V 0, Opacity 75, Blur 6.00. Delete the gray shamrocks layer.
Open up a flower from the kit. Resize by 20%, smartsize. Copy and paste onto your canvas. Give it a drop shadow of H and V 0, Opacity 65, Blur 5.00. Position in the middle of the 5 leaf clover.
Open up a pendant from the kit. Resize by 25%, smartsize. Copy and paste onto your canvas. Give it a drop shadow of H -2, V 0, Opacity 70, Blur 2.00. Duplicate the pendant. Go to image > mirror. Duplicate the original and the mirrored pendant one time each for a total of 4. Mirror them. Position them to your liking on the 5 leaf clover.
Open up the charm from the kit. Resize by 50%, smartsize. Copy and paste onto your canvas. Give it a drop shadow of H -2, V 0, Opacity 65, Blur 3.00. Duplicate. Go to image > mirror. Position them to your liking on the shamrocks.
Open up flower deco 2 from the kit. Resize by 20%, smartsize. Copy and paste onto your canvas. Give it the same drop shadow you gave your charm. Duplicate. Go to image > mirror. Position them at the top of the charms. (see my tag for reference)
Highlight your white background. Open up the flower deco. Resize by 25%, smartsize. Copy and paste onto your canvas. Give it a drop shadow of H -2, V 0, Opacity 70, Blur 3.00. Duplicate the deco. Go to image > flip. Duplicate the original and the flipped deco one time each for a total of 4. Mirror them. Position them as in my tag above. Merge the deco layers together.
Open up the string of beads from the kit. Resize by 20%, smartsize. Copy and paste onto your canvas. Give it a drop shadow of H -1, V 0, Opacity 75, Blur 2.00. Duplicate. Go to image > mirror. Duplicate the original and the mirrored beads one time each for a total of 4. Position them as in my tag above. Merge the beads layers together.
Open up a clover from the kit. Copy and paste onto your canvas. Give it a drop shadow of H 2, V 1, Opacity 70, Blur 4.00. Duplicate. Go to image > mirror. Position them to your liking on the beads.
Merge your flower deco 1 layer, the beads layer, and the clover layers together.
Highlight your white background. Add a new raster layer. Set your foreground to a color or paper of choice. Grab your airbrush tool, preset smoke puff (standard brush in PSP), size 100, Step 10, Density 100, Rotation 0, and Opacity 45. Paint the new layer to add some color behind the template layer. Grab your eraser tool, opacity 9, size 100 and gently erase the edges to soften. (See my tag for reference)
Crop and resize to your liking.
Highlight your top layer. Open up your tube. Resize as necessary, bicubic. Copy and paste onto your canvas. Give it a drop shadow of H 4, V 2, Opacity 75, Blur 12.00. Position to your liking.
Add your copyright info, watermark and your text. If you are not animating, save as JPG or PNG.
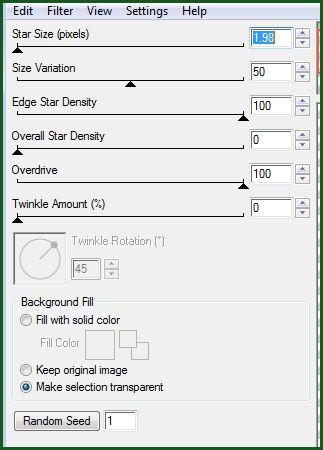
Highlight your merged flower deco and beads layer. Duplicate. Highlight the top layer. Apply Constellation with the following settings:
Copy merged. Open up Animation Shop. Paste as a new animation in AS.
Back to Paint Shop Pro. Go to edit > undo constellation. Apply Constellation again, but this time hit the random seed button. Copy merged. Paste after your current frame in AS.
Repeat the above steps 3 more times for a total of 5 frames.
Select all frames (CTRL+A). Change the frame properties to 12.
Optimize and save as gif.
I hope you enjoyed this tutorial. If you have any questions, just give me a shout!
Subscribe to:
Post Comments (Atom)
0 comments:
Post a Comment