Wednesday, May 4, 2011
 Lephrechaun Kiss
This tutorial was written by me on 6 March 2009. Any similarities to other tutorials is purely coincidental.
Supplies Needed:
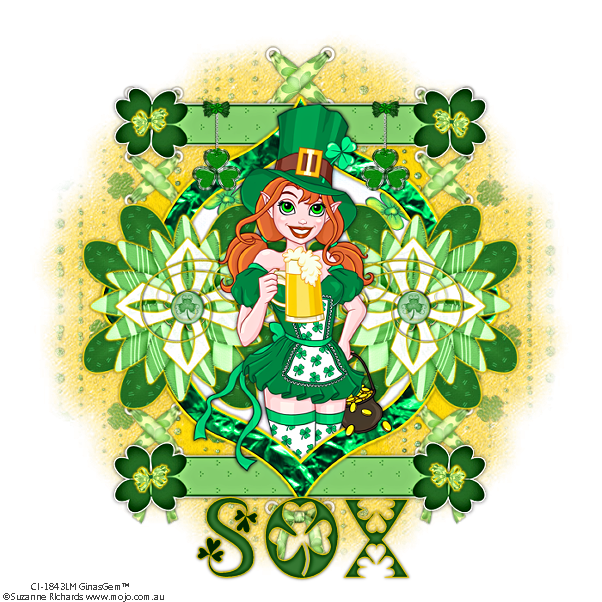
Tube of choice. I am using the adorable artwork of Suzanne Richards. I bought this tube when CILM was still open. You can find her art at CDO now.
Scrapkit of choice. I am using Luck of the Irish by Soxsational Scraps. If you wish to purchase this kit, you can here.
Thank you, Tracey!!
Template 135 made by me which you can download here.
GG_Mask 6 made by me which you can get here.
Font of choice. I used Patty Day (pay font).
Plugins:
AAA Filters - Texture
Eyecandy 5 Impact - Gradient Glow
No other supplies needed
*~*~*~*~*~*~*~*~*~*~*~*~*~*~*~*~*~*~*~*~*~*~*~*~*~*~*~*~*~*~*~*~*~*~*~*~*~*~*~*~*~*~*~
Ok! Let's get started! Open up my template. Duplicate by holding down shift + d. Close the original. Delete the credit info layer.
Highlight the fill layer. Go to selections > select all. Selections > float. Selections > defloat. Open up a paper from the kit. Resize by 70%, smartsize. Copy and paste onto your canvas. Selections > invert. Hit delete on your keyboard. Deselect (CTRL+D). Delete the gray fill layer.
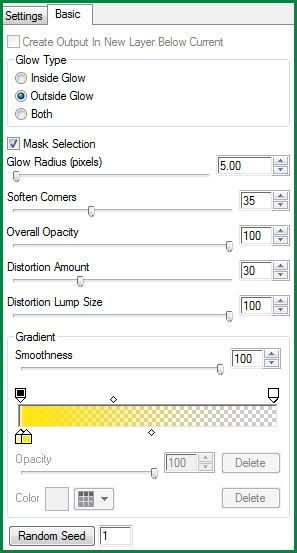
Highlight one of the foil frames layer. Delete the other 2 that you aren't using. Apply Gradient Glow with the following settings:
Repeat. Give the frame a drop shadow of H and V 0, Opacity 75, Blur 6.00.
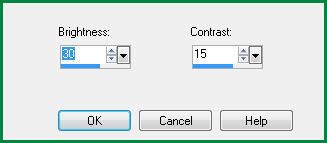
Highlight the clovers layer. Select, float and defloat. Open up a paper from the kit. Resize by 80%, smartsize. Copy and paste onto your canvas. Selections > invert. Hit delete and deselect. Grab your magic wand tool, tolerance set at 100, feather set at 20. Click inside the four parts of both clovers so that there are marching ants surrounding it. Go to selections > modify > contract by 26. Go to adjust > Brightness/Contrast > Brightness/Contrast. Apply with the following settings:
Deselect. Apply Gradient Glow, same settings as earlier. Give the layer a drop shadow of H and V 0, Opacity 70, Blur 4.00. Delete the gray clovers layer.
Open up a flower from the kit. Resize by 75%, smartsize. Copy and paste onto your canvas. Apply Gradient Glow, same settings. Give it a drop shadow of H and V 0, Opacity 70, Blur 4.00. Duplicate the flower. Go to image > mirror. Position them in the center of the clovers.
Hightlight the crosses layer. Select, float and defloat. Open up a paper from the kit. Resize by 70%, smartsize. Copy and paste onto your canvas. Selections > invert. Hit delete on your keyboard. Apply Gradient Glow, same settings. Give the layer a drop shadow of H and V 0, Opacity 70, Blur 4.00. Delete the gray crosses layer.
Delete the 2 glass buttons layer that you are not using in your tag. Highlight the one that you are using and give them a drop shadow of H and V 0, Opacity 55, Blur 3.00.
Delete the 2 shamrock doodle layers you are not using. Highlight the one that you are, and give it a drop shadow of H and V 2, Opacity 75, Blur 2.00.
Open up your tube. Resize as necessary, bicubic. Copy and paste onto your canvas. Position your tube to your liking within the frame. Give your tube a drop shadow of H and V 0, Opacity 65, Blur 9.00. Duplicate your tube. Drag your bottom tube layer beneath your foil frame. Grab your magic wand tool, tolerance set at 100, feather set at 0. Click inside the empty space of the frame. Go to selections > modify > expand by 9.00. Selections > invert. Highlight your bottom tube layer. Erase the part of the tube you don't want hanging out of the frame. Deselect. Highlight your top tube layer. Erase the part of the tube you don't want hanging out of the frame.
Hide your white background. Merge your visible layers together. Resize your merged layer by 85%, bicubic. Go to adjust > sharpness > unsharp mask. Apply with radius 5, strength 15, clipping 1.
Open up the banner from the kit. Resize by 85%, smartsize. Copy and paste onto your canvas. Give it a drop shadow of H and V 0, Opacity 70, Blur 8.00. Duplicate the banner. Drag both banners beneath your foil frame layer. Position one at the top of the frame and the other at the bottom.
Open up the charm from the kit. Resize by 50%, smartsize. Copy and paste onto your canvas. Give it a drop shadow of H and V 1, Opacity 60, Blur 3.00. Duplicate the charm. Go to image > mirror. Position them to your liking on the top banner.
Open up a cross lace of choice. Copy and paste onto your canvas. Give it a drop shadow of H and V 0, Opacity 65, Blur 4.00. Duplicate. Resize the duplicated laces by 85%, smartsize (all layers unchecked!). Duplicate the resized laces. Drag them beneath your banner layers. Position them as in my tag above.
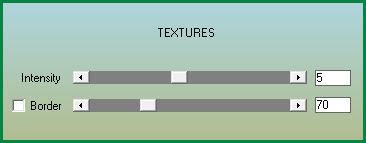
Highlight your white background. Add a new raster layer. Floodfill with a color of choice. Apply AAA Textures with the following settings:
Apply my mask with the following settings:
Source Luminance
Fit to Layer
Hide all mask
Delete the mask from your layer palette, answer yes, and merge the group. Duplicate the mask 2 times. Merge all 3 mask layers together.
Open up a rain of choice from the kit. Copy and paste onto your canvas. Position the top ened of the rain towards the top of the mask. Highlight your mask layer. Select, float and defloat. Highlight your rain layer. Go to selections > invert. Hit delete. Deselect. Duplicate the rain. Go to image > flip.
Add any other embellishments of your choosing.
Crop and resize to your liking.
Add your copyright info, watermark and your text. Save as JPG or PNG.
I hope you enjoyed this tutorial! If you have any questions, just give me a shout.
Subscribe to:
Post Comments (Atom)
0 comments:
Post a Comment