Monday, May 2, 2011
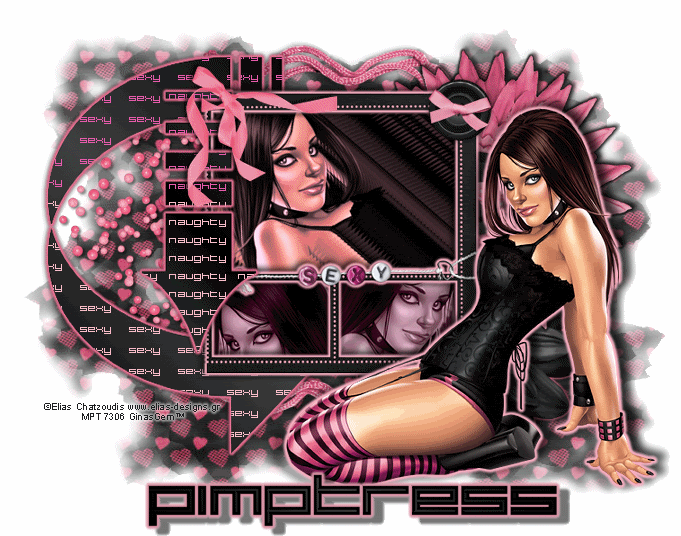
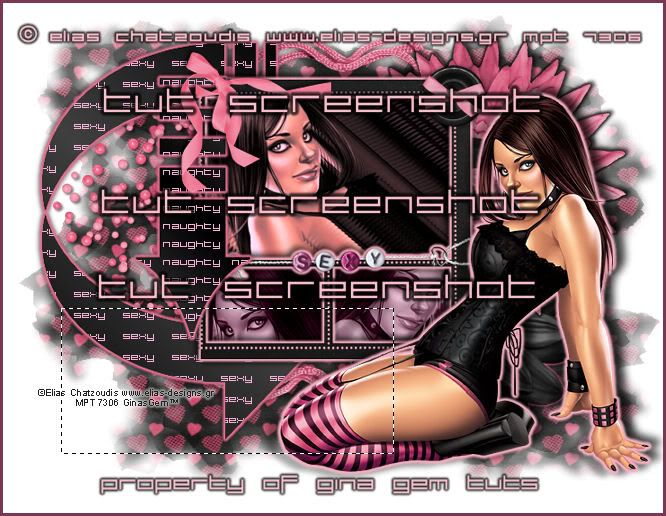
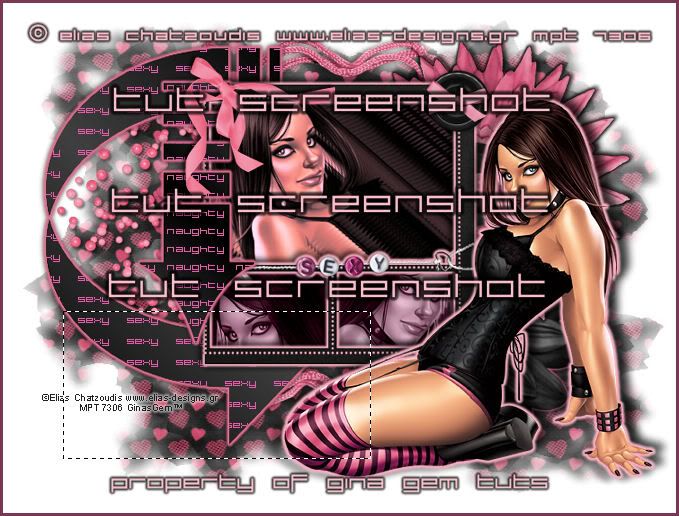
 Sexy Naughty Babe
This tutorial was written by me on 8 July 2009. Any similarities to other tutorials is purely coincidental.
Supplies Needed:
Tube of choice. I am using the awesome artwork of Elias Chatzoudis. I purchased this tube when he was still with MPT. If you would like to purchase his artwork now, you can at PSP Tubes Emporium.
Scrapkit. I am using the fabulous kit Kate by Pimp'd Designz. If you would like to purchase this scrapkit, you can here. Thank you, Cora!!
Mask 228 by Chelle of Wee Scots Lass Creations. Check out her blog for awesome goodies!
Preset Arrow shapes or use the ones I've included in the supplies.
Font of choice. I used Large9 which you can download here.
Plugins:
Xero Filters - Duochrome and Soft Mood XL
Eyecandy 4000 - Gradient Glow
Supplies HERE
*~*~*~*~*~*~*~*~*~*~*~*~*~*~*~*~*~*~*~*~*~*~*~*~*~*~*~*~*~*~*~*~*~*~*~*~
Ok! Let's get started! Open up a new transparent image 800 (w) x 650 (h). Floodfill with white.
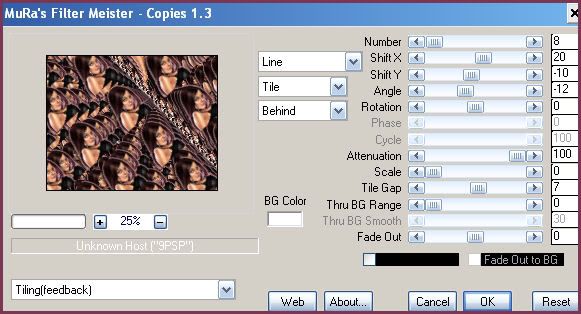
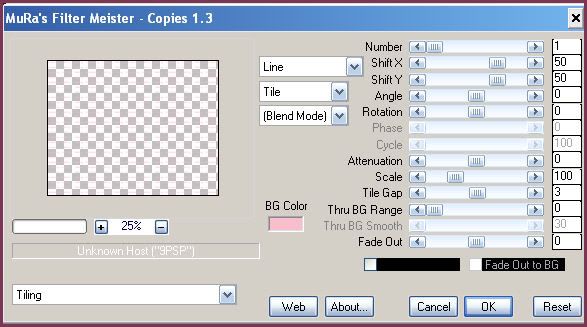
Open up your tube. Don't resize. Mirror your tube. Copy and paste as a new layer onto your canvas. Apply Mura Meister Copies with the following settings:
Hide this layer for now.
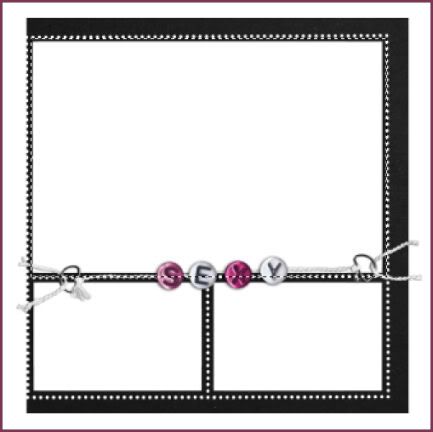
Open up frame 06 from the kit. Resize by 40%, smartsize. Copy and paste as a new layer onto your canvas. Grab your selection tool, rectangle, feather set at 0.00. Draw out a rectangle outlining the top opening of the frame like this:
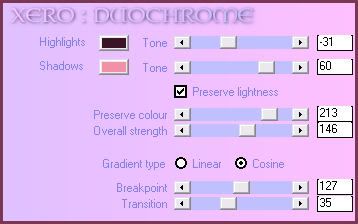
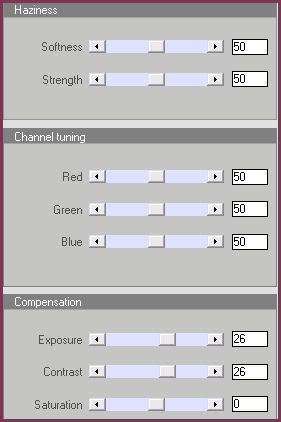
Unhide the Mura Meister tube layer. Position it to your liking within the selection. Go to selections > invert. Hit delete on your keyboard. Deselect (CTRL+D). Highlight the tiled tube layer. Change your foreground color to #793754 and your background color to #f5abbd. Apply Xero Filters - Duochrome with the following settings:
Now go to adjust > sharpen > high pass sharpen. Apply with the following settings:
Highlight your frame layer. Grab your selection tool again, rectangle, feather set at 0.00. Select around the bottom left opening of the frame. Open up a paper from the kit. Resize by 65%, smartsize. Copy and paste as a new layer onto your canvas. Position to your liking within the selection. Selections > invert. Hit delete. Don't deselect.
Open up your tube again. Copy and paste as a new layer onto your canvas. Position to your liking within the selection. Hit delete. Deselect. Apply Xero Filters - Soft Mood with the following settings:
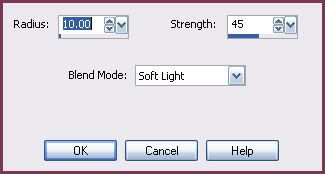
Go to adjust > sharpen > unsharp mask. Apply with radius set to 5, strength 25, clipping 1. Change the blend mode to Luminance (Legacy). Apply Gradient Glow with the following settings:
Highlight the frame and grab your selection tool, same settings as before. Select around the right bottom opening. Copy and paste the same paper you used before, resized by 65%, smartsize. Copy and paste as a new layer onto your canvas. Position to your liking within the selection. Selections > invert. Hit delete. Don't deselect.
Open up your tube again. Mirror it. Copy and paste as a new layer onto your canvas. Position to your liking within the selection. Hit delete. Deselect. Apply Xero - Soft Mood, same settings as before. Go to adjust > sharpness > unsharp mask. Apply with the same settings as before. Apply Gradient Glow, same settings.
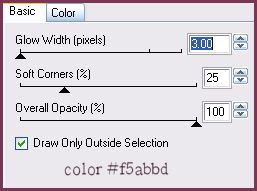
Highlight your frame and drag it to the top of your layer palette. Apply Gradient Glow to the mask, same settings, but change the color to #f8c8d3. Repeat the gradient glow. Give the frame a drop shadow of H and V -3, Opacity 75, Blur 12.00. Now give it a drop shadow of H and V 2, Opacity 45, Blur 8.00. Hide your white background and merge your visible layers.
Open up flower 1 and 2 from the kit. Resize them both by 65%, smartsize. Copy and paste them as new layers onto your canvas. Give the pink flower a gradient glow, same settings, color black. Give it a drop shadow of H 5, V -3, Opacity 65, Blur 8.00. Give the black flower the same gradient glow, but change the color to #de7593. Give the black flower a drop shadow of H 5, V 3, Opacity 65, Blur 8.00. Position the pink flower behind your merged layer at the top right and the black flower beneath the pink flower.
Open up the button. Resize by 35%, smartsize. Copy and paste as a new layer onto your canvas. Give it a drop shadow of H and V 0, Opacity 60, Blur 8.00. Position the button at the top right corner of the frame.
Open up arrow 2 from the supplies. Copy and paste as a new layer onto your canvas. Position it as in my tag above. Go to selections > select all. Selections > float. Selections > defloat. On your materials palette change your foreground color to #000000. Change your background color to #404040. Make a gradient - style Linear, Angle 45, Repeats 1. Add a new raster layer to your working image. Floodfill the new layer with your gradient. Deselect. Delete the gray arrow 2 layer.
Open up arrow from the supplies. Copy and paste as a new layer onto your canvas. Position as in my tag above. Select, float and defloat. Add a new raster layer. On your materials palette, invert the gradient. Floodfill the new layer with the gradient. Deselect. Delete the gray arrow. We will come back to the arrows later.
Open up the beads from the kit. Resize by 60%, smartsize. Copy and paste as a new layer onto your canvas. Mirror the beads. Give the beads a drop shadow of H -3, V -1, Opacity 55, Blur 4.00. Position the beads behind the arrows so that they are visible through the emtpy spaces. (see my tag above). Grab your freehand selection tool, and select around any beads that are hanging below the frame. Hit delete. Deselect. Duplicate the beads. Position them next to the other beads layer. Both beads layer should be right above your white background layer.
Open heart rope 1 from the kit. Resize by 65%, smartsize. Copy and paste as a new layer onto your canvas. Give it a drop shadow of H and V 0, Opacity 65, Blur 8.00. Position so the top of it is peeking out from behind the top of the frame. Duplicate. Go to image > flip.
Highlight your top layer. Open up ribbon 6 from the kit. Resize by 20%, smartsize. Copy and paste as a new layer onto your canvas. Mirror the ribbon. Give it a drop shadow of H -2, V 1, Opacity 75, Blur 5.00. Position at the top left corner of the frame.
Add any other embellishments of your choosing.
Crop and resize your tag to your liking.
Highlight your white background layer. Open up a paper from the kit. Add a new raster layer. Go to selections > select all. Copy and the paper and paste into the selection. Deselect. Apply WSL Mask 228 with the following settings:
Source Luminance
Fit to Canvas
Hide all Mask
Delete the mask from your layer palette, answer yes to the pop up box and merge the group.
Highlight your top layer and open up your tube. Resize as necessary, bicubic. Copy and paste as a new layer onto your canvas. Arrange the tube to your liking. Apply Gradient Glow, same settings as before, color #eea4b7. Repeat the gradient glow. Give your tube a drop shadow of H 7, V -4, Opacity 75, Blur 12.00. Now give it a drop shadow of H -5, V 2, Opacity 35, Blur 8.00.
***Just a small note - the reason we resize before we add our words, is because if you resize after the words have been added, they become a bit fuzzy. Depending on how large or small you prefer your tags, you may have to adjust the size of the font. :-)***
Highlight your arrow layer (the bigger arrow). Set your background color to #f8becc. Grab your font tool. I used font Large 9, Font Size - 11, Anti-alias - off, Stroke width set to 0.00, Kerning set to50 and Create as - Vector. Type out "SEXY" (all caps). Go to obects > align > center in canvas. On your layer palette, convert your text to Raster Layer. Apply Mura Meister Copies with the following settings:
Position the tiled words to your liking within the arrow. Highlight the arrow layer. Select, float and defloat. Go to selections > invert. Highlight the "SEXY" layer. Hit delete. Deselect. Highlight your arrow layer. Apply Graident Glow, same settings as before, color #de7593. Repeat the gradient glow. Give the arrow layer a drop shadow of H and V 0, Opacity 80, Blur 10.00.
Highlight your arrow 2 layer (the smaller arrow). Grab your font tool again, same settings as before. Type out "NAUGHTY". Go to objects > align > center in canvas. Apply Mura Meister Copies, same settings, except change Tile Gap to 3. Position the "naughty" layer to your liking within the smaller arrow. Highlight your arrow layer. Select, float and defloat. Selections > invert. Highlight the "naughty" layer. Hit delete and deselect. Highlight the smaller arrow layer and apply Gradient Glow 2 times, same settings and color. Give the arrow a drop shadow of H and V 0, Opacity 80, Blur 8.00.
Add your copyright info, watermark and your text. If you are not animating, save as JPG or PNG.
If you are animating, copy merged. Open up Animation Shop. Paste as a new animation in AS.
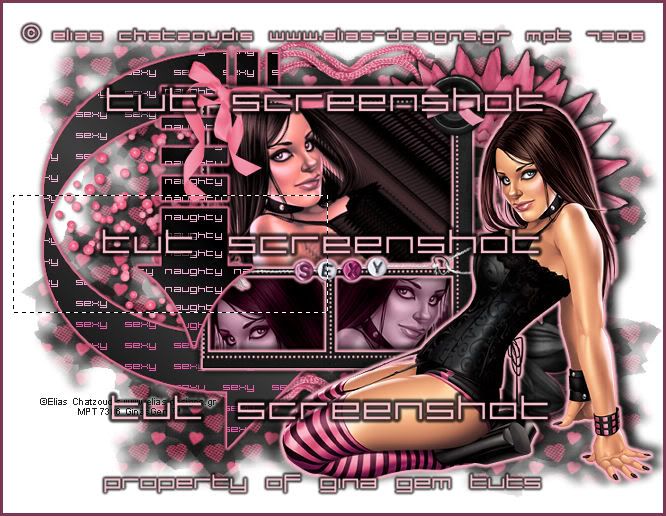
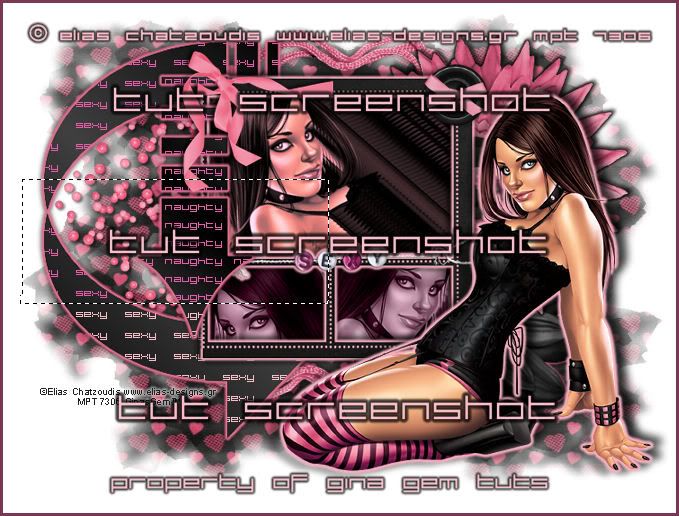
Back to Paint Shop Pro. Grab your selection tool, rectangle, feather set to 0.00. Select the bottom of our text, like this:
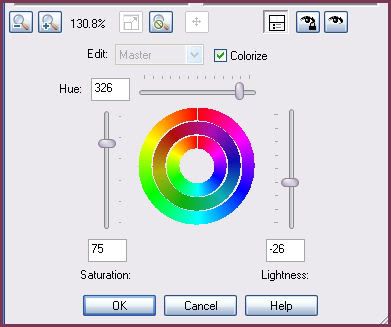
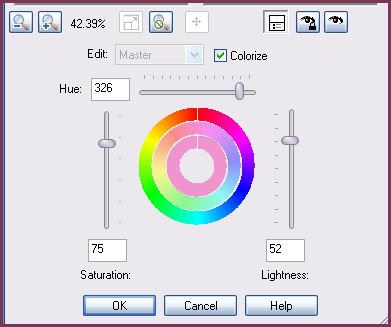
Highlight the "sexy" words layer. Go to adjust > Hue/Saturation/Lightness > Hue/Saturation/Lightness. Apply with the following settings:
Now highlight the "naughty" word layer, and apply Hue/Saturation/Lightness with the same settings. Deselect. Copy merged. Paste after frame 1 in Animation Shop.
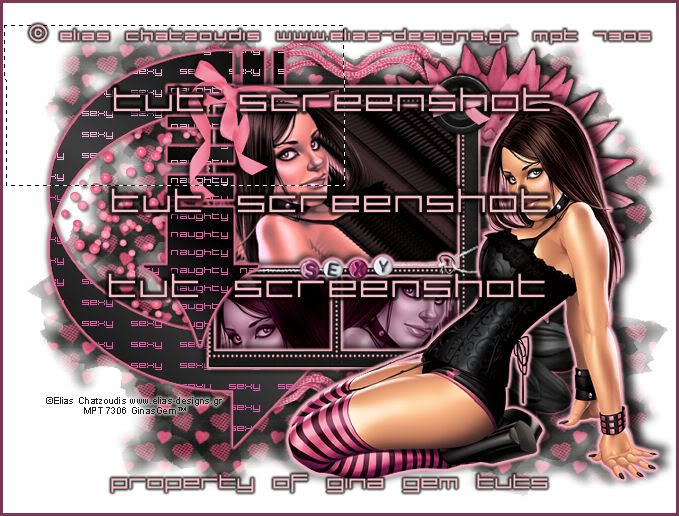
Back to Paint Shop Pro. Grab your freehand selection tool, same settings as before, and select another small area of the lighter words like this:
Highlight the "sexy" words layer and adjust Hue/Saturation/Lightness, same settings as before. Highlight the "naughty" words layer and adjust H/S/L, same settings. Deselect. Copy merged. Paste after frame 2 in Animation Shop.
Back to Paint Shop Pro, grab your freehand selection tool, rectangle, feather - 0.00. Select around the last area of words like this:
Adjust Hue/Saturation/Lightness on the "sexy" and "naughty" words layer. Deselect. Copy merged. Paste after frame 3 in AS.
Back in Paint Shop Pro. Select around the first third of the purple words. (refer to your frames in AS, so you are selecting around the same area):
Highlight the "sexy" words layer and adjust Hue/Saturation/Lightness using the following settings:
Highlight the "naughty" words layer and adjust H/S/L, using the same settings. Deselect. Copy merged. Paster after frame 4 in Animation Shop.
Back to Paint Shop Pro (last time, I promise! LOL). Select around the next portion of the purple words (again refer back to your frames in AS)
Highlight the "sexy" words layer and adjust Hue/Saturation/Lightness, same settings you used before. Highlight the "naughty" words layer and do the same. Deselect. Copy merged. Paste after frame 5 in AS.
You sould have 6 frames in Animation Shop. Select all frames (CTRL + A). Go to Animation > Reverse Frames. Change the frame properties to 20.
Optimize and save as gif.
I hope you enjoyed this tutorial! If you have any questions, just give me a shout.
Subscribe to:
Post Comments (Atom)
0 comments:
Post a Comment