Monday, May 2, 2011
 Garv Girls are Sexy
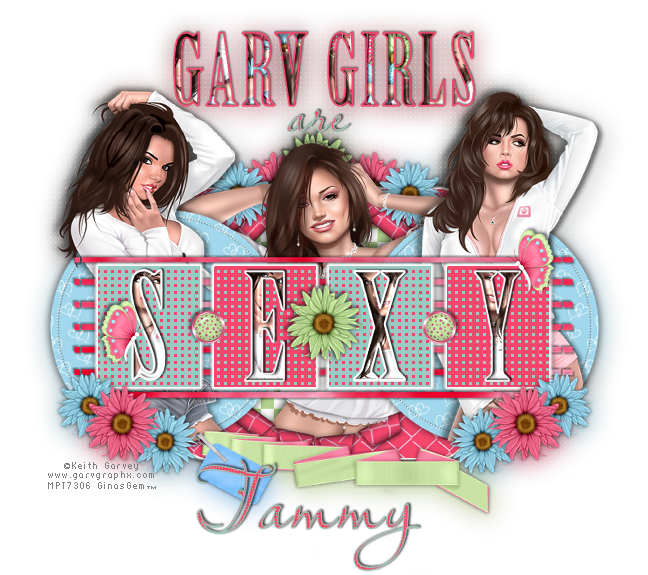
This tutorial was written by me on 8 July 2009. Any similarities to other tutorials is purely coincidental.
Supplies Needed:
3 or 4 tubes of choice. I am using the sexy artwork of Keith Garvey. I purchased these tubes when he was stil with MPT.. You can now purchase his work at PSP Tubes Emporium.
Scrapkit. I am using the awesome kit, Girly Girl by Tammy Scraps. If you wish to purchase this kit, you can here. Thank you, Tammy!!
Template 177 made by me. You can find it here.
Scripty font of choice. I used Lavishly Yours. (pay font)
Plugins:
Eyecandy 4000 - Gradient Glow
Xenofex 2 - Rip Open
No other supplies needed
*~*~*~*~*~*~*~*~*~*~*~*~*~*~*~*~*~*~*~*~*~*~*~*~*~*~*~*~*~*~*~*~*~*~*~*~*~*~*
Ok! Let's get started! Open up my template. Duplicate by holding down shift + d. Close the original. Delete the credit info layer.
Highlight the transpattern rounded rectangle layer. Go to selections > select all. Selections > float. Selections > defloat. Highlight your white background layer and add a new raster layer. Floodfill the new layer with a color of choice. (I used a light green). Deselect. (CTRL+D). The transpattern rectangle should be above your floodfill layer. Highlight the trasnpattern rounded rectangle and change the blend mode to Luminance (Legacy).
Highlight the rounded rectangle layer. Select, float and defloat. Add a new raster layer. Open up a "fence" paper from the kit. (I used paper 2). Resize by 65%, smartsize. Copy. Highlight your new raster layer. Paste into selection. Deselect. Apply Graident Glow to the paper layer with the following settings:
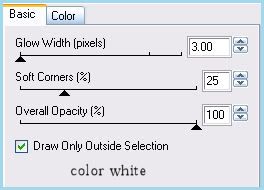
Repeat the gradient glow.
Grab your preset shape tool - ellipse - oval. Change your foreground to null and make your background black. Draw out a wide oval that covers most of the paper like this:
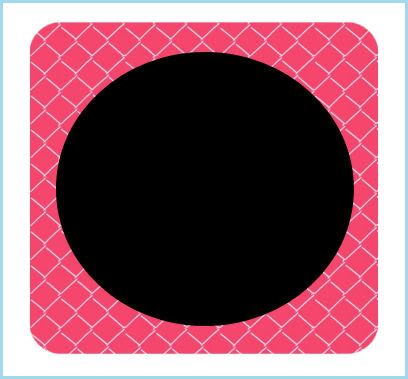
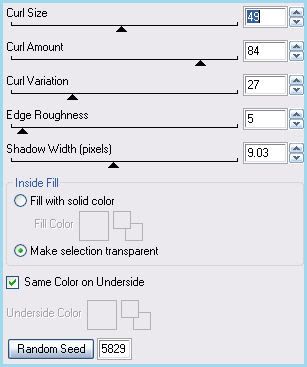
Make certain the oval is centered in the middle of the rounded rectangle fence paper. Grab your magic wand tool, tolerance set at 100, feather set at 25.00. Click on the black oval. Highlight the rounded rectangle fence paper and apply Xenfoex - Rip Open with the following settings:
Deselect. Give the paper rounded rectangle layer a drop shadow of H and V 0, Opacity 75, Blur 10.00. Delete the gray rounded rectangle layer.
Open up your first tube of choice. Resize, as necessary, bicubic. Copy and paste as a new layer onto your canvas. Position to your liking in the center of the rounded rectangle. The top part of the tube should be clearly visible above the rest of the template layers (see my tag for reference). Make certain you like where the tube is positioned because you can't move it after this!! lol Duplicate the tube. Drag the bottom tube layer below your ripped open rectangle. Give this tube layer a drop shadow of H 5, V 2, Opacity 60, Blur 8.00. Hide the top tube layer and highlight the bottom tube layer. Grab your eraser tool, size set to 35, Opacity 100. Carefully erase the part of the tube that is hanging below the rounded rectangle. Unhide and highlight your top tube layer. It should be right above the ripped open rectangle layer. Give it a drop shadow of H -7, V -3, Opacity 60, Blur 12.00. Grab your eraser tool again, same settings. Carefully erase the parts of the tube that are hanging below the rounded rectangle, and the middle part of the tube so it looks as if it is "coming out" of the rip in the rectangle. (see my tag for reference)
Highlight the circle 1 layer. Select, float and defloat. Open up a "heart" paper from the kit. ( I used paper 12.) Resize by 65%, smartsize. Copy and paste as a new layer onto your canvas. Position the paper to your liking within the selection. Go to selections > invert. Hit delete on your keyboard. Don't deselect yet.
Open up your second tube of choice. Resize, as necessary, bicubic. Highlight the diamond circle 1 layer. Copy and paste your tube as a new layer onto your canvas. Position the tube to your liking within the circle. Grab your eraser tool, same settings as before. Carefully erase the parts of the tube you don't want hanging out of the circle. Deselect. Give your tube a drop shadow of H -7, V -2, Opacity 55, Blur 12.00. Now give it a drop shadow of H 5, V 1, Opacity 55, Opacity 8.00. Highlight the diamond circle 1 layer and give it a drop shadow of H and V 1, Opacity 65, Blur 2.00. Highlight your paper circle and give the layer a drop shadow of H and V 0, Opacity 75, Blur 10.00. Delete the black circle 1 layer.
Highlight the circle 2 layer. Select, float and defloat. Open up the same paper you just used. Resize, 65%, smartsize. Copy and paste as a new layer onto your canvas. Position to your liking within the selection. Selections > invert. Hit delete. Don't deselect.
Open up your third tube of choice. Resize, as necessary, bicubic. Copy and paste as a new layer onto your canvas. Position to your liking within the circle. Drag your tube layer above your diamond circle 2 layer. Grab your eraser tool, same settings as earlier. Carefully erase the parts of the tube you don't want hanging out of the circle. Deselect. Give your tube a drop shadow of H 7, V -2, Opacity 55, Blur 12.00. Now give it a drops hadow of H -5, V 1, Opacity 55, Blur 8.00. Highlight your paper circle and give it a drop shadow of H and V 0, Oapciyt 75, Blur 10.00. Highlight your diamond circle 2 layer and give it a drop shadow of H -1, V 1, Opacity 65, Blur 2.00. Delete the balck circle 2 layer.
Highlight your stripes layer. Select, float and defloat. Open up a "cloud" paper from the kit. (I used paper 8.) Resize by 85%, smartsize. Copy and paste as a new layer onto your canvas. Selections > invert. Hit delete and deselect. Give the layer a drop shadow of H and V 3, Opacity 40, BLur 3.00. Now give it a drop shadow of H and V -3, Opacity 40, Blur 3.00. Delete the gray stripes layer.
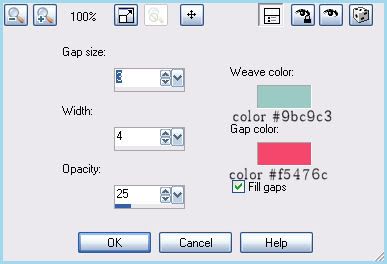
Highlight the 4 rectangles layer. Grab your magic wand tool, tolerance set to 100, feather set to 0.00. Click on the 2 lighter gray rectangles so that there are marching ants all around them. Add a new raster layer. Floodfill the new layer with color #9bc9c3. Deselect. Go to effects > texture effects > weave. Apply with the following settings:
Now apply gradient glow, same settings and color as before 2 times. Give the layer a drop shadow of H and V 0, Opacity 65, Blur 8.00.
Highlight the 4 rectangles layer again. Grab your magic wand tool, same settings as before. Click on the 2 darker gray rectangles so that there are marching ants all around them. Add a new raster layer. Floodfill the new layer with color #f5476c. Deselect. Apply weave same settings as before BUT change the weave color to #9bc9c3, and the gap color to #f5476c. Apply Gradient Glow (same settings) 2 times. Give the layer a drop shadow of H and V 0, Opacity 65, Blur 8.00. Delete the gray 4 rectangles layer.
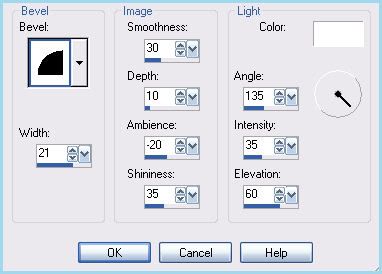
Highlight the sexy fill layer. Grab your magic wand tool, tolerance 100, feather 0.00. Click on the "S" so there are marching ants all around it. Open up your first tube. Resize, as necessary, bicubic. Copy and paste as a new layer onto your canvas. Position to your liking within the selection. Selections > invert. Hit delete. Deselect. Go to effects > 3D effects > inner bevel. Apply with the following settings:
Repeat the above steps to the rest of the sexy fill layer. Delete the black sexy fill layer.
Highlight the sexy outline layer and give it a drop shadow of H 2, V -1, Opacity 75, Blur 2.00.
Highlight the Garv Girls fill layer and repeat the same steps you did to the sexy fill layer. Highlight the Garv Girls outline layer and give it a drop shadow of H 2, V -1, oapcity 70, Blur 2.00. Delete the gray Garv Girls fill layer.
Open up Flowers 1,2 and 3 from the kit. Resize the green and pink flower by 15%, smartsize. Copy and paste them both as new layers onto your canvas. Give them both a drop shadow of H and V 0, Opacity 70, Blur 7.00. Position the green flower behind your center tube so that the top of the petals are peeking out from behind it. Duplicate the pink flower. Go to image > mirror. Position the pink flowers on both sides of the green flowers, so that they overlap a bit. The green flower layer should be above both pink flower layers. (see my tag for reference). Resize the blue flower by 12%, smartsize. Copy and paste as a new layer onto your canvas. Give it a drop shadow of H and V 0, Opacity 70, Blur 6.00. Duplicate the blue flower. Go to image > mirror. Position the blue flowers beside each of the pink flowers so that they overlap a bit. The blue flower layers should be above the pink flower layers.
Duplicate the green flower layer. On your layer palette right click > arrange > bring to top. Position it in between the "E" rectangle and the "X" rectangle. (see my tag for reference)
Open up a brad from the kit. Resize by 12%, smartsize. Go to adjust > sharpen. Copy and paste as a new layer onto your canvas. Give ita drops hadow of H -2, V -1, Opacity 65, Blur 5.00. Position it in between the "S" rectangle and the "E" rectangle. Duplicate. Go to image > mirror. Position the duplicated brad in between the "X" rectangle and the "Y rectangle.
Open up a butterfly from the kit. Resize by 15%, smartsize. Copy and paste as a new layer onto your canvas. Give it a drop shadow of H -2, V -1, Opacity 55, Blur 5.00. Duplicate. Go to image > mirror. Position them to your liking.
Open up the pink and blue flower again. Resize the pink flower by 15%, smartsize. Copy and paste as a new layer onto your canvas. Give it a drop shadow of H and V 0, Opacity 70, Blur 8.00. Duplicate. Go to image > mirror. Positon them towards the bottom of your circles. Resize the blue flower by 12%, smartsize. Copy and paste as a new layer onto your canvas. Give it a drop shadow of H and V 0, Opacity 70, Blur 7.00. Duplicate. Go to image > mirror. Duplicate the original flower one time, and the mirrored flower one time for a total of 4 blue flowers. Arrange them on your circles as in my tag above.
Open up a ribbon and tag from the kit. Resize by 40%, smartsize. Copy and paste as a new layer onto your canvas. Give it a drop shadow of H and V 0, Opacity 70, Blur 9.00. Position at the bottom of your rounded rectangle.
Add any other embellishments of your choosing.
Type out the word "are" using your script font of choice. Give it a drop shadow of H 2, V -1, Oapicyt 70, Blur 3.00. Arrange beneath "GARV GIRLS".
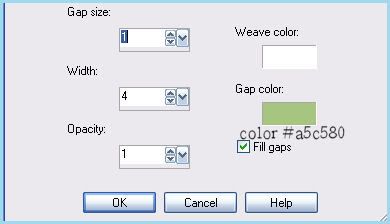
Hide your white background. Merge your visible layers together. Duplicate your merged layer. On your bottom merged layer, go to adjust > blur > gaussian blur. Apply with a radius of 12. Apply weave with the following settings:
Change the blend mode of the layer to Exclusion. Go to adjust > brightness/contrast. Apply with brightness set to -35, Contrast 15. Lower the opacity of the layer to about 80.
Crop and resize to your liking.
Add your copyright info, watermark and any other text.
Save as PNG or JPG.
I hope you enjoyed this tutorial! If you have any other questions, just give me a shout.
Subscribe to:
Post Comments (Atom)
0 comments:
Post a Comment