Wednesday, May 4, 2011
 Santa Baby
This tutorial was written by me on 29 October 2008. Any similarities to other tutorials is purely coincidental.
Supplies Needed:
A close up tube or image and a tube of choice. I am using the artwork of Oren Kramek. I got this tube when he was still with MPT. I don't know of anywhere you can get his work, so just another tube.
Scrapkit. I am using the adorable scrapkit Christmas Magic by Silent Dreamer Designs. If you wish to purchase this kit you can here
Template #93 by Designs by Ali
Gifts tube by Rainbow Coffi
Lamp Post and Glass Ornaments tube. I got these through yahoo groups. If they are yours, please let me know so I can credit you properly or take them out of my supplies.
Fonts of Choice. I used Gwendolyn and Lyarith
Plugins
Eyecandy 5 Impact Gradient Glow
Alien Xenofex 2 Constellation and Crumple
Let's get started! Open up Ali's Template. Hold down shift + d to duplicate and close the original. Resize all layers by 85%, smartsize. Go to Image > Canvas size. Change the canvas size to 700 x 600. (we can crop later) Add a new raster layer. Arrange > send to bottom. Floodfill the new layer with white. Delete the top credits layer.
Highlight the Raster 6 layer. Colorize to your liking. Go to Adjust > Add/Remove Noise > Add Noise. Gaussian, Monochrome checked, Noise Value 30. Give the layer a drop shadow of H 1, V 0, Opacity 45, Blur 2.00.
Highlight Raster 1 layer. Go to Selections > select all. Selections > float. Defloat. Open up a paper of choice from the kit. Resize by 69%, smartsize. Copy and paste as a new layer onto your canvas. Go to selections > invert. Hit delete on your keyboard. Deselect (CTRL+D) Delete the black rectangle layer.
Highlight the Raster 8 layer. You can either leave it white like I did, of floodfill with a color of choice. Add Noise with the same settings as before. Give the frame a drop shadow of H and V 0, Opacity 60, Blur 6.00.
Highlight the Raster 2 layer. Select, float and defloat. Open up a paper of choice from the kit. Resize 69%, smartsize. Copy and paste onto your canvas. Selections > invert. Hit delete on your keyboard. Do not deselect yet.
Open up your close up tube or image of choice. Resize, bicubic if necessary. Copy and paste as a new layer onto your canvas. Position to your liking within the selection. Hit delete on your keyboard. Deselect. Give the close up a drop shadow of H and V 0, Opacity 50, Blur 7.00. Lower the opacity to about 90%. Delete the template rectangle.
Highlight the Raster 4 layer. Select, float and defloat. Add a new raster layer. Floodfill with a color of choice. Deselect. Apply noise, same settings as before. Give the layer a drop shadow of H and V 0, Opacity 60, Blur 6.00. Delete the gray rectangle frame.
Highligh the Raster 3 layer. Select, float and defloat. Open up a paper of choice from the kit. Resize 69%, smartsize. Copy and paste as a new layer onto your canvas. Selections > invert. Hit delete on your keyboard. Do not deselect yet.
Open up your tube. Resize bicubic if necessary. Copy and paste as a new layer onto your canvas. Position to your liking within the selection. Hit delete. Deselect. Give the tube a drop shadow of H and V 0, Opacity 60, Blur 7.00. Delete the gray tree layer.
Highlight the Raster 5 layer. Select, foat and defloat. Add a new raster layer. Floodfill with a color of choice. Deselect. Add noise, same settings as before. Give the layer a drop shadow of H and V 0, Opacity 60, Blur 6.00. Delete the gray tree frame layer.
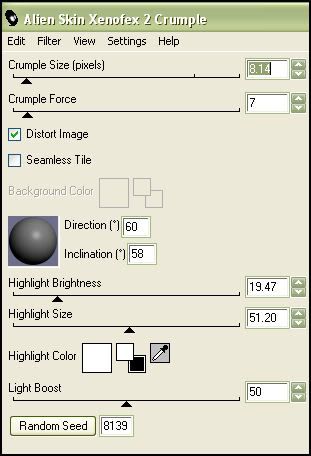
Open up a notepaper of choice from the scrapkit. Resize by 42%, smartsize. Copy and paste as a new layer onto your canvas. Apply Xenofex 2 Crumple with the following settings:
Position the note paper to your liking. Give it a drop shadow of H and V 0, Opacity 40, Blur 4.00
Open up a bow of choice from the kit. Resize by 20%, smartsize. Copy and paste as new layer onto your canvas. Give it the same drop shadow you gave your paper. Position the bow at the top of the paper.
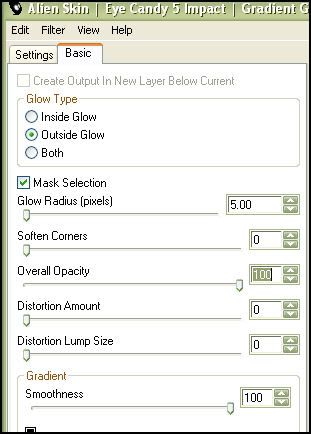
Open up CMChristmas balls. Resize by 40%, smartsize. Copy and paste as a new layer onto your canvas. Position to your liking on the tree. Apply Gradient Glow (color white) with the following settings:
Open up a santa of choice from the kit. Resize by 25%, smartsize. Copy and paste as a new layer onto your canvas. Position to your liking. Give santa a drop shadow of H and V 0, Opacity 40, Blur 4.00.
Add any other embellishments from the kit that you wish to.
Open up the Rainbow Coffi gifts. Resize by 20%, smartsize. Copy and paste as a new layer onto your canvas. Position under the tree. Give the gifts the same drop shadow you gave santa.
Open up the Glass Ornaments. Resize by 40%, smartsize. Copy and paste as a new layer onto your canvas. Position to your liking. Give the ornaments the same drop shadow you gave the gifts.
Highlight the 'mask' layer. Open up the lamp post. Paste as a new layer onto your canvas. Give it a drop shadow of H and V 0, Opacity 40, Blur 4.00. Duplicate the lamp post. Go to Image > mirror. Position the lamps to your liking.
Crop and resize to your liking. Add some text to the note paper. Give the text the same gradient glow as before.
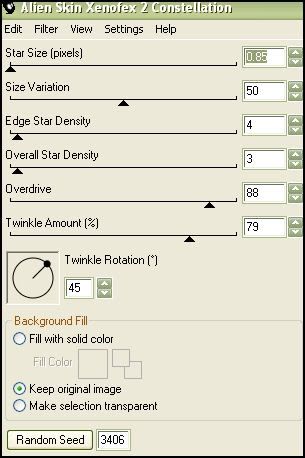
Add your copyright info, watermark and name. Merge all layers together. Grab your freehand selection tool. Carefull select around glass of the lamp post and anywhere else you wish to have sparkles. Apply Constellation with the following settings:
Deselect. Copy. Paste as a new animation in Animation Shop. Back to PSP. Go to Edit > Undo 2x, so that the constellation is gone, but the selection is standing. Apply Constellation again, but this time hit the Random Seed button. Deselect. Copy and paste after your current frame in AS.
Repeat the above step one more time for a total of 3 frames.
Optimize and save as gif.
I hope you enjoyed this tutorial! If you have any questions, just give me a shout.
Subscribe to:
Post Comments (Atom)
0 comments:
Post a Comment