Wednesday, May 4, 2011
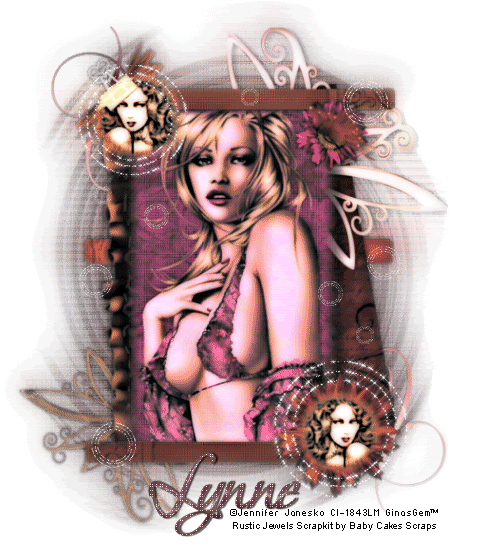
 Rustic Beauty
This tutorial was written by me on the 1 September 2008. Any similarities to other tutorials is purely coincidental.
Supplies needed:
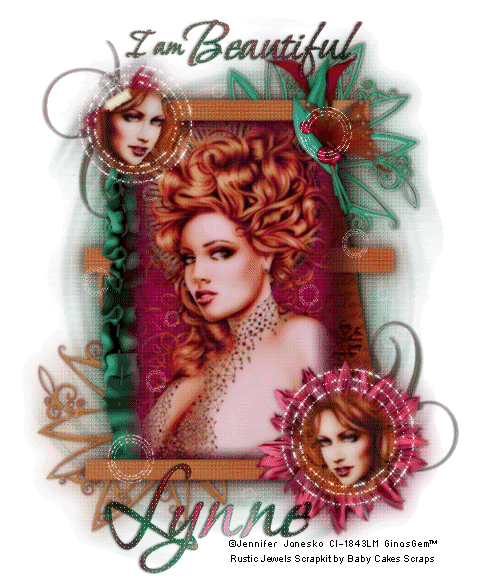
1 or 2 Tubes of choice. I am using the beautiful artwork of Jennifer Janesko. I bought this tube when CILM was still open. You can find her at CDO now.
Rustic Jewels scrapkit by Baby Cakes Scraps. You can purchase this lovely scrapkit here and here. Thank you so much for this gorgeous kit Lynne!!
GinasGems_Template1 made by me. Keep an eye on my blog. . . I will be adding lots of goodies!
Circle bling animation made by me
GinasGems_mask1 made by me
Doodle of choice. I am using a doodle from one of Melissa's (Sentimental Style) scrapkits. I can not supply it per TOU, but she has lots of great freebies on her wonderful blog here
Font of choice. I used Bonheur Royale which I can't supply because it is a pay font.
Filters Needed:
Xero Porcelain These are free filters which can download here
Penta Filters Dot and Cross (the garbage collections) and Color Dot. You can get them here
Animation Shop (optional)
Ok! Let's Begin!
Open up the template. Delete the credits and highlight the layer large rectangle. Grab your magic wand tool, tolerance set at 50, feather 35. Click inside of the rectangle. Open up a paper of choice (I used paper 9) and paste as a new layer onto your canvas. Postion the paper to your liking and then go to Selections > Invert. Hit delete on your keyboard 3x. DO NOT DESELECT!!
Open up your main tube. Resize if necessary (bicubic, all layers unchecked) Paste onto your canvas. Position it to your liking. When you are satisfied with your placement, hit delete 3x. Deselect (CTRL + D) Add a drop shadow with the the following settings: H and V 0, Opacity 75, Blur 10.00. Lower the opacity of your tube layer to about 80.
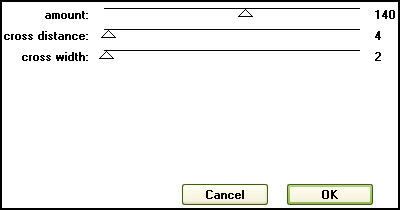
Delete the grey large rectangle layer, and highlight your paper layer. Apply the Penta Filter > Dot and Cross with the following settings:
Apply a drop shadow with the following settings: H 9 and V 1 Opacity 85% Blur 10.00 Hide all of your layers except the tube and paper layer. Merge these two layers together.
Highlight your tilted rectangle layer. Grab your magic wand tool tolerance set at 50, feather 0.00. Click inside the tilted rectangle so you have marching ants surrounding it. Open up a second paper of choice (I used paper 4) and paste onto your canvas. Position the paper to your liking. Go to Selections > Invert. Hit Delete on your keyboard and deselect (CTRL +D). Apply a drop shadow with these settings: H 2 V -2 Opacity 45% Blur 11.00. Delete the black tilted rectangle layer.
Highlight Circle 1. Grab your magic wand tool, tolerance 50, feather 25.00. Select circle 1 with your magic wand. Go to Selections > Invert. Open up a paper of choice (I used paper 9) and paste as a new layer onto your canvas. Hit delete 3x on your canvas. Do NOT deselect!!!
If you are using 2 tubes, open up your second tube (if you are not just copy your main tube) Resize so that the part you want showing in the circle will fit. (Bicubic, all layers unchecked) Paste onto your canvas and arrange to your liking. Hit Delete 3x. Deselect (CTRL +D) Lower the opacity of this tube layer to 85%. Give it a drop shadow with these settings: H 1 V 7 Opacity 45, Blur 10.00. Highlight your paper circle layer. Apply the Penta Filter > color dot, with the same settings as before. Give it a drop shadow with these settings : H 1 V -9, Opacity 75% Blur 10.00. Delete the grey circle 1 layer. Hide all of your layers except for the circle paper layer and the small tube layer. Merge these two layers together.
Highlight your circle 2 layer. Repeat what you did with circle 1, except mirror the tube and give the tube layer a drop shadow of H -7 V -1 Opacity 45, Blur 10.00. Give the paper circle 2 layer a drop shadow of H -9 Vertical -1, Opacity 45, Blur 10.00. Delete the grey circle 2 layer. Merge the mirrored tube, and paper circle 2 layers together. Unhide your finished layers, and arrange the circles on opposite corners of the main tube layer. (see my tag above for reference)
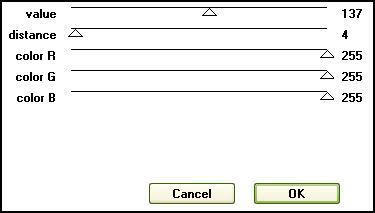
Highlight rectangle 1. Grab your magic wand tool, tolerance 50, feather 0.00. Copy and paste a paper of choice onto your canvas. (I used paper 1) Selections > Invert. Hit Delete. Deselect (CTRL + D) Apply the Penta Filter > Color Dot with these settings:
Apply a drop shadow of H and V 0, Opacity 60% Blur 15.00. Delete the black rectangle 1 layer. Repeat these steps with Rectangle 2 and 3. Drag the rectangle 2 paper layer in between your tube layer and your angled rectangle layer. Arrange your rectangles like my tag above.
Open up a sunflower of choice (I used sunflower 2) Resize by 45%. Paste it onto your canvas. And arrange right below the circle that is in the right bottom corner. Give the sunflower the following drop shadow H and V 0, Opacity 60, blur 5.00. Open up the clipped flower and paste onto your canvas. Resize by 35%. Go to Image > Free Rotate. Rotate left by 25.00 degrees, both boxes unchecked. Place it below your the circle that is in the let upper corner. Grab your magic wand tool, tolerance 50, feather 0. Select the cream part of the clip. It should look like this:

Drag your circle tube above the flower clip and hit delete on your keyboard. Now it looks as if the circle is clipped into the flower. Add the same drop shadow that you did to the sunflower.
Open up the cala lilies. Resize by 35%. Go to Image > Mirror. Position the cala lilies in the upper right hand corner of the tag. Give them the same drop shadow as the flower clip. Open the butterfly. Resize by 25%. Place on top of the cala lilies and give it a drop shadow.
Open up a ruffled ribbom of choice. ( I used ruffled ribbon2) Paste onto your canvas and resize by 55%. Go to Image > Free Rotate and rotate it left by 90 degrees. Drag the ribbon between the angled rectangle and your main tube layer. Give it a drop shadow of H and V 0, Opacity 55% Blur 7.00. Position it so it's peeking out from the right side. (see my tag for reference) Hide your white background and merge all visible layers.
Highlight your white background and open up one of the acrylic accents ( I used the green one) Resize by 80% and paste onto your canvas. Postion to your liking. Open up another accent and resize by 80%. Go to Image > Mirror. Image > Flip. Position the second acrylic accent in the corner diagnally across from the first accent. (see my tag for reference) Give both accents a drop shadow of H 1 V 0, Opacity 60, blur 5.00. Hide your white background, and merge your visible layers.
Open up another paper of choice. (I used paper 3) and paste it onto your canvas as a new layer. Make sure it is underneath your tag layer. Apply Ginasgems_mask1. Make sure you choose Fit to Canvas. Answer yes, delete the mask, and merge the grop. Grab your pick tool (or deform tool) and pull it up and then down, so a bit of the mask shows behind the tag layer. Make the mask a bit thinner as well. (see my tag for reference)
Apply the Penta Filter > Color Dot with the same settings as before. Apply FM Tile Tools > Blend Emboss with the following settings:
Apply the following drop shadow to your mask layer: H and V 0 Opacity 25%, Blur 11.00. Lower the opacity of the mask layer to about 60.
Add a couple of doodles if you like. (make sure they are behind your tag layer, but on top of your mask layer.)
Duplicate your tag layer. On the bottom tag layer, go to adjust > blur > gaussian blur. Enter 12.00 for the radius. Apply the Penta and FM Tile Tools filters (same settings as before) to the blurred layer.
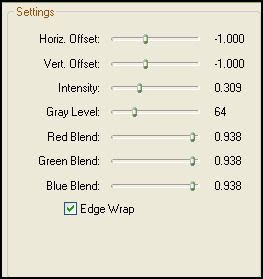
Hide your white background and merge all visible layers. On your tag layer, Apply Xero > Porcelain filter with the following settings:

Go to Adjust > Sharpness > Unsharp Mask and apply with these settings:
Radius - 5 Strength - 20 Clipping - 1.00
Add your copyright info, watermark and your text. Crop and resize if you wish. If you are not animating, you are done. If you are, read on.
Merge all of your layers together. Open up animation shop. Copy your tag. Over in Animation shop, paste it as a new animation. Duplicate it 2x, so you have a total of 3 frames. Back to PSP. Open up the circle bling. Copy frame 1 and paste as a new animation in Animation shop. Back to PSP. Copy frame 2 and paste after frame 1 in animation shop. Back in PSP, copy frame 3 and paste after frame 2 in animation shop.
In Animation Shop, select all of the frames of the circle bling animation (CTRL + A). Copy. Select all of the frames of the tag animation (CTRL + A) Go to Edit > Paste > Into selected frame. Place the circle bling to your liking. You can do this as many times as you like. Resize the animation for different sized circles. Have fun with it! When you are done, optimize and save as gif.
I hope you enjoyed this tutorial, if you have any questions, ask away!
Below is an example of what Xero Filters can do. Instead of Porcelain, I used Nostalgia. Experiment! You never know what you might come with! :-)
Subscribe to:
Post Comments (Atom)
0 comments:
Post a Comment