Wednesday, May 4, 2011
 Oriental Mystique
This tutorial was written by me on 31 August 2008. Any similarities to other tutorials is purely coincidental.
Supplies needed:
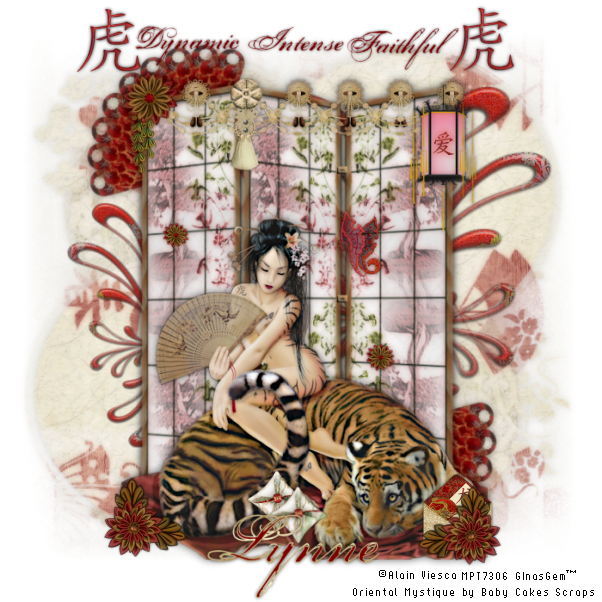
Tube of choice. I am using the beautiful artwork of Alain Viesca. I purchased this tube when he was still with MPT. I don't where you could his artwork now, so just use a tube you like instead.
Oriental Mystique scrapkit by Baby Cakes Scrap. If you wish to purchase this beautiful scrap, you can here and here. She has loads of beautiful kits!!!
Japanese Blinds made by me. You may use these for your own personal use, and in other tutorials, but PLEASE leave all credits intact and include a link to my site.
Mask by Essex Girl Check out her wonderful resources!!
Font - I used Porcelain
Filters Needed:
Filters Unlimited 2.0 - paper textures - japanese paper
*if you don't have filters unlimited another filter with textures will do*
Ok, let's begin! Open up a new transparent image 700 x 700. Floodfill with white. Open up the Oriental Screen tube and paste as a new layer onto your canvas. Center it in the middle of the canvas.
Open up the swag. Paste as new layer onto your canvas. Resize by 32% and add a small drop shadow. Position it just above the oriental screen.
Open up the tassel and paste onto your canvas. Resize by 20%, smart size, all layers unchecked. Apply a small drop shadow (H and V 0 Opacity 50 Blur 5.00) Position in it in the left fold of the screen (see my tag above for reference). Open up the gold glass flower. Resize by 20% and place over the top of the tassel. Add a small drop shadow
Open up the lantern and paste as a new layer onto your canvas. Resize by 55%, and add a small drop shadow. Position on the right corner of the oriental screen.
Paste the red gold bloom vine onto your canvas. Resize by 35% and apply a small drop shadow. Go to Image > Mirror and position it onto the corner of the screen that is opposite from the lantern.
Open up a chinese butterfly and paste onto your canvas. Resize by 15% and add a small drop shadow. Position to your liking on the screen.
Open up the red gold bloom and paste onto your canvas. Resize by 10% and give it a small drop shadow. Duplicate it as many times as you want and place them to your liking on the oriental screen.
Add any other embellishments you like to the screens. . . there is plenty to choose from! When you are satisfied, hide your white background and merge your visible layers.
Open up the fan. Paste as new layer onto your canvas and resize by 45%. Go to Image > Free Rotate > left by 45 degrees. (make sure both boxes are unchecked.) Position it in the left upper corner of the screen. Give the fan a blurry drop shadow ( H and V 0, opacity 45, blur 10.00) Duplicate the fan layer. Go to Image > Mirror. And then Image > Flip. Position the duplicated fan in the bottom right corner (see my tag for reference) Drag the fans below your screen. Hide your white background, and merge all visible layers.
On the merged layer, apply Xero > Porcelain with the following settings:
Softness - 50
Strength - 128
Brightness - 128
Red Channel - 131
Green Channel - 0
Blue Channel - 0
Unhide your white background and highlight it. Open up the floral paper. Resize it by 80%. Copy and paste as a new layer onto your canvas. Position it in the center of your canvas. Apply sg_double-stenciled-elipse1 tag to the paper layers. (Make certain you choose the option Fit to Layer) Delete the mask, answer yes, and merge the group.
Go to Filters > ICNet > Paper Textures > Japanes paper. Apply with the intensity set to 41 and the lightness set to 60.
Open up the symbols paper. Resize by 85% and paste onto your canvas. Apply the mask again to the symbols paper (same settings) Delete the mask, answer yes and merge the group. On the symbols paper mask layer, go to Image > Free Rotate > Right by 90 degrees. Apply Filters Unlimited with the same settings as before.
Hide your screen layer and your white backgrond. Merge your two mask layers together. Resize it by 95%.
Open up the red doodle. Resize by 75%. Paste onto your canvas and position it to your liking. Drag this layer below your screen layer but on top of your mask layer. Duplicate the doodle. Go to Image > Mirror. Resize the duplicated doodle by 60%. Position on the opposite side of the larger doodle. (see my tag for reference)
Apply the filter Xero - Porcelain with the same settings as before to your merged mask layer and the doodles. Give the mask layer a drop shadow with H and V 0, Opacity 20, blur 12.00. Give your doodles a drop shadow of H 1 V 0 Opacity 50 Blur 3.00
Hide your white background and merge visible layers.
Open up your tube and paste as new layer onto your canvas. Resize if necessary. Apply Xero - Porcelain filter with the following settings:
Softness - 36
Strength - 112
Brightness - 128
Red Channel - 0
Green Channel - 0
Blue Channel - 0
Still on your tube layer, go to Adjust > Sharpness > Unsharp Mask, and apply with these settings:
Radius - 5 Strenght - 15 Clipping - 1
Luminace only box Unchecked.
Give your tube the following drop shadow : H and V 0, opacity 65, Blur 15.00
Decorate around your tube with different embellishments from the kit if you wish. (see my tag for reference)
From the scrapkit, choose a symbol (I chose tiger because the tube is sitting on one lol) I looked up personality traits for that Chinese astrological sign and chose 3. In between the tiger symbols, I typed them out and gave it a blurry drop shadow. Or. . . add whatever text you like. :-)
Add your copyright, watermark, and name. Merge your layers. Crop and resize to your liking.
I hope you enjoyed this tutorial. If you have any questions ask away. I'd love to see your results!
Subscribe to:
Post Comments (Atom)
0 comments:
Post a Comment