Wednesday, May 4, 2011
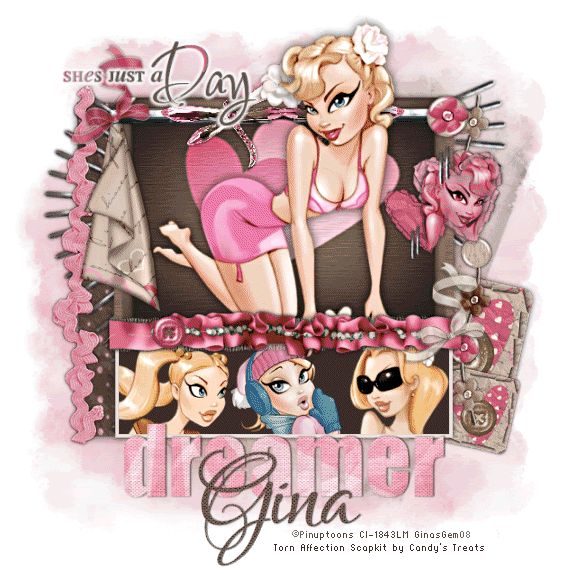
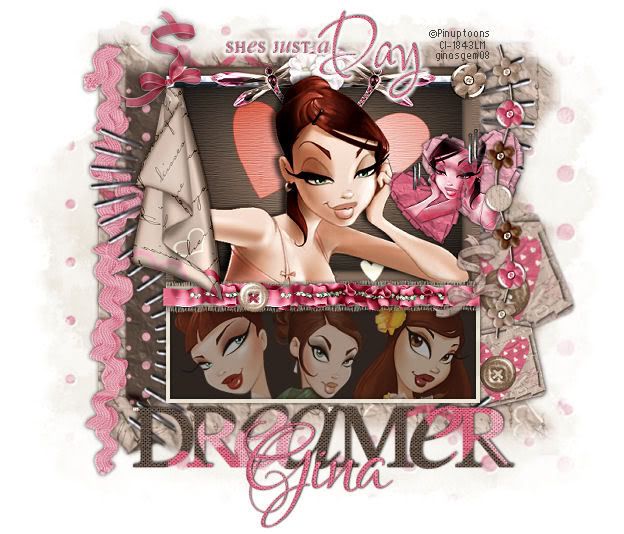
 Day Dreamer
This tutorial was written by me on the 30 August 2008. Any similarities to other tutorials is purely coincidental.
Supplies:
4 tubes of choice. I am using the adorable artwork of Rion Vernon. I got this art when CILM was still open. You can find him at CDO now.
Scrapkit is Torn Affection by Candy's Treats and can be purchased from her HERE
Word Art by Missy of Divine Intentionz (it's word art #16)
Mask by Becky. Unfortunately, her site is now closed (mask included in supplies)
Slideshow Rectangle made by me.
Font of Choice. I used Lover's Quarrel which I can not supply because it is a pay font.
Filters Needed:
Supplies HERE
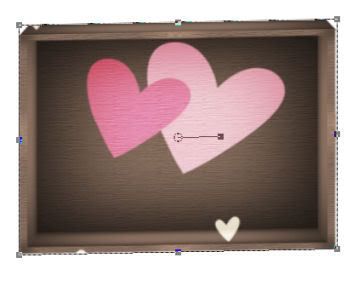
Let's begin! Open up a new transparent image 650 x 650. Floodfill with white. Open up one of the boxes from Candy's scrapkit. Resize it by 75%, Smart Size, all layers unchecked. Grab your pick (or deform tool). Elongate the box equally on both sides until it looks similiar to this:
Now go to Adjust > Sharpen > Unsharp mask
Radius: 5 Strength: 17 Clipping: 1 Luminance only box UNCHECKED
Open up your tube. Copy and paste as a new layer. Resize if needed. Position your tube within the box to your liking. Erase or delete (if there are any) parts of the tube that you don't want hanging out of the box. Hide your tube for now.
Apply the following drop shadow to the box: H and V 0, Opacity 75, Blur 11.00 Color black.
Highlight your tube layer and apply the same drop shadow as above, but change the blur to 15.00.
Open up a Fold from the scrapkit. Copy and paste as a new layer onto your canvas. Resize it by about 30%. Apply a small drop shadow. H and V 0 Opacity 50 blur 5 color black. Position the fold in one of the corners of the box.
Open up the Dragonfly Slide. Copy and paste as a new layer onto your canvas. Resize it by about 40%. Apply a small drop shadow. Duplicate the dragonfly slider and mirror the duplicated image. Postion as so:

Open up a flower from the scrap kit. Paste as a new layer onto your canvas. Resize by 10%. Position in the middle of the dragonfly sliders.
Open up a ribbonbow of choice. Paste as a new layer onto your canvas and resize by 25%. Position it over the corner of the box where the the fold is at. Apply a small drop shadow. Open up a button of choice and paste as a new layer onto your canvas and resize by 20%. Apply a small dropshadow and position it in the opposite corner of the ribbonbow.
Open up the crumpledheartstorn from the scrapkit. Paste as a new layer onto your canvas. Resize by about 23%.
Grab your magic wand tool. Mode: Add, Tolerance 38, Feather 15. Click inside of the torn crumpled hearts. Copy and paste your tube as a new layer onto your canvas (you can resize and mirror if you wish) Position the part of the tube that you want showing within the heart. Go to Selections > Invert. Hit Delete 3x. Deselect (CTRL + D) Change the blend mode of the tube to Luminance. Apply a small drop shadow to the crumpled hearts.
Open up the staples. Paste as a new layer onto your canvas. Resize by 23%. Rotate left 90.00 degrees, all layers unchecked. Apply a small drop shadow, and duplicate the staples. Resize the duplicated staples by 85%. Position them so it looks as if the crumpled hearts are stapled to the box.
Unhide your big tube layer. Make certain it is the top layer. Hide your white background and merge visible layers.
Open up the Slideshow Rectangle. Paste as a new layer onto your canvas. Resize or use the deform tool so it is the same length as your box. Grab your magic wand tool, mode add, tolerance 38, feather 0.00. Click inside the dark area of the box. Paste your first tube as a new layer onto your canvas. Position the face of the tube inn the left corner. Go to Selections > Invert. Hit Delete. Repeat this step with 2 more tubes. Deselect. Hide your white background, Slideshow rectangle and box layers. Merge the tube layers together. Unhide your other layers. Apply the following drop shadow to the Rectangle H and V 0 Opacity 75, blur 9.00 color black.
Open the DistressedRibbon and paste as a new layer onto your canvas. Resize by 43%. Position it where the box and the rectangle meet. Apply a small drop shadow. Open up a ruffle of choice. Paste as a new layer onto your canvas. Resize by 46%, and postion it on top of the distressed ribbon. Apply a small drop shadow.
Open up a glitter button of choice. Paste as a new layer onto your canvas. Resize by 12%. Apply a small drop shadow and postion is to your liking on the ruffle.
Open up a ribbonbow of choice. Paste as a new layer onto your canvas and resize by 25%. Apply a drop shadow and postion to your liking on the ruffle. Hide your white background, Slideshow Rectangle, box, and face tubes layer, and merge the ribbons, buttons and bow together. Unhide your other layers.
Highlight your white background. Open up Folded 1 paper. Paste as a new layer onto your canvas. Resize by 70%. Go to Image > Free Rotate, Right by 90 degrees. Apply Becky mask 22. Delete the mask and merge the group. Duplicate the mask layer.
Open up folded 2 paper. Paste as a new layer onto your canvas. Rotate by 90 degrees right. Resize by 35%. Apply a blurry drop shadow, and position it so that the straight edge is peeking out ofthe left side of the box. Use your deform tool to elongate it so that it reaches the bottom of the Slideshow Rectangle. Make sure this layer is below your mask layers.
Open up a ricrac of choice. Paste as a new layer and rotate it right by 90 degrees. Resize it by 70%. Add a small drop shadow and position it over the edge of the folded2 paper.
Open up Staples wave and paste as a new layer onto your canvas. Resize by 70%. Apply a small drop shadow and position to your liking. Duplicate the staples and mirror the duplicated layer. Position to your liking.
Open up String from your scrap kit. Paste as a new layer onto your canvas and resize by 70% Rotate right by 90 degrees, and apply a small drop shadow. Position opposite of the ricrac. Open up the Torn Element. Paste as a new layer onto your canvas. Resize by 60%. Apply a drop shadow. Duplicate the Torn Element. Resize the duplicated layer by 60%. Position them to your liking.
Highlight your white background. Add a new raster layer. Go to Selections > Select > all. Open up a paper of choice. Copy the paper and choose paste into selection. Do not deselect. Apply the Becky mask again. Deselect. Apply FM tile tools Blend Emboss with the default settings.
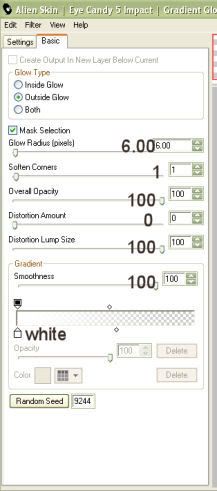
Open up Missy word art paste as new layers onto your canvas and place to your liking. Resize if you like. Highlight She's Just a Day layer. Go to Selections > Select All > Float > Defloat. Paste a paper of choice as new layer. Go to Selections > Invert. Hit Delete. Delete the black she's just a day layer. Apply EyeCandy impact Gradient Glow with the following settings:
Highlight the Dreamer layer and go to selections > select all > selections float > defloat. Open up another paper of choice. Paste as a new layer onto your canvas. Go to selections > invert. Hit delete. Delete the gray dreamer layer. Apply a close drop shadow.
Add your copyright, watermark and your text. Crop and resize if you wish. Hide your face tubes layer and merge the rest of your layers together. If you are not animating your tag, you're done! Save as JPEG. If you are animating, then keep reading.
Open up Animation Shop. In PSP, right click your canvas and select copy merged. In Animation Shop, paste it as a new animation.
Back to PSP. Highlight your face tubes layer. Change the layer opacity to 80. Copy merged and paste after current frame. Repeat this step except lower the opacity to 60. Then to 40. Then to 20.
Select all of the frames (CTRL + A) Copy the animation. Paste as a new animation. On the copied animation, select all of the frames. Go to Animation > Reverse frames. Delete frame 1. Select all of the frames and copy. Paste after the last frame of your original animation. Change your frame properties to 25. Optimize and save as gif.
I hope you enjoyed this tutorial. If you have any questions, feel free to ask.
Subscribe to:
Post Comments (Atom)
0 comments:
Post a Comment