Wednesday, May 4, 2011
 Cloud Nine
This tutorial was written by me on 19 January 2008. Any resemblance to other tutorials is purely coincidental.
Supplies Needed:
Tube of Choice. I am using the gorgeous artwork of Jessica Dougherty. I got this tube when CILM was still open. You can find her at CDO now.
Template made by me
Rose tube and Feather Fan tube
Clouds with Hearts and Pearl Accent tubes by Rainbow Coffi. You can find Rainbow Coffi HERE
Doodle Art by Melissa of Scrappy Expressions. You can find Melissa HERE
Mask by Becky. Unfortunately, her wonderful site is now closed.
Pearls by Monti. As per her TOU I can not supply them. You can download them from her site HERE. (download the wedding scrap kit, Accesories. They are in there. :))
Font -Cecily
Filters (optional)
Filters Unlimited 2.0
FM Tiles Tools - Blend Emboss
Supplies HERE
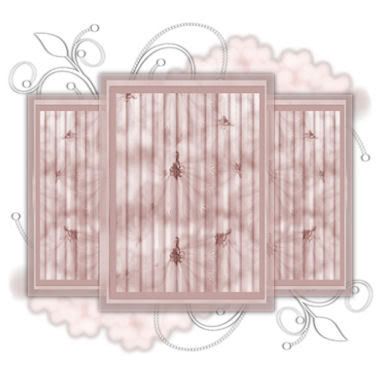
Ok! Let's begin! Open up a new transparent image 550 x 550. (we can crop and resize later) Floodfill with white. Open up the template. Copy and paste as new layer onto your canvas.
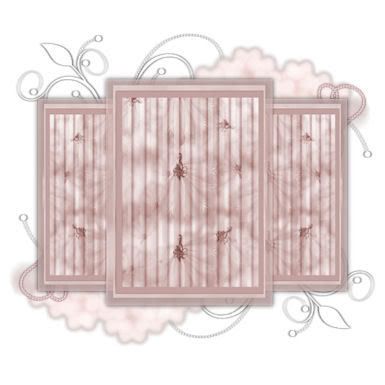
Resize it by 80% (bicubic, all layers unchecked) Colorize the template to match your tube. Apply a drop shadow with the following settings:
Apply to your template with the following settings:
Horizontal and Vertical 0
Opacity 70 Blur 10.00
Color Black
Open up the SE_doodleART_5 tube. If you are using darker colors, and would like to leave the doodle black, skip this step. If you would like to turn your doodle white, read on.
Go to Adjust > Brightness and Contrast > Brightness and Contrast.
Apply with the following settings:
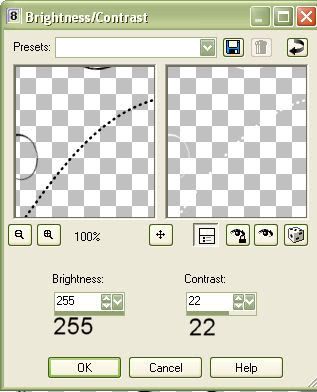
Your doodle is now white.
Copy and paste the doodle as a new layer onto your canvas.
Resize the doodle by 70% (all layers unchecked!!)
Apply a drop shadow to your doodle layer with the following settings:
Vertical 0 Horizontal 2
Opacity 50% Blur 3.00
Color Black
Apply another Drop Shadow to the doodle layer except this time change Horizontal to -2.
Go to your layer palette and duplicate your doodle layer. On the duplicated layer, go to Image > Mirror. Then, Image > Flip.
Postion them to your liking and drag both doodle layers below your template layer.
Open up the V~CloudsWithHearts tube. With your freehand selection tool, select around the cloud you would like to use. Copy and paste is a new layer onto your canvas.
Resize the cloud by 65%. (If you wish to colorize it, go ahead) Apply a drop shadow with the following settings:
Vertical and Horizontal 0
Opacity 45% Blur 5.00
Color Black
Duplicate your cloud layer. Go to Image > Mirror. Then, Image Flip. Postion them in opposite corners, and drag them below your template and doodle layers. Your layer palette should look like this:
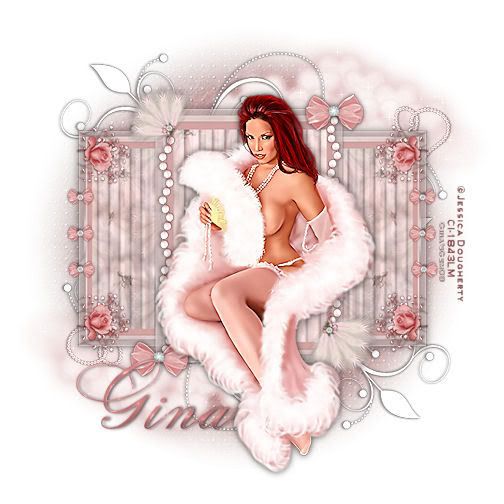
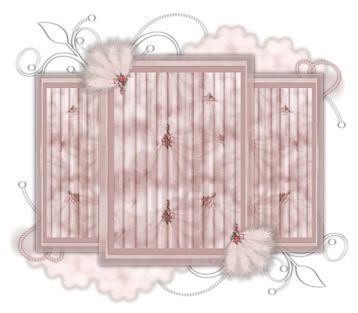
Your canvas should look similiar to this :
Open up the V~PearlHearts tube. Select around the heart you would like to use and paste it as a new layer onto your canvas.
Resize the pearl heart by 25% (bicubic, all layers unchecked). You can colorize the heart if you like. Apply a drop shadow to the pearl heart with the following settings:
Vertical and Horizontal 0
Opacity 60% Blur 4.00
Color Black
Duplicate the pearl heart layer. Go to Image > Mirror. Then, Image > Flip and position them in the corners of your clouds like this:
Hide your white backgroud layer, and merge all visible layers.
Open up the featherfan tube. Copy and paste as a new layer onto your canvas. Resize it by 30%. Go to Image > Rotate > Free Rotate. Rotate the fan Left by 45.00 degrees.
Apply a drop shadow to the fan with the following settings:
Vertical and Horizontal 0
Opacity 50% Blur 5.00
Color Black
Duplicate your fan layer. Go to Image > Mirror. Then Image > Flip. Position your fans in opposite diagnol corners of the largest rectangle of the template.
Open up the Monti_wedding Pearls tube. Copy and paste as a new layer onto your canvas. Resize the pearls by 40%. Go to Image > Rotate > Free Rotate. Rotate the pearls Left by 90.00 degrees.
Apply a drop shadow to you pearl layer with the following settings:
Vertical and Horizontal 0
Opacity 55% Blur 7.00
Color Black
Duplicate the pearl layer. On the duplicated layer go to Image > Mirror. Postion them on both long sides of the largest rectangle of the template. Drag your pearl layers beneath your fan layers.
Open up the bowanddiamond tube. Colorize the bow to your liking. Right click on it and select COPY MERGED
Paste as a new layer onto your canvas.
Resize your bow by 50%. Go to Adjust Sharpness > Sharpen.
Apply a drop shadow to your bow with the following settings:
Vertical and Horizontal 0
Opacity 50% Blur 5.00
Color Black
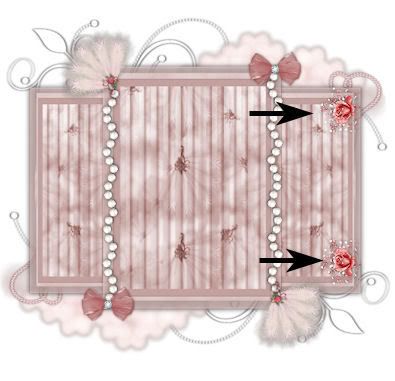
Duplicate your bow and postion them over the open ends of the pearls. (see my tag above)
Hide your whitebackground and merge your visible layers.
Open up the roseandbabybreathe tube. Colorize to your liking. Copy and paste as a new layer onto your canvas. Resize the rose by 30%. Go to Adjust > Sharpen > Sharpen. Go to Image > Rotate > Free Rotate Left 90.00 degrees. Apply a drop shadow to the rose with the following settings:
Vertical and Horizontal 0
Opacity 55% Blur 6.00
Color Black
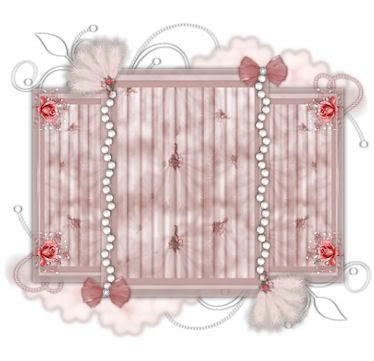
Duplicate the rose. Go to Image > Flip. Position the roses as so:
Merge your two rose layers together. Duplicate the merged rose layer. On the duplicated layer go to Image > Mirror. Position them on the opposite side of your template.
Hide your white background, and merge visible layers.
Copy your bowanddiamond tube once again. Paste as a new layer onto your canvas. Resize it by 25%. Go to Adjust > Sharpen > Sharpen. Apply a drop shadow to the little bow with the following settings:
Vertical and Horizontal 0
Opacity 50% Blur 3.00
Color Black
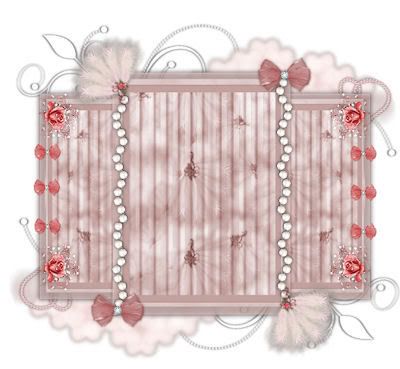
Duplicate the small bow layer 5 times, so that you have a total of 6 small bow layers. Arrange them as below:
Hide your white background and merge visible layers.
Add a new raster layer. Drag this new layer below your template layer but above your white background. Floodfill the new layer with a color from your tube.
Go to Layers > Load/Save mask from Disk. Find Becky_Mask019 in the drop down menu.
Apply the mask with the following settings:
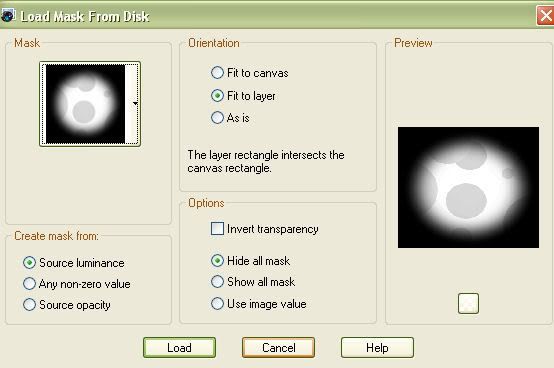
Delete the mask, answer yes and merge the group.
On your mask layer, go to Effects > Texture Effects > Weave
Apply to your mask layer with the following settings:

These next 2 steps are optional. If you have the Filters, then continue on. If not, then skip this part.
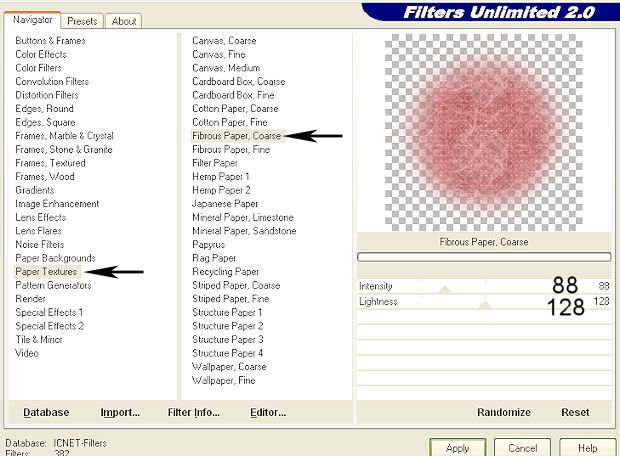
On your mask layer, Go to Effects, Plug Ins > ICNet Software > Filters Unlimited 2.0
Find Paper Textures > Fibrous Paper Course and apply with the following settings:
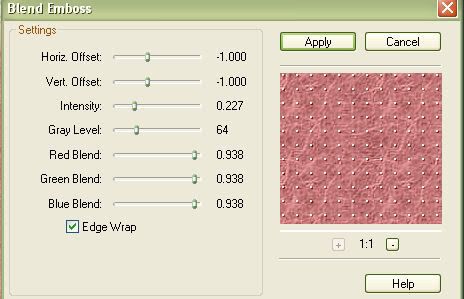
Still on your mask layer, go to Effects > Plug Ins > FM Tile Tools > Blend Emboss and apply with the following settings:
Apply a drop shadow to your mask with the following settings:
Vertical and Horizontal 0
Opacity 50% Blur 15.00
Color Black
Copy and paste your tube as a new layer, resizing if necessary. (if you resize your tube, don't forget to sharpen it. )
Apply a drop shadow to your tube with the following settings:
Vertical and Horizontal 0
Opacity 70% Blur10.00
Color Black
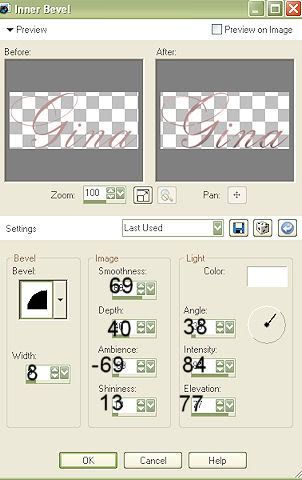
Add your name using my font or a font of choice. I used Cecily, size 100, and applied the following inner bevel:
Position your text and apply a drop shadow (I did V 0, H 2, O 56% Blur 3.00)
Merge your layers together. Crop and resize as necessary. Add your copyright and watermark info.
I hope you enjoyed this tutorial. If you have any questions, please feel free to ask.
Subscribe to:
Post Comments (Atom)
0 comments:
Post a Comment