Tuesday, May 3, 2011
 Rock Princess
This tutorial was written by me on 23 April 2009. Any similarities to other tutorials is purely coincidental.
Supplies Needed:
Tube of choice. I am using the awesome artwork of Mark Wasyl. I purchased this tube when CILM was still open. I don't know of any place where his tubes are available for purchase, so just use one that you like.
Rock Princess Scrapkit by Just a Girl's Designs. If you wish to purchase this awesome kit, you can here. Thank you, Tamara!!
Font of choice. I used Nirvana which you can download from here.
Plugins:
Xenofex 2 - Constellation and Crumple
Animation Shop (opt)
*~*~*~*~*~*~*~*~*~*~*~*~*~*~*~*~*~*~*~*~*~*~*~*~*~*~*~*~*~*~*~*~*~*~*~*~*~*~*~*~*~*~*~*
Ok! Let's get started! Open up a new transparent image 800 x 700. Floodfill with white.
Open up the frame cluster from the kit. Copy and paste as a new layer onto your canvas. Grab your magic wand tool, tolerance set at 30, feather set at 0.00. Click inside the emtpy spaces of the frame. Go to selections > modify > expand by 5.00. Open up a paper from the kit. Resize by 90%, smartsize. Copy and paste onto your canvas. Go to selections > invert. HIt delete on your keyboard. Don't deselect yet!
Open up your tube. Resize as necessary, bicubic. Copy and paste onto your canvas. Position to your liking within the frame. Hit delete. Don't deselect.
Open up the microphone from the kit. Resize by 50%, smartsize. Copy and paste onto your canvas. Positon to your liking within the selection. Hit delete. Deselect (CTRL+D) Give your tube a drop shadow of H and V 0, Opacity 80, Blur 10.00. Give your microphone a drop shadow of H and V 0, Opacity 65, Blur 5.00.
Highlight your frame layer. Give it a drop shadow of H and V 0, Opacity 85, Blur 6.00. Drag it to the top of your layer palette.
Open up the frame wrap from the kit. Resize by 50%, smartsize. Copy and paste onto your canvas. Go to image > free rotate. Rotate right by 90.00, both boxes unchecked. Give it a drop shadow of H and V 0, Opacity 50, Blur 4.00. Position to your liking. Grab your freehand selection tool, type point to point, feather set at 1.00. Carefully select around the areas of the ribbon that are hanging over the frame. Hit delete. Deselect.
Open up the lock from the kit. Resize by 20%, smartsize. Copy and paste onto your canvas. Give it a drop shadow of H and V 0, Opacity 55, Blur 4.00. Position to your liking.
Open up a bow from the kit. Resize by 15%, smartsize. Copy and paste onto your canvas. Give it a drop shadow of H and V 0, Oapcity 55, Blur 4.00. Position to at the top of the lock.
Open up a flair from the kit. Resize by 20%, smartsize. Copy and paste onto your canvas. Give it a drop shadow of H and V 0, Opacity 65, Blur 4.00. Position to your liking.
Open up a hanger from the kit. Resize by 60%, smartsize. Copy and paste onto your canvas. Give it a drop shadow of H and V 0, Opacity 65, Blur 4.00. Position to your liking.
Open up a heart deco from the kit. Resize by 25%, smartsize. Give it a drop shadow of H and V 0, Opacity 65, Blur 3.00. Position to your liking.
Open up the ticket from the kit. Resize by 25%, smartsize. Copy and paste onto your canvas. Apply Xenofex 2 Crumple with the following settings:
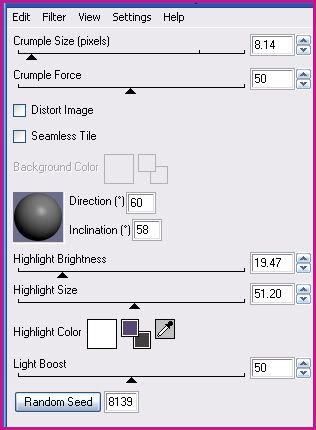
Give it a drop shadow of H and V 0, Opacity 65, Blur 5.00. Position to your liking.
Highlight your white background. Open up the star doodle from the kit. Resize by 65%, smartsize. Copy and paste onto your canvas. Duplicate 2 times. Flip one of the doodles. Positoin to your liking. Merge the 3 doodles together. Duplicate the merged doodle layer. Go to image > mirror. Position to your liking. Merge the 2 doodle layers together.
Add any other embellishments of your choosing.
Crop and resize to your liking.
Add your copyright info, watermark and your text. If you are not animating, save as JPG or PNG.
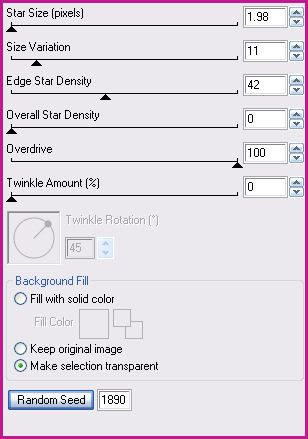
If you are animating, duplicate the doodles layer. On the top layer, apply constellation with the following settings:
Give the constellation layer a drop shadow of H 1, V -1, Opacity 35, Blur 1.00. Copy merged. Open up Animation Shop. Paste as a new animation in AS.
Back to PSP. Go to edit > undo drop shadow. Edit > undo constellation. Apply Constellaion again, but this time hit the random seed button. Give the constellation layer a drop shadow of H 1, V -1, Opacity 35, Blur 1.00. Copy merged. Paste after your current frame in AS.
Repeat the above steps 3 more times for a total of 5 frames.
Optimize and save as gif.
I hope you enjoyed this tutorial! If you have any questions, just give me a shout!
Subscribe to:
Post Comments (Atom)
0 comments:
Post a Comment