Wednesday, May 4, 2011
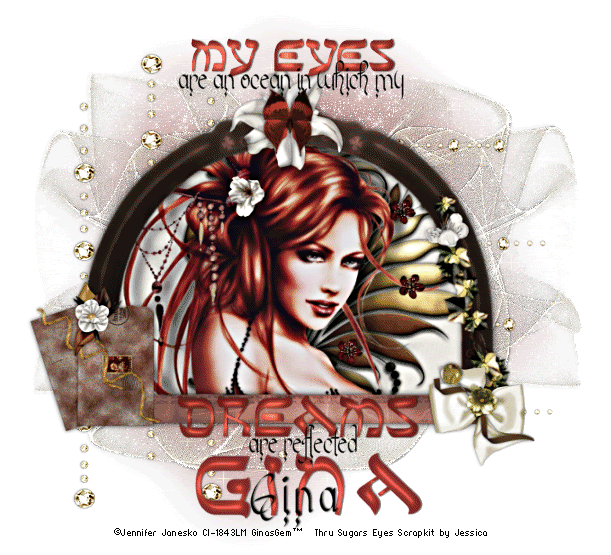
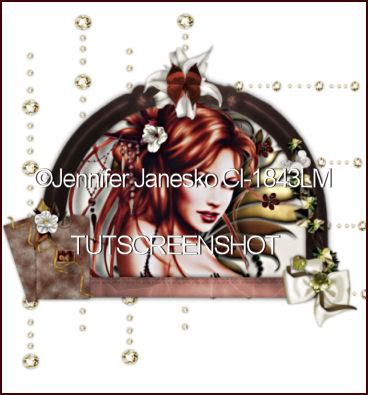
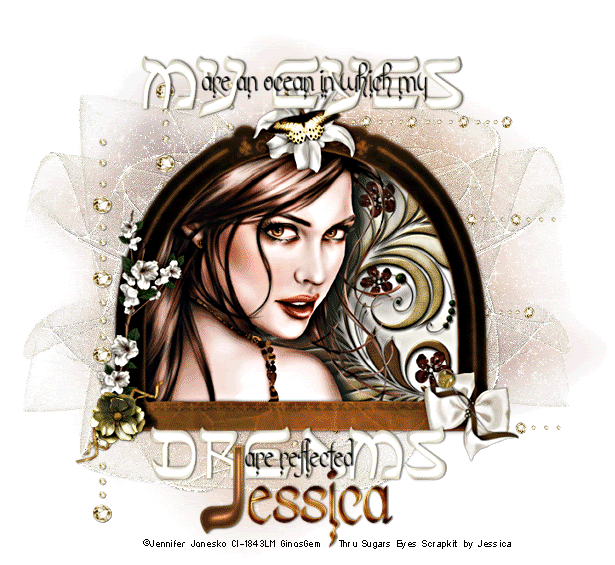
 Reflected Dreams
This tutorial was written by me on 7 September 2008. Any similiarities to any other tutorials is purely coincidental.
Supplies Needed:
Tube of choice. I am using the amazing artwork of Jennifer Janesko. I got this art when CILM was still open. You can find her at CDO now.
Scrapkit. I am using Thru Sugars Eyes by Jessica. If you wish to use this amazing scrapkit you can purchase it here Thank you Jessica!
Mask by Becky. Unfortunately, her site is now closed. :-(
Sinedots tube, made by me
Wordart made by me
Font(s) of Choice. I used Cupiedoll and Sefar AH.
Filters Needed:
Xenofex 2 Constellation (opt)
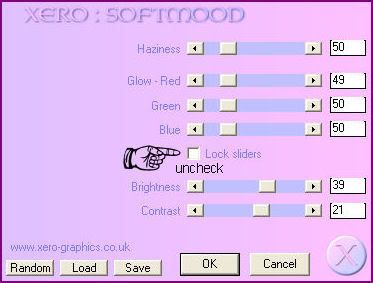
Ok! Let's Begin! Open up a new transparent image 700 x 700. Floodfill with white. Open up the window from your scrapkit. Resize by 80%, smartsize. Copy and paste as a new layer onto your canvas. Apply the filter Xero Soft Mood with the following settings (Make sure you uncheck lock sliders):
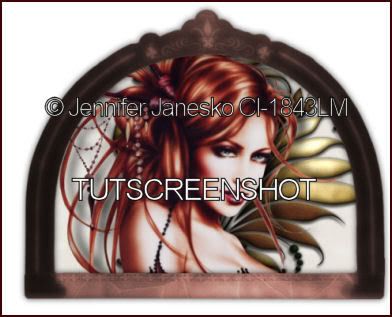
Go to Adjust > Sharpen > Sharpen more. Grab your magic wand tool, tolerance set to 50, feather 0.00. Click inside the empty space of your window/frame. Go to Selections > Modify > Expand by 4.00
Open up a paper of choice from your scrapkit (prefereably a lighter colored paper) Paste as a new layer onto your canvas. Go to Selections > Invert. Hit delete on your keyboard. Do NOT deselect yet.
Open up your tube. Resize if necessary. Paste as a new layer onto your canvas. Position the tube to your liking. Hit delete on your keyboard. Deselect (CTRL +D) Drag your window/frame above your tube and paper layers. Open up the Metal1 tube from the scrapkit. Resize by 70%. Paste onto your canvas. Position within your frame/window so that none of it is hanging out of the window. Give it a drop shadow of H 1 V 0, opacity 60%, Blur 4.00. Position behind your tube like this:
If you like, you can apply Xero Soft Mood with the same settings as before to your metal doodle.
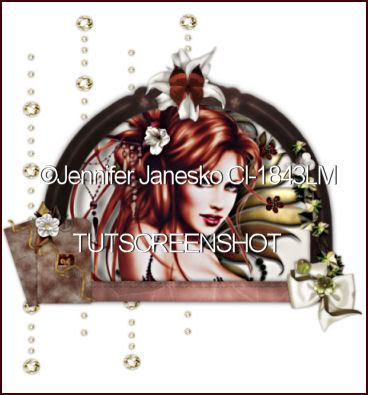
Highlight your frame layer and give it a drop shadow of H and V 0, opacity 70%, Blur 12.00. Highlight your tube layer and give it a drop shadow with H 11 V -1, Opacity 70, Blur 16.00 Add any other flowers or embellishments inside your frame. I placed little flowers sporadically on the metal doodle, and one in my tube's hair. :-)
Hide your white background and merge your visible layers. Open up Flower2, (or a flower of choice if you are using a different kit) Resize by 45%. Paste onto your canvas and position in the middle on the top of the frame. Give the flower a drop shadow of H and V 0, opacity 50, blur 4.00.
Open up a butterfly of choice. I colorized mine to match my tube. Resize it by 32%. Paste onto your canvas, on top of the white flower. Give it the same drop shadow you gave the flower.
Open up a bow of choice. Resize it by about 45 %. Position in the right bottom corner of your frame. Give it the same drop shadow you gave the flower. Open up the pin. Go to Image > Mirror. Resize by 60% and paste onto your canvas. Position it on top of your bow.
Open up the envelope. Resize by 35% and paste onto your canvas. Go to Image > Free Rotate > Rotate left by 90 degrees. (both boxes unchecked!!) Position it in the right hand corner of your frame. Give it a drop shadow of H and V 0, Opacity 65% Blur 7.00
Open up Flower6 (or one of your choice) Resize it by about 25%. Paste onto your canvas, and postion it on the top where the two envelopes meet. Give it a drop shadow of H and V 0, opacity 50, blur 5.00:

Open up ribbon6. Resize by 25%. Paste onto your canvas. Go to Image > free rotate. Rotate left by 45.00 degrees. Place it on your envelope. Give it a small drop shadow (same that you gave the flower)
Open up the Ivy and resize it by 35 %. Paste onto your canvas and place it beneath your bow. Go to Image > free rotate and rotate leftt by 15.00 degrees. Give it a small drop shadow. Open up a couple of flowers of choice, and resize until they are really small. Place on your ivy. Add any other embellishments you like to your frame. When you are satisfied, hide your white background and merge your visible layers.
Open up the blingstring from your scrapkit. Resize by about 80%. Paste onto your canvas. Go to Adjust > sharpness > sharpen. Give it a drop shadow of H 1 V 0, opacity 45%, blur 2.00. Duplicate the Blingstring, and go to Image > Flip. Duplicate the unflipped bling string 1 x. Now, duplicate the flipped bling string 1 x. Arrange underneath your frame layer as so:
Duplicate the original blingstring again. Resize it by 60%. Go to Image > Free Rotate > Right by 90 degrees. Duplicate the resized bling. Go to Image > Flip. Duplicate the flipped and unflipped resized bling 1 x each. Arrange like this:
Hide your frame layer and white background and merge all of the blings together.
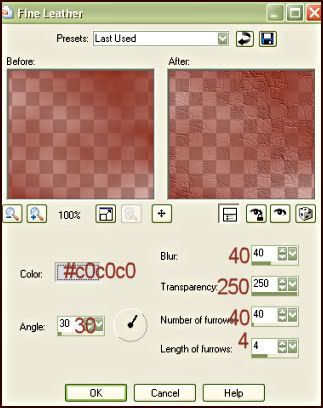
Choose a medium dark color from your tube. Highlight your white background and add a new raster layer. Fill the layer with the color you chose from your tube. Apply the Becky Mask to this layer. Delete the mask, answer yes, and merge the group. Resize the mask layer by 85%. Center it in the canvas. Go to Effects > Textures > Fine Leather. Apply to the mask layer with these settings:
Lower the opacity of the mask layer to about 60%. Open up the Sinedots tube. Paste onto your canvas and place below the bling strings but above the mask layer. Give the sindedot a drop shadow of H and V 0, Opacity 25&, blur 5.00.
Open up your wordart. Decorate to your liking. Crop and resize if you wish.
Add your copyright, watermark and your name.
If you are not animating , then you are done! If you are, let's continue.
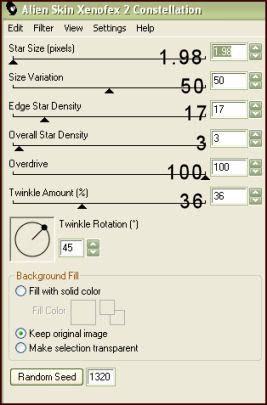
Highlight your Sinedots layer. Go to Effects > Filters > Xenofex 2 > Constellations. Apply with settings:
Right click on your canvas and Copy Merged.
Open Animation shop, and paste as a new animation. Back to Paint Shop Pro. Go to Edit > Undo Constellation. Apply Constellation again to the sinedots layer again but hit the random seed button this time. Copy Merged and paste after the first frame in animation shop. Repeat the above step one more time. Optimize and save as gif.
I hope you enoyed this tutorial. If you have any questions, just email me.
Subscribe to:
Post Comments (Atom)
0 comments:
Post a Comment