Wednesday, May 4, 2011
 Purple Rain
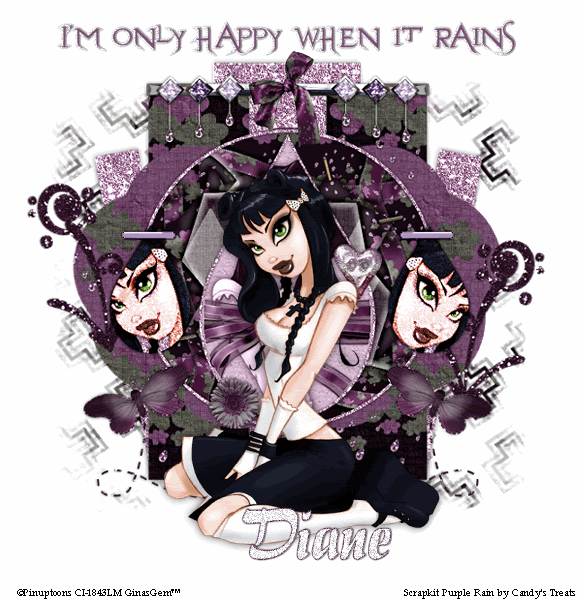
This tutorial was written by me on 2 November 2008. Any similarities to other tutorials is purely coincidental.
Supplies Needed:
Tube of choice. I am using the awesome artwork of Rion Vernon. I bought this tube when CILM was still open. You can find him at CDO now.
Scrapkit Purple Rain by Candy's Treats. If you wish to purchase this awesome kit you can here As usual, there is an awesome freebie that goes with this kit that you download at her blog! Thank you Diane! :-)
Template 20 by me. You can download it here
Wordart animation made by me
Mask by Chelle Don't forget to check out her site for awesome masks and tuts!
Font of choice. I used Brush Flair Regular which you can download here
Plugins:
Filters Unlimited 2.0 Paper Textures
Animation Shop
Let's get started! Open up the template and delete the credits. Open up a glitter of choice from the kit. Make it your background on your layer palette, angle 45, scale 35. Highlight the small rectangles layer. Go to selections > select all. Selections > float. Selections > defloat. Add a new raster layer. Floodfill the new layer with your glitter. Deselect (CTRL+D) Give the layer a drop shadow of H and V 0, Opacity 60, Blur 8.00. Delete the black small rectangle layers.
Highlight the large rectangle layer. Select, float and defloat. Add a new raster layer. Floodfill the new layer with the glitter again. Deselect. Give the layer the same drop shadow aas before. Delete the dark gray large rectangle layer.
Highlight the medium sized rectangles layer. Select, float and defloat. Open up a paper of choice from the kit. Resize by 68%, smartsize. Copy and paste as a new layer onto your canvas. Position the paper to your liking within the selection. Go to selections > invert. Hit delete on your keyboard. Deselect. Give the rectangles a drop shadow of H and V 0, Opacity 50, Blur 5.00. Delete the gray medium rectangles layer.
Highlight the cloudy shape layer. Select, float and defloat. Open up a paper of choice from the kit. Resize 68%, smartsize. Copy and paste as a new layer onto your canvas. Selections > invert. Hit delete on your keyboard. Deselect. Give the layer a drop shadow of H and V 0, Opacity 60, Blur 8.00. Delete the gray cloudy shape layer.
Highlight the circle fill layer. Select, float and defloat. Open up a paper of choice from the kit. Resize, 68%, smartsize. Copy and paste onto our canvas. Selections > invert. Hit delete. Do NOT deselect.
Open up CT-FOLD1 paper from the kit. Resize by 50%, smartsize. Copy and paste as a new layer onto your canvas. Position the Fold so that it frames the circle (see my tag for reference) Hit delete on your keyboard. Deselect. Duplicate the fold layer. Go to image > mirror. Then, image > flip. Position the folds so you have something similar to this:
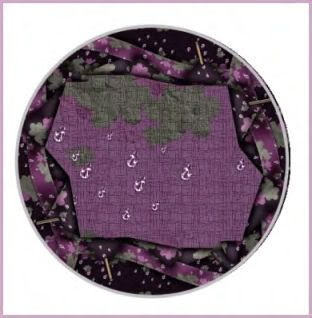
Give both fold layers a drop shadow of H and V 0, Opacity 100, Blur 8.0, color white.
Highlight the circle frame layer. Select, float and defloat. Open up a glitter of choice from the kit. Make it your background pattern, same settings as before. Add a new raster layer. Floodfill the new layer with the glitter. Deselect. Give the glitter frame a drop shadow of H and V 0, Opacity 60, Blur 4.00, color black. Delete the gray circle frame layer.
Highlight the tear fill layer. Select, float and defloat. Choose a medium color from your tube or tag. (I used color #caabc3) Add a new raster layer. Floodfill the new layer with your color. Do NOT deselect.
Open up your tube. Resize, bicubic, if necessary. Copy and paste as new layer onto your canvas. Position to your liking within the selection. Selections > invert. Hit delete. Do NOT deselect.
Open up a wrap of choice. Resize by 30%, smartsize. Copy and paste as a new layer onto your canvas. Position to your liking within the selection. Hit delete. Deselect. Give the wrap a drop shadow of H and V 0, Opacity 50, Blur 4.00.
Highlight the tube and change the blend mode to Lumance (Legacy) Give the tube a drop shadow of H and V 0, Opacity 60, Blur 6.00.
Highlight the colored tear layer and apply Filters Unlimited 2.0 Paper Textures > Rag Paper with the default settings.
Highlight the large tear frame layer. Select, float and defloat. Add a new raster layer. Floodfill with the same glitter you used for your circle frame. Give the glitter frame a drop shadow of H and V 0, Opacity 60, Blur 4.00.
Highlight the left small tear layer. Select, float and defloat. Add a new raster layer and floodfill with a glitter of choice. Open up your tube. Resize, bicubic, if necessary. Copy and paste onto your canvas. Position to your liking within the selection. Selections > invert. Hit delete. Deselect. Change the blend mode of the tube to Overlay. Give the glittered tear a drop shadow of H and V 0, Opacity 55, Blur 6.00. Delete the gray left small tear layer. Repeat the same steps with the right small tear layer, but mirror the tube.
Open up a clip square of choice from the kit. Resize by 35%, smartsize. Copy and paste as a new layer onto your canvas. Position at the top of the left middle sized rectangle. Give the clip a drop shadow of H and V 0, Opacity 50, Blur 4.00. Duplicate the clip and mirror. Position at the top of the right middle sized rectangle.
Open up a bow of choice. Resize by 20%, smartsize. Copy and paste as a new layer onto your canvas. Give it the same drop shadow you gave your clips. Position between the clips.
Open a butterfly of choice. Resize by 30%, smartsize. Copy and paste onto your canvas. Give the butterfly the same drop shadow you gave your bow. Duplicate the butterfly and mirror. Position the butterflies to your liking.
Open up a purple staple of choice. Copy and paste onto your canvas. Duplicate the staple. Position them so it looks as if they are holding the small tears in place.
Open up a glitter doodle of choice. Resize by 30%, smartsize. Copy and paste as a new layer onto your canvas. Give the doodle a drop shadow of H 1, V 0, Opacity 35, Blur 2.00. Duplicate the doodle and mirror. Position them to your liking.
Add any other embellishments that you choose. :-)
Highlight your white background. Open up a paper of choice. Resize by 70%, smartsize. Apply the WSL mask:
Source Luminance
Fit to Layer
Hide all mask.
Delete the mask from your layer palette. Answer yes to the pop up box. Merge the group. Position the mask to your liking. Give the mask the same drop shadow you gave your doodles.
Open up your tube. Resize, bicubic. Paste onto your canvas and arrange to your liking. Give the tube a drop shadow of H and V 0, Opacity 60, Blur 12.00.
Merge all of your layers together.
Crop and resize to your liking.
Add your copyright and watermark and text.
Copy. Open up Animations Shop. Paste as a new animation. Duplicate so you have a total of 3 frames. Open up the Happy when it rains animation. Select all frames (CTRL+A) Copy.
Highlight your working image. Select all frames (CTRL+A) Go to Edit > Paste into selected frame. Position the text to your liking.
Optimize and save as gif.
I hope you enjoyed this tutorial! If you hae any questions, just give me a shout.
Subscribe to:
Post Comments (Atom)
0 comments:
Post a Comment