Wednesday, May 4, 2011
 Waiting for Love
This tutorial was written by me on 3 November 2008. Any similarities to other tutorials is purely coincidental.
Supplies Needed:
Tube of choice. I am using the gorgeous artwork of Steve Baier. If you wish to use his artwork, you must purchase a license with Up Your Art.
Scrapkit Love is a Rose by Silent Dreamer Designs. If you wish to purchase this fab kit, you can here. Thank you!
Template 41 by Rachel of Scraps of Enchantment
Mask by Zuzzana
Font of choice. I used Brush Script (pay font)
Plugins
Xero Soft Mood and Tekstya
Alien Skin Xenofex 2 Crumple
Animation Shop
Let's begin! Open up the template. Duplicate by holding (SHIFT +D) Close the original. Resize all layers by 83%, smartsize.
Go to image > canvas size. Change the canvas size to 650 x 650 pixels. Highlight the background layer and floodfill with white. Delete the info layer.
Highlight the brush layer. Go to selections > select all. Selectios > float. Selections > defloat. Open up a paper of choice from the kit. Resize b 68%, smartsize. Copy and paste onto your canvas. Go to selections > invert. Hit delete on your keyboard. Deselect. (CTRL+D) Give the layer a drop shadow of H 1, V 0, Opacity 40, Blur 1.00. Delete the black brush layer.
Highlight the gray shape layer. Select, float and defloat. Open up a paper from the kit. Resize by 68%, smartsize. Copy and paste onto your canvas. Selections > invert. Hit delete. Delete the gray shape template layer.
Highlight the shape layer. Select, float and defloat. Add a new raster layer. Pick a color from your tube. Floodfill the new layer with this color. Deselect. Apply Xero Tekstya with the following settings:
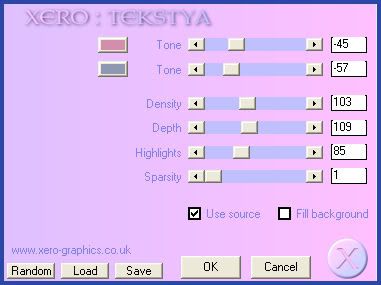
Give the layer a drop shadow of H and V 0, Opacity 60, Blur 5.00. Delete the shape template layer.
Highlight Black frame 1. Select, float and defloat. Open up a paper from the kit. Resize 68%, smartsize. Copy and paste onto your canvas. Selections > invert. Hit delete. Deselect. Apply Tekstya same settings as before. Give it a drop shadow of H and V 0, Opacity 60, Blur 5.00. Delete the black frame 1 layer. Repeat the same steps with the black frame 2 layer.
Highlight innerframe 1 layer. Select, float and defloat. Open a paper from the kit. Resize 68%, smartsize. Copy and paste onto your canvas. Selections > invert. Hit delete. Deselect. Delete the template innerframe layer. Repeat the same steps with innerframe 2.
Highlight the large black mat layer. Select, float and defloat. Open a paper of choice. Copy and paste onto your canvas. Selections > invert. Hit delete on your keyboard. Deselect. Give the layer a drop shadow of H and V 0, Opacity 60, Blur 8.00. Delete the black mat layer.
Highlight the white mat layer. Select, float and defloat. Add a new raster layer. Floodfill with same color as before. Deselect. Apply Tekstya with the same settings as before. Do NOT deselect.
Open up your tube. Resize, bicubic if necessary. Copy and paste as a new layer onto your canvas. Position to you liking within the selection. Selections > invert. Hit delete on your keyboard. Deselect. Give you tube a drop shadow of H and V 0, Opacity 60, Blur 8.00. Highlight the mat layer and give it the same drop shadow. Delete the white mat layer
Open up the loverose letter. Resize by 45%, smartsize. Copy and paste onto your canvas. Apply Xenofex Crumple with the following settings:
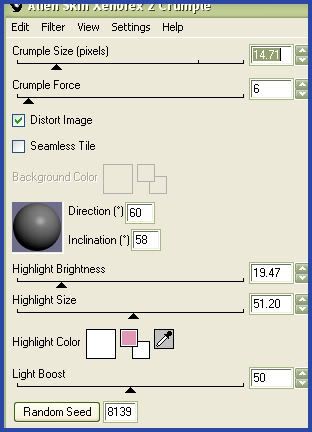
Give it a drop shadow of H and V 0, Opacity 50, Blur 4.00. Duplicate the letter. Go to image > mirror. Position them to your liking. Drag both letters under your mat layers.
Open up a rose of choice. Resize by 80%, smartsize. Copy and paste onto your canvas. Go to image > free rotate. Rotate right by 90.00, both boxes unchecked. Give it the same drop shadow you gave the letter. Position to your liking.
Open up a butterfly of choice. Resize by 40%, smartsize. Copy and paste onto your canvas. Give it a drop shadow of H and V 0, Opacity 20, Blur 8.00. Position to your liking.
Add other embellishments if you like. :-)
Highlight your white background.
Open up a paper of choice. Resize by 75%, smartsize. Copy and paste onto your canvas. Apply Zuzzana's Mask:
Source Luminance
Fit to Layer
Hide All Mask
Invert Transparency checked.
Delete the mask from your layer palette. Answer yes, and merge the group.
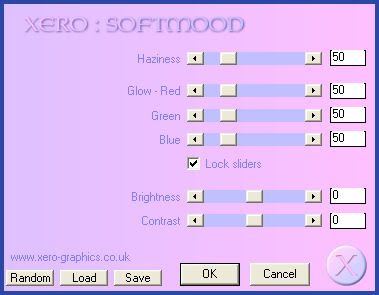
Hide your white background, and merge your visible layers. On your merged layer, apply xero softmood with the following settings:
Go to adjust > sharpness > unsharp mask:
Radius 5 Strength 35 Clipping 1
Merge all layers together. Crop and resize to your liking.
Add your copyright info, watermark and text. If you are not animating, you are done. :-)
If you are, apply VM Natural Sparkle with the following settings:

Copy. Open up animation shop. Paste as a new animation. Back to PSP. Go to Edit > Undo Sparkle. Apply Sparkle again but this time slide the random seed button. Copy and paste after your current frame in AS. Repeat this step one more time for a total of 3 frames.
In AS, select all frames (CTRL+A) Change the frame properties to 13.
Optimize and save as gif.
I hope you enjoyed this tut! If you have any questions, just give me a shout!
Subscribe to:
Post Comments (Atom)
0 comments:
Post a Comment